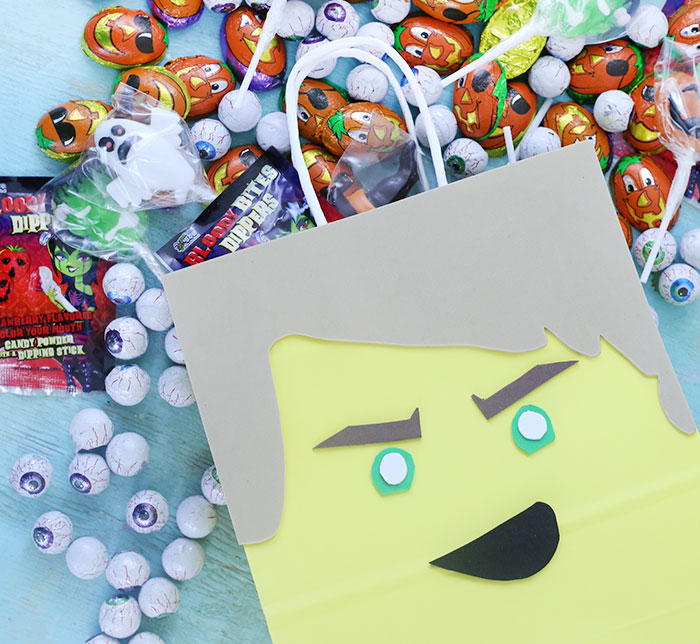
DIY Smurf Halloween Treat Bag
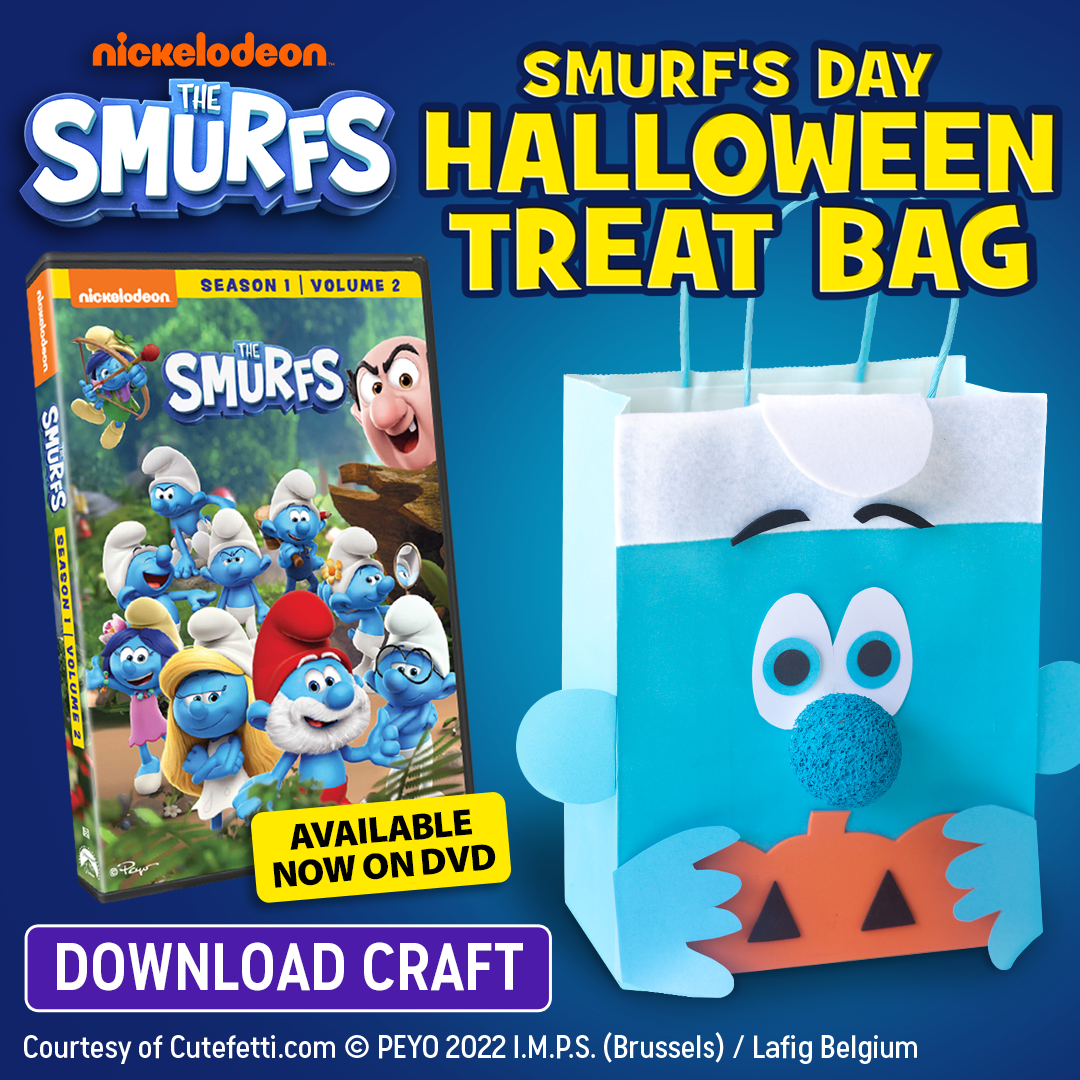
Ready for some SMURF-ing good fun? Let's celebrate The Smurfs: Season 1, Volume 2, available NOW on DVD. Build excitement for your watch parties with this adorable DIY Smurf Trick or Treat Bag for kids using a plain gift bag and simple craft items! This post in sponsored by Paramount Home Entertainment and Nickelodeon Home Entertainment.

Are you a Smurf loving family? You're not going to want to miss these all-new adventures. Follow along as your favorite Smurfs protect the village from none other than Gargamel.
Plus it's time to meet some new Smurf friends! Get to know Willow, Blossom, Storm, and Lily!
Kick start the festivities with this step-by-step tutorial to make a Smurf inspired Halloween Treat Bag!
DIY SMURF HALLOWEEN TREAT BAG
Gather the family around and make this fun crafty DIY to build up some excitement for The Smurfs: Season 1, Volume 2, available NOW on DVD. Transform simple craft supplies and a gift bag into a Smurf-tastic Halloween Treat Bag.
Alternately, you can leave the pumpkin portion off and use it for a regular gift bag. Just promise, you will have fun with it, no matter what you do!
SMURF HALLOWEEN TREAT BAG SUPPLIES
Gather a handful of craft items and get ready to have a blast making this Smurf-y Trick or Treat Bag. You can read on or download the craft tutorial here to keep for yourself, too.
Here is what you need:
CRAFT SUPPLIES:
- Blue Gift Bag
- White Felt Sheet
- Styrofoam Craft Ball. 2” & Blue Paint
- Blue Paper or Blue Foam Sheet (2 Sheets)
- White Paper or White Foam Sheet
- Black Paper or Black Foam Sheet
- Foam Pumpkin or Orange Pumpkin Sheet
CRAFT TOOLS:
- Scissors
- Pencil
- Glue Gun
- Paint Brush
- Toothpick
- Optional: Hole Puncher & Circle Punches
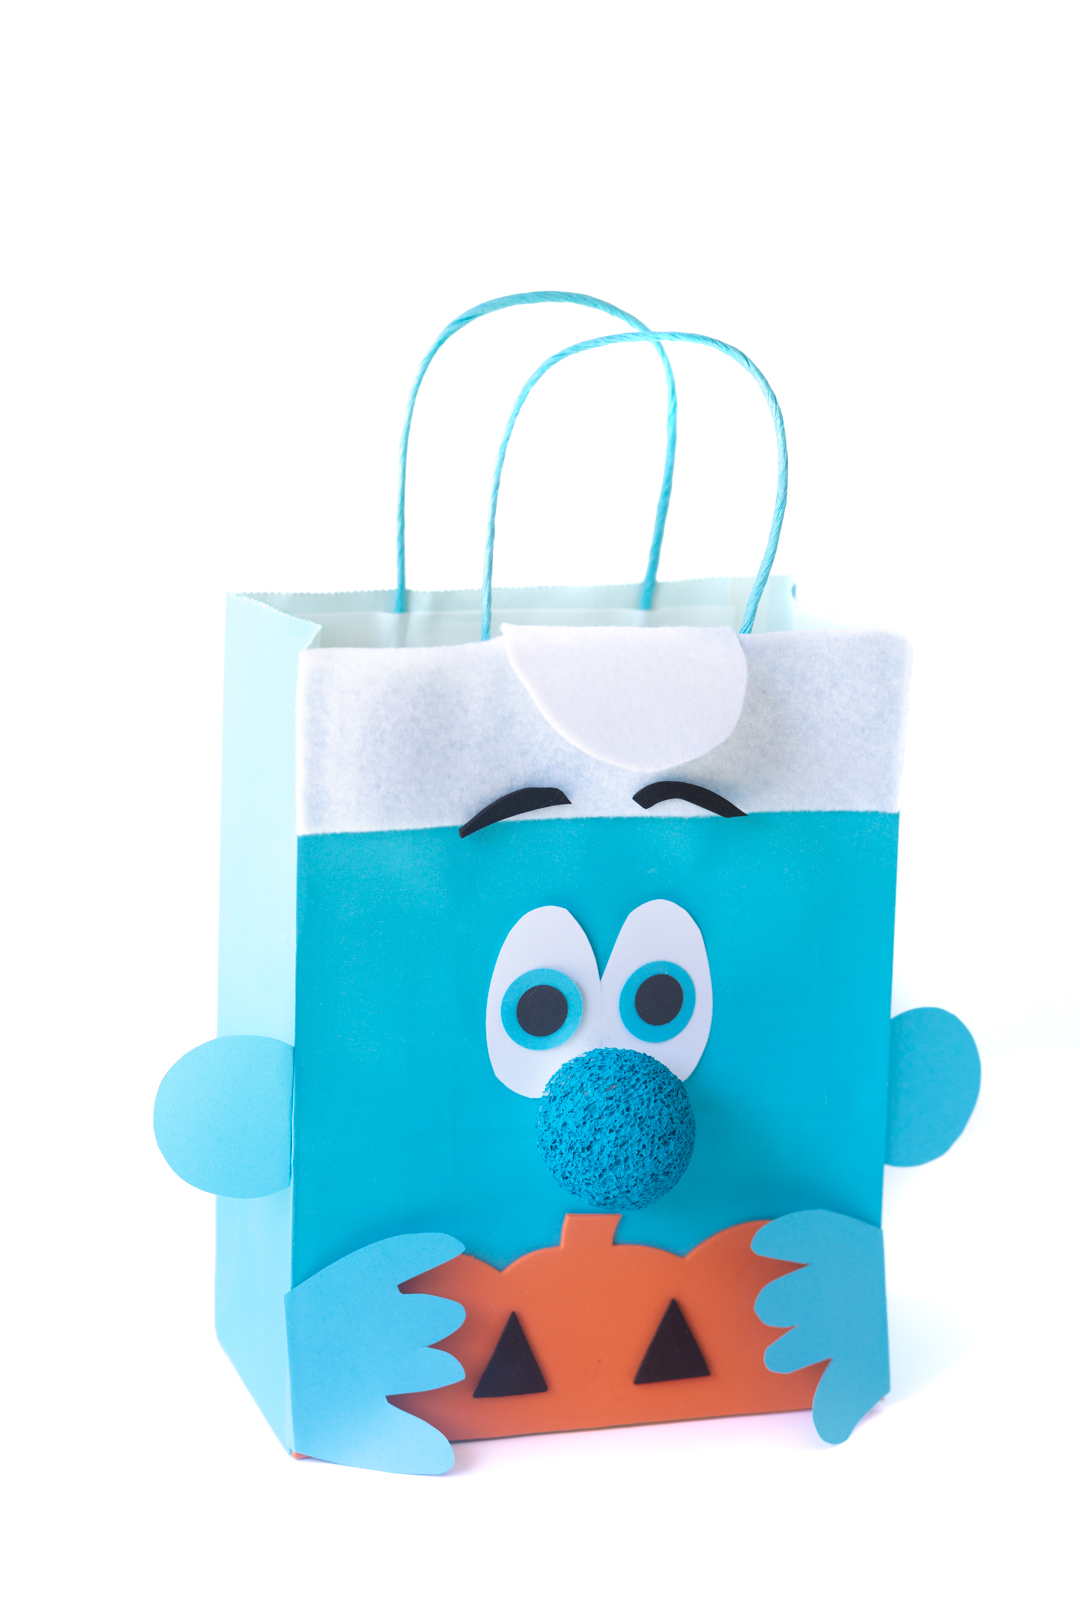
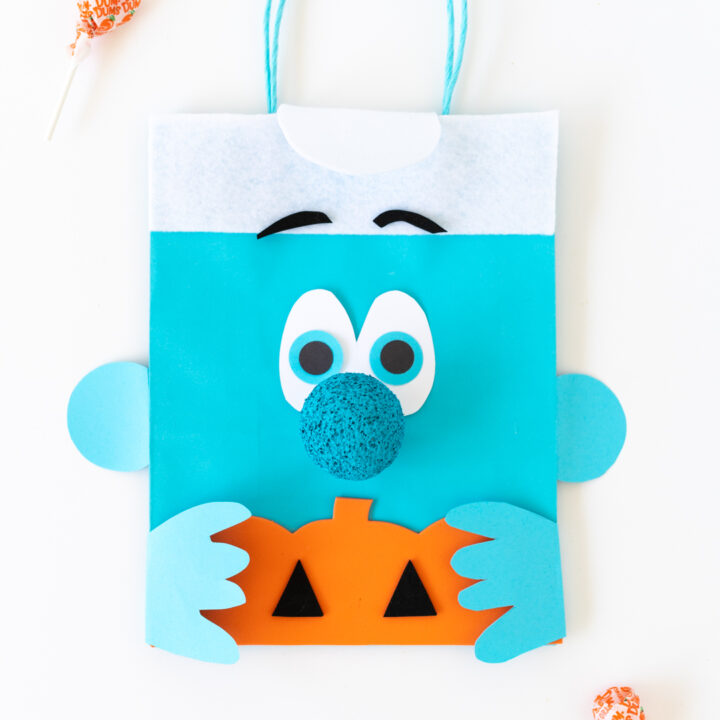
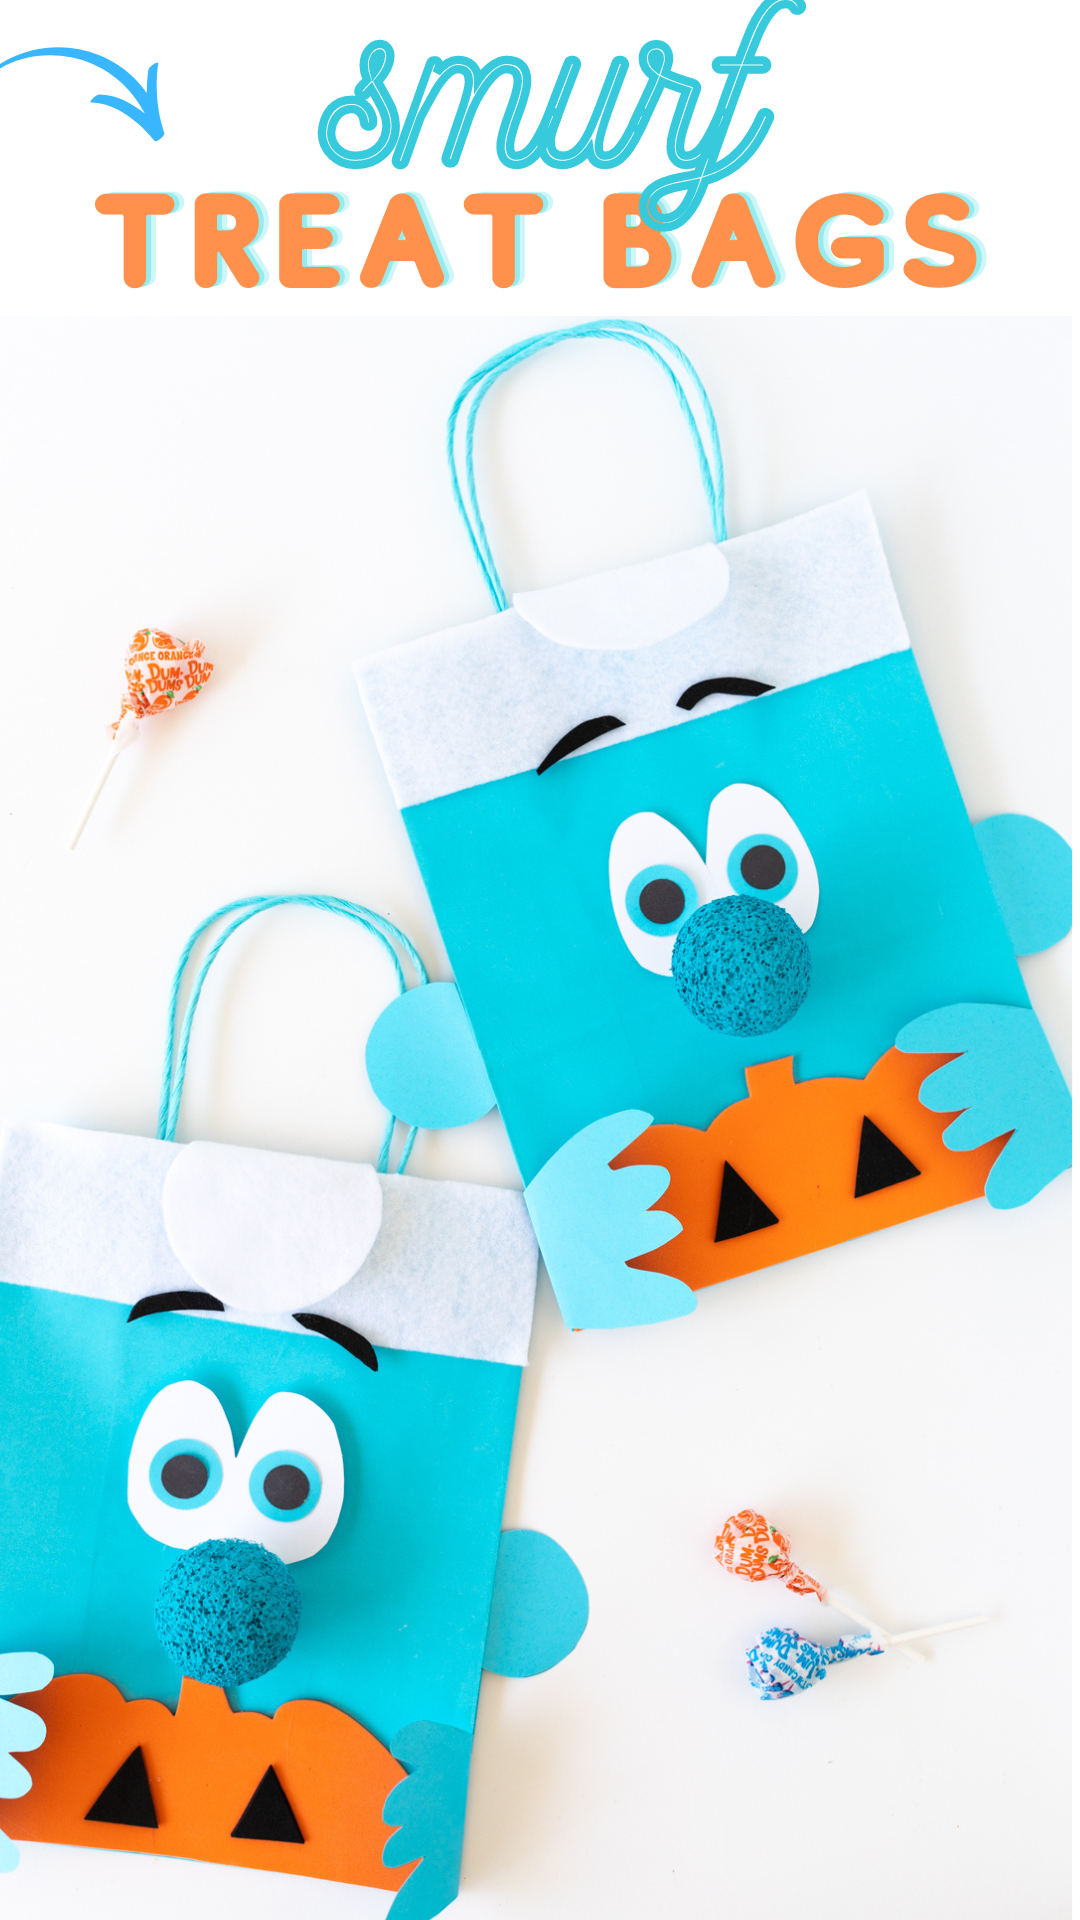
HOW TO MAKE SMURF HALLOWEEN BAG
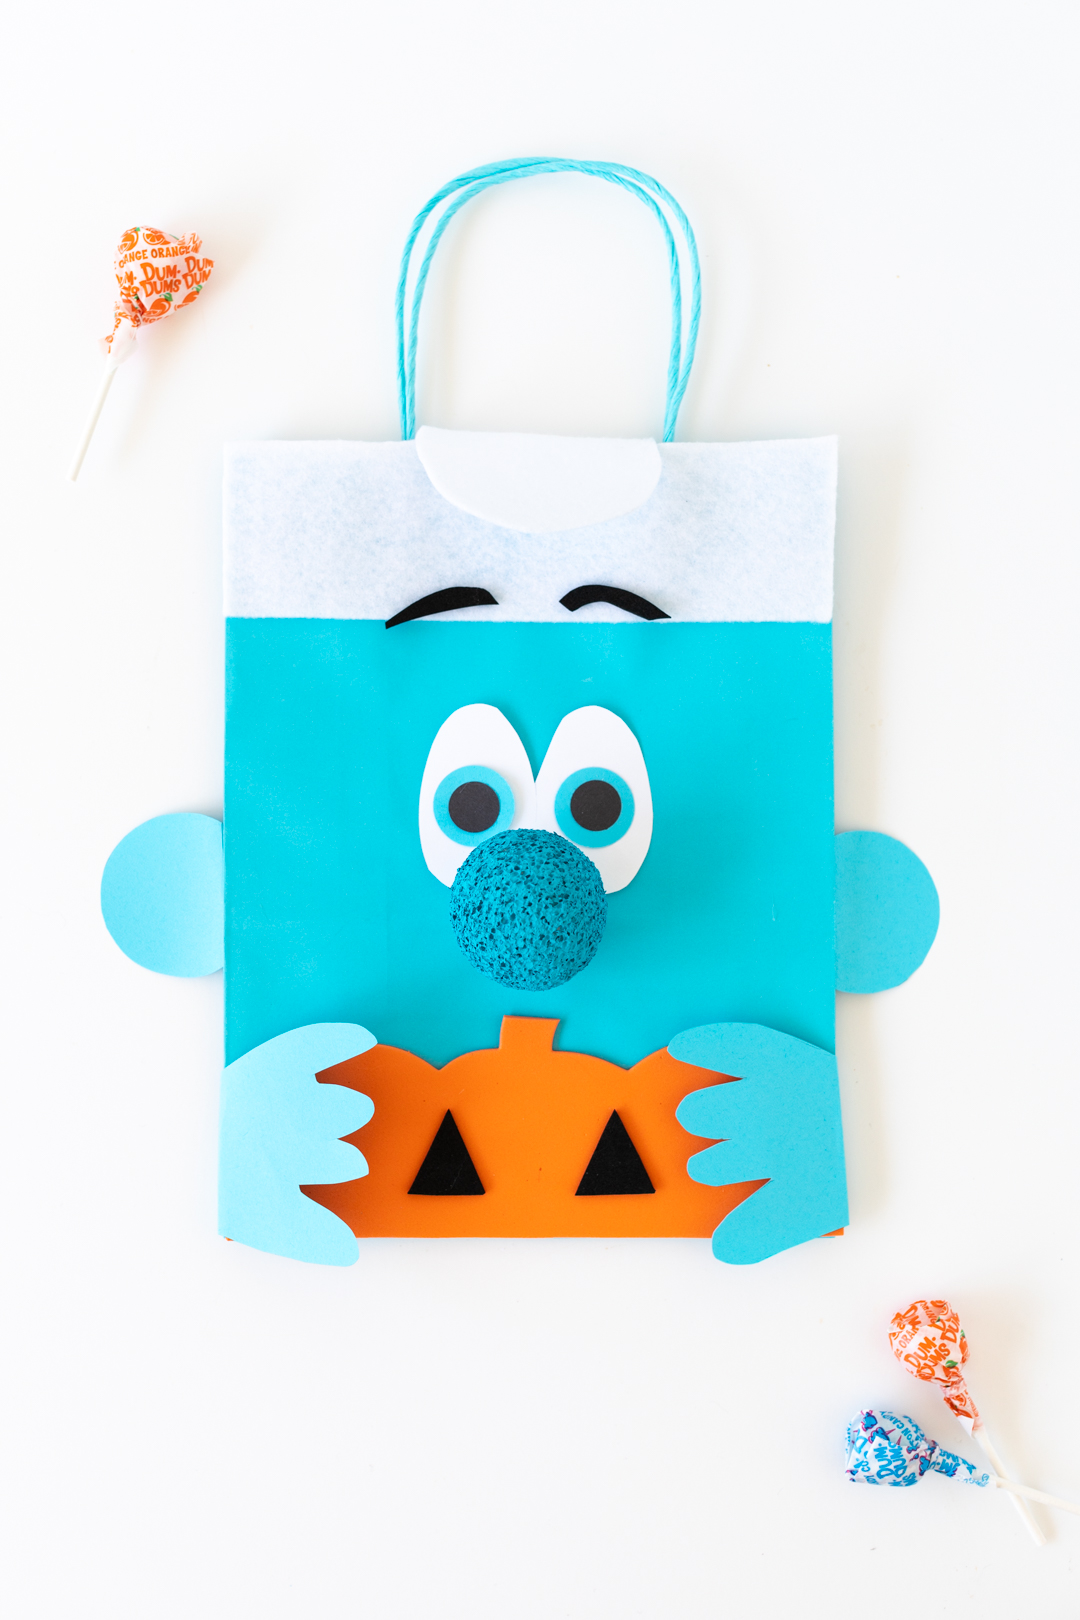
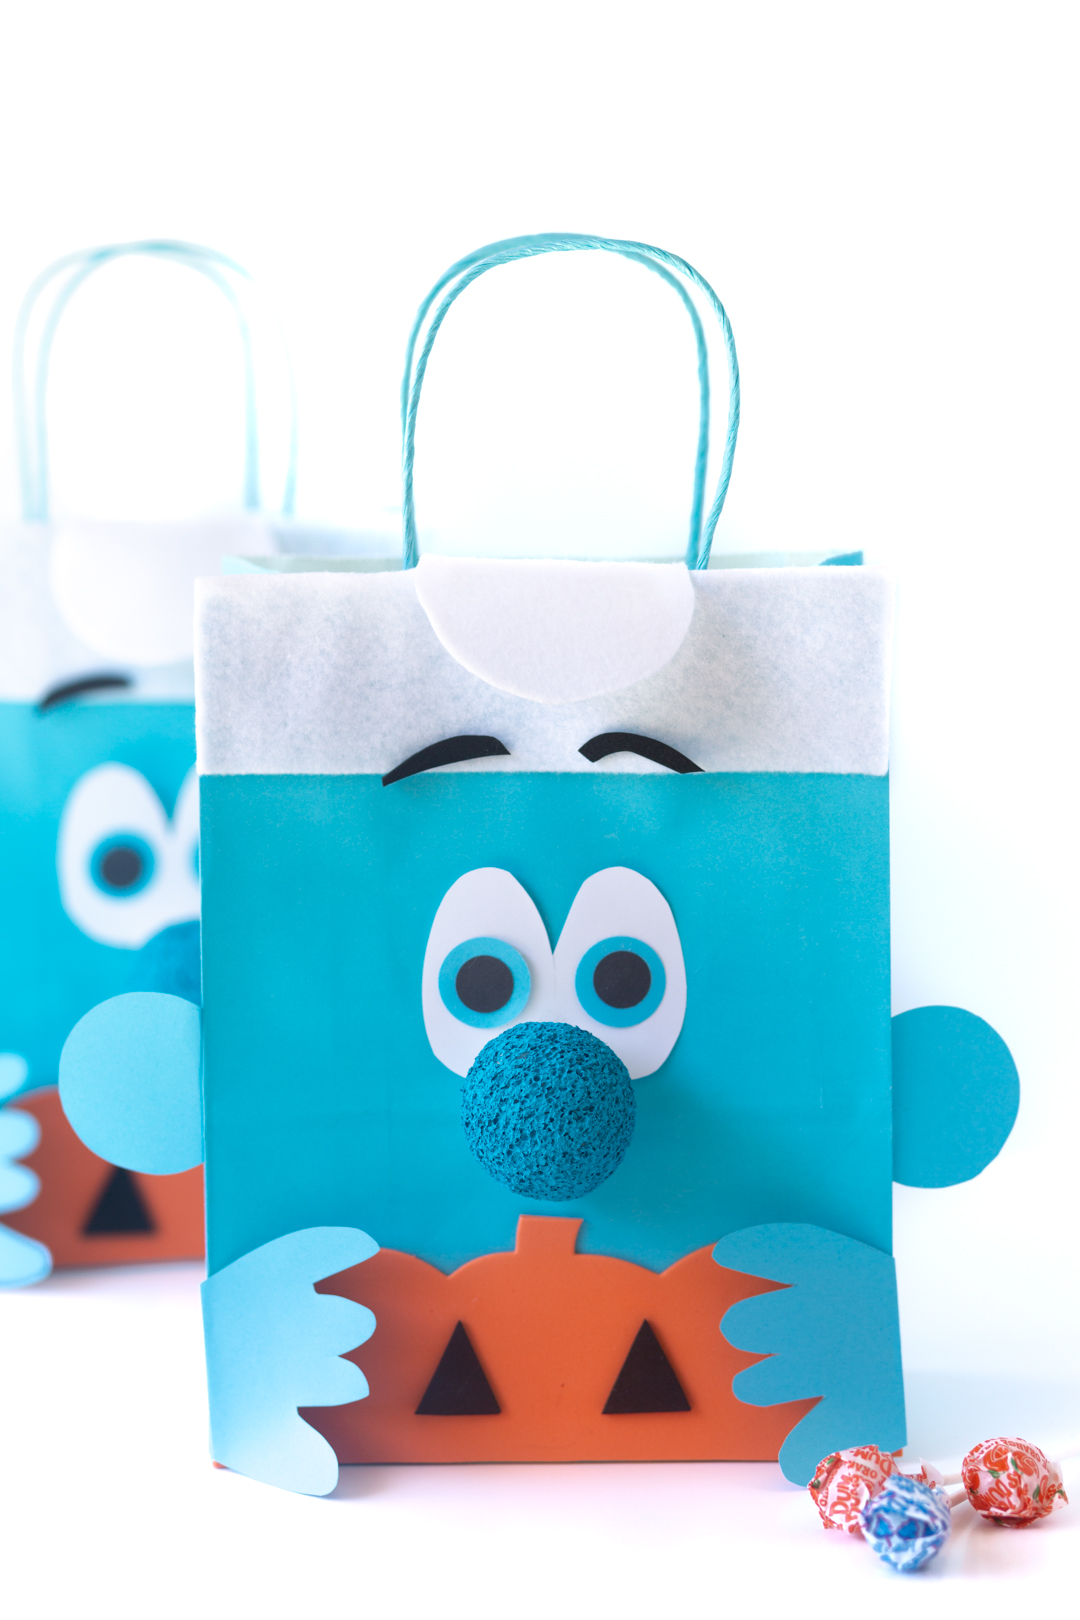
SMURF NOSE:
Press a toothpick into the ball and use that to hold while painting. Paint the styrofoam ball with blue paint. Let dry completely.
SMURF HAT:
Cut a 2” strip that is the width of your blue gift bag out of the white felt. Glue it onto the top of the front of the blue bag. Cut a circle out of white felt. Make a small fold at the top of the circle and glue it to the back of the front of the bag and fold the rest of the circle over. Use a tiny bit of glue underneath the top of the circle onto the front of the bag while leaving the rest loosely hanging down.
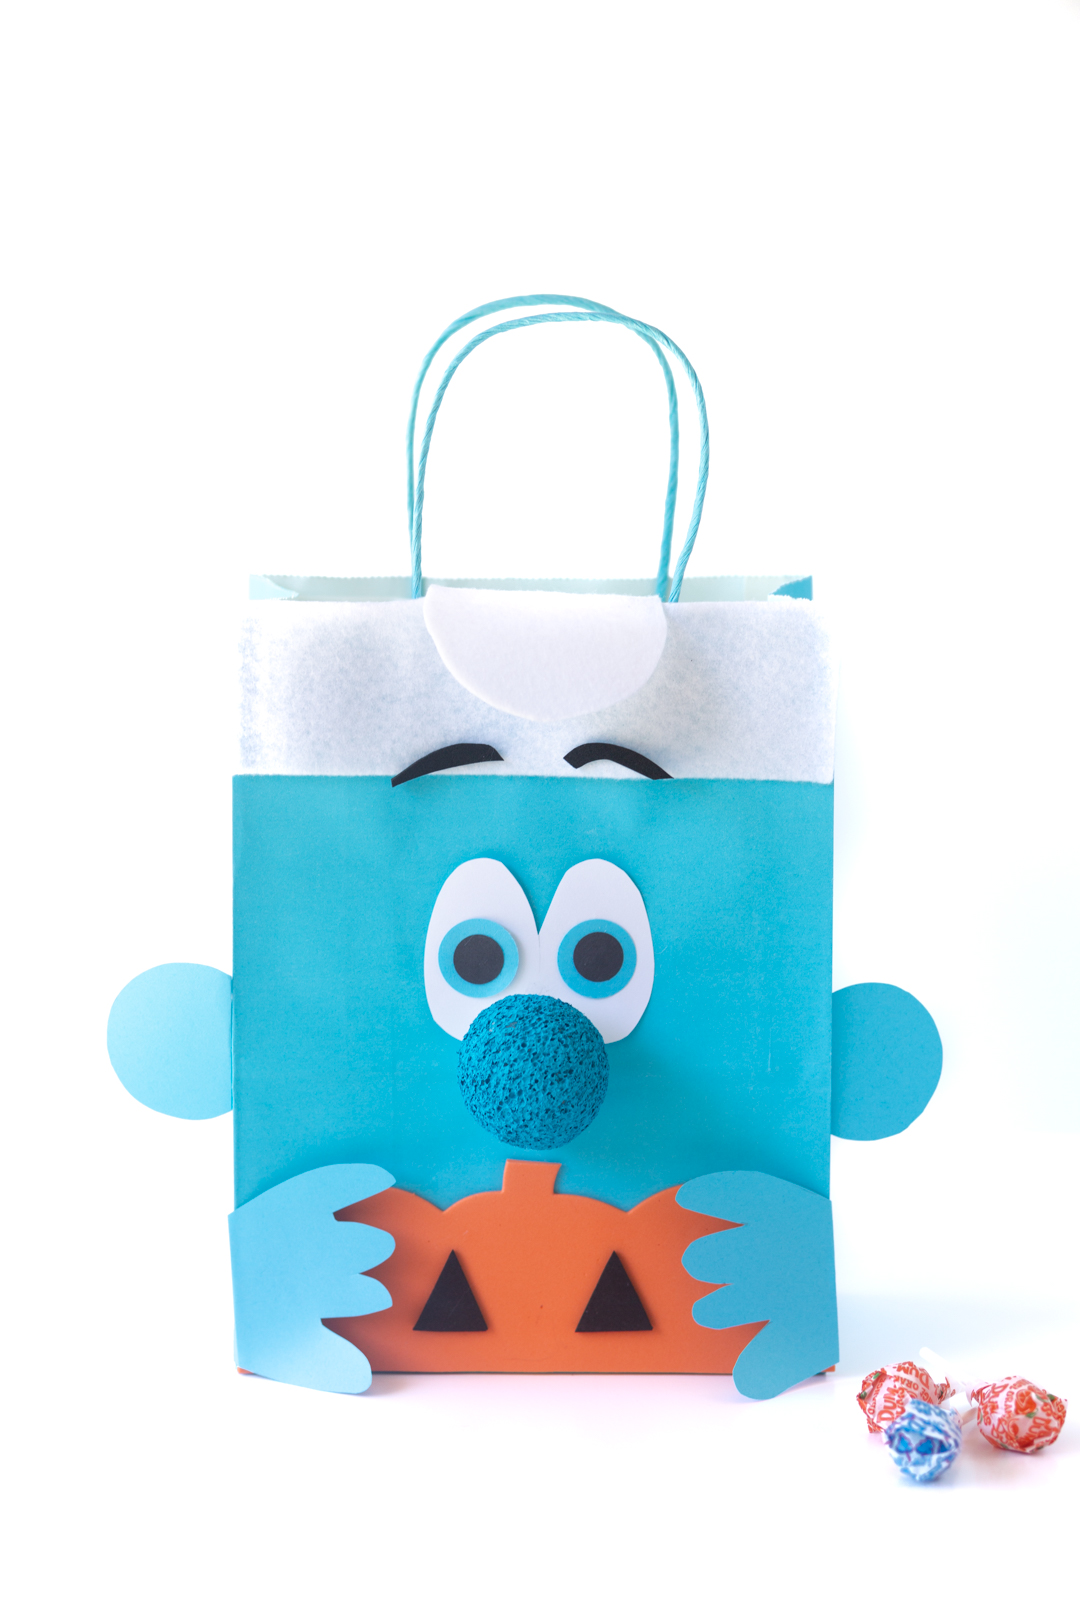
MAKE PUMPKIN:
Cut Foam Pumpkin in half and glue to the bottom of the bag. Alternatively, cut your own pumpkin shape out of orange foam or orange paper. Add small triangles cut out of black paper or black foam and glue them on the pumpkin.
SMURF EYES:
The eye shape is two identical ovals overlapping each other. Cut the shape out of the white paper or white foam sheet. Then, cut a small blue circle out of the blue paper or blue foam sheet. Then, cut a smaller circle out of the black paper or black foam sheet (you can use a hole punch for this to make it easier). Glue the blue circles onto the white part of the eyes and then the black circles onto the center of that. Glue the completed eyes onto the bag about 1 and ½” under the hat. Cut eyebrows out of black paper or black foam sheet. Glue them onto the rim of the hat.

GLUE NOSE:
Using a glue gun, glue the nose directly underneath the eyes.
SMURF EARS:
Cut two identical circles out of blue paper. Fold ¼th of the ear and glue that portion onto each side of the bag for the ears.
SMURF HANDS:
Cut small hands with only 4 fingers out of blue paper or blue foam. Fold over a small amount and glue onto the sides of the bag so that the hands loosely hang over for a 3D effect.
Voila! That is all. Use to trick or treat or even as a party favor bag. It also works as a regular gift bag, too!
DIY Smurf Halloween Treat Bag
Totally cute DIY Smurf Halloween Treat Bag craft that can be made with a handful of easy items. Grab a blue gift bag and simple craft supplies to make it.
Materials
- Blue Gift Bag
- White Felt Sheet
- Styrofoam Craft Ball. 2” & Blue Paint
- Blue Paper or Blue Foam Sheet (2 Sheets)
- White Paper or White Foam Sheet
- Black Paper or Black Foam Sheet
- Foam Pumpkin or Orange Pumpkin Sheet
Tools
- Scissors
- Pencil
- Glue Gun
- Paint Brush
- Toothpick
- Optional: Hole Puncher & Circle Punches
Instructions
Make the Smurf Nose. Press a toothpick into the ball and use that to hold while painting. Paint the styrofoam ball with blue paint. Let dry completely.
Make the Smurf Hat. Cut a 2” strip that is the width of your blue gift bag out of the white felt. Glue it onto the top of the front of the blue bag. Cut a circle out of white felt. Make a small fold at the top of the circle and glue it to the back of the front of the bag and fold the rest of the circle over. Use a tiny bit of glue underneath the top of the circle onto the front of the bag while leaving the rest loosely hanging down.
Cut Foam Pumpkin in half and glue to the bottom of the bag. Alternatively, cut your own pumpkin shape out of orange foam or orange paper. Add small triangles cut out of black paper or black floam and glue them on the pumpkin.
Make the Smurf Eyes. The eye shape is two identical ovals overlapping each other. Cut the shape out of the white paper or white foam sheet. Then, cut a small blue circle out of the blue paper or blue foam sheet. Then, cut a smaller circle out of the black paper or black foam sheet (you can use a hole punch for this to make it easier). Glue the blue circles onto the white part of the eyes and then the black circles onto the center of that. Glue the completed eyes onto the bag about 1 and ½” under the hat. Cut eyebrows out of black paper or black foam sheet. Glue them onto the rim of the hat.
Using a glue gun, glue the nose directly underneath the eyes.
Make the Smurf Ears. Cut two identical circles out of blue paper. Fold ¼th of the ear and glue that portion onto each side of the bag for the ears.
Make the Smurf Hands. Cut small hands with only 4 fingers out of blue paper or blue foam. Fold over a small amount and glue onto the sides of the bag so that the hands loosely hang over for a 3D effect.
Use as a party favor bag or to trick or treat.
All-NewThe Smurfs: Season 1, Volume 2 episodes:
- The Pluffs!
- The Majestic 5/Kitchen Klutz
- Chef Soup/Adventures in Smurfsitting
- The Round Up/Waffle Wednesday
- Funny Mommy/Smurfy Day Care
- Smurfy Secrets
- Crashing Gargamel’s Party/The Curse of the Smurfs’ Treasure
- Storm Loses her Mojo/Pop Out
- Knight Smurfalot/Forget Me What?
Find The Smurfs: Season 1, Volume 2, available on DVD on Amazon or at other retailers NOW.
Love adorable crafts? You might also like these DIY Craft Microphones and Dancing Wands Craft, too.
If you make this DIY Smurf Halloween Treat Bag craft for kids, I would love to see your pictures! Tag me @cutefetti on social media.