How to Make a Funfetti Rainbow Cake – Perfect for Every Celebration!
What's better than a perfectly baked cake? A cake that's decorated like a rainbow! Enter this Funfetti Rainbow Cake. This colorful dessert will not only brighten your day but also any party table. Whether it's a birthday, graduation, or a baby shower, a rainbow cake makes every occasion more special and joyful.
Today, we'll teach you how to make a delicious Funfetti Rainbow Cake that'll make everyone's day and leave an exciting impression on their taste buds.

With a few simple ingredients and a little creativity, it's time to sprinkle some colorful magic!
FUNFETTI RAINBOW CAKE RECIPE
Let's whip up a stunning rainbow cake! First, let's go over the ingredients. Then we will walk through the steps below.
INGREDIENTS AND SUPPLIES
What will I need to make this funfetti rainbow cake?
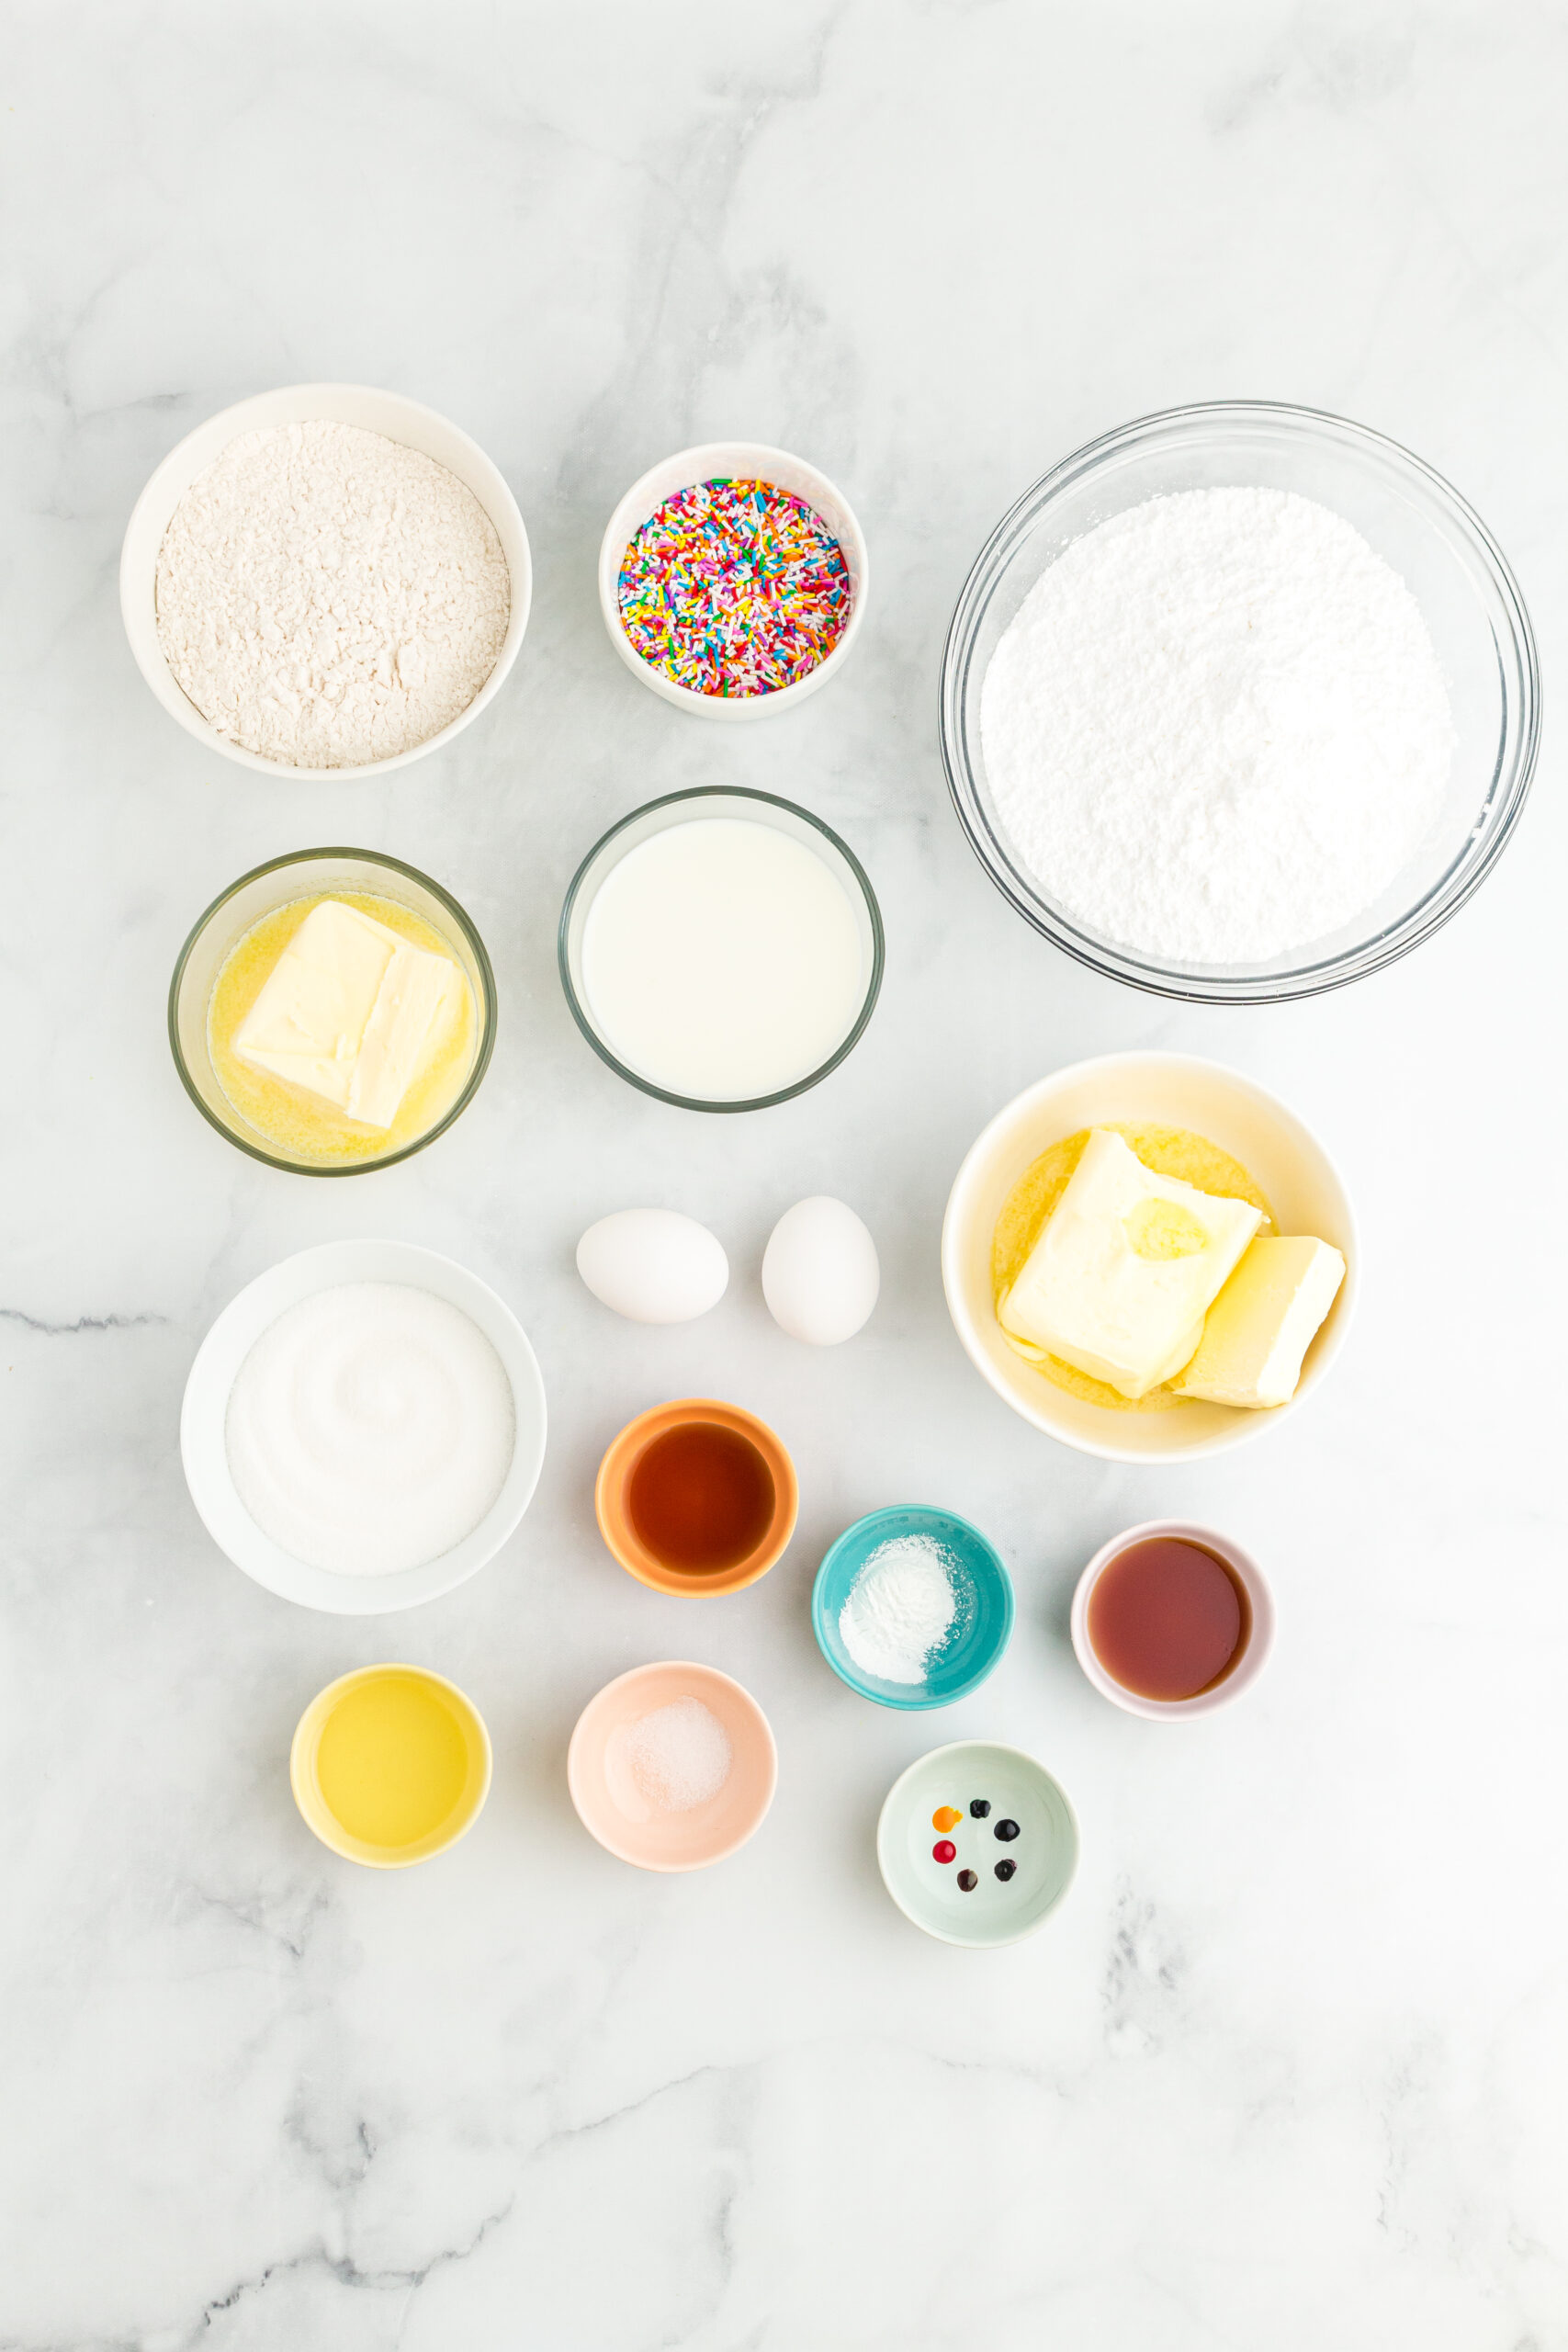
To make this funfetti rainbow cake, you will need the following ingredients:
- all-purpose flour
- baking powder
- salt
- unsalted butter
- granulated sugar
- eggs
- vanilla extract
- milk
- vegetable oil
- sprinkles
- gel food coloring: red, orange, yellow, green, blue, purple
- confectioners’ sugar
To make this funfetti rainbow cake, you will need the following supplies:
- measuring cups and spoons of various sizes
- mixing bowls of various sizes
- spatula
- electric mixer
- two 8” round cake pans
- parchment paper
- non-stick cooking spray
- spatula
- food scale
- wire rack
- large baking sheet
- serrated knife
- cake scrapper tool
- cake plate
- tipless icing bags
MAKE A FUNFETTI RAINBOW CAKE
The steps to make this fun cake are broken down here, but please be sure to get the exact recipe and measurements in the recipe card at the bottom of this post.
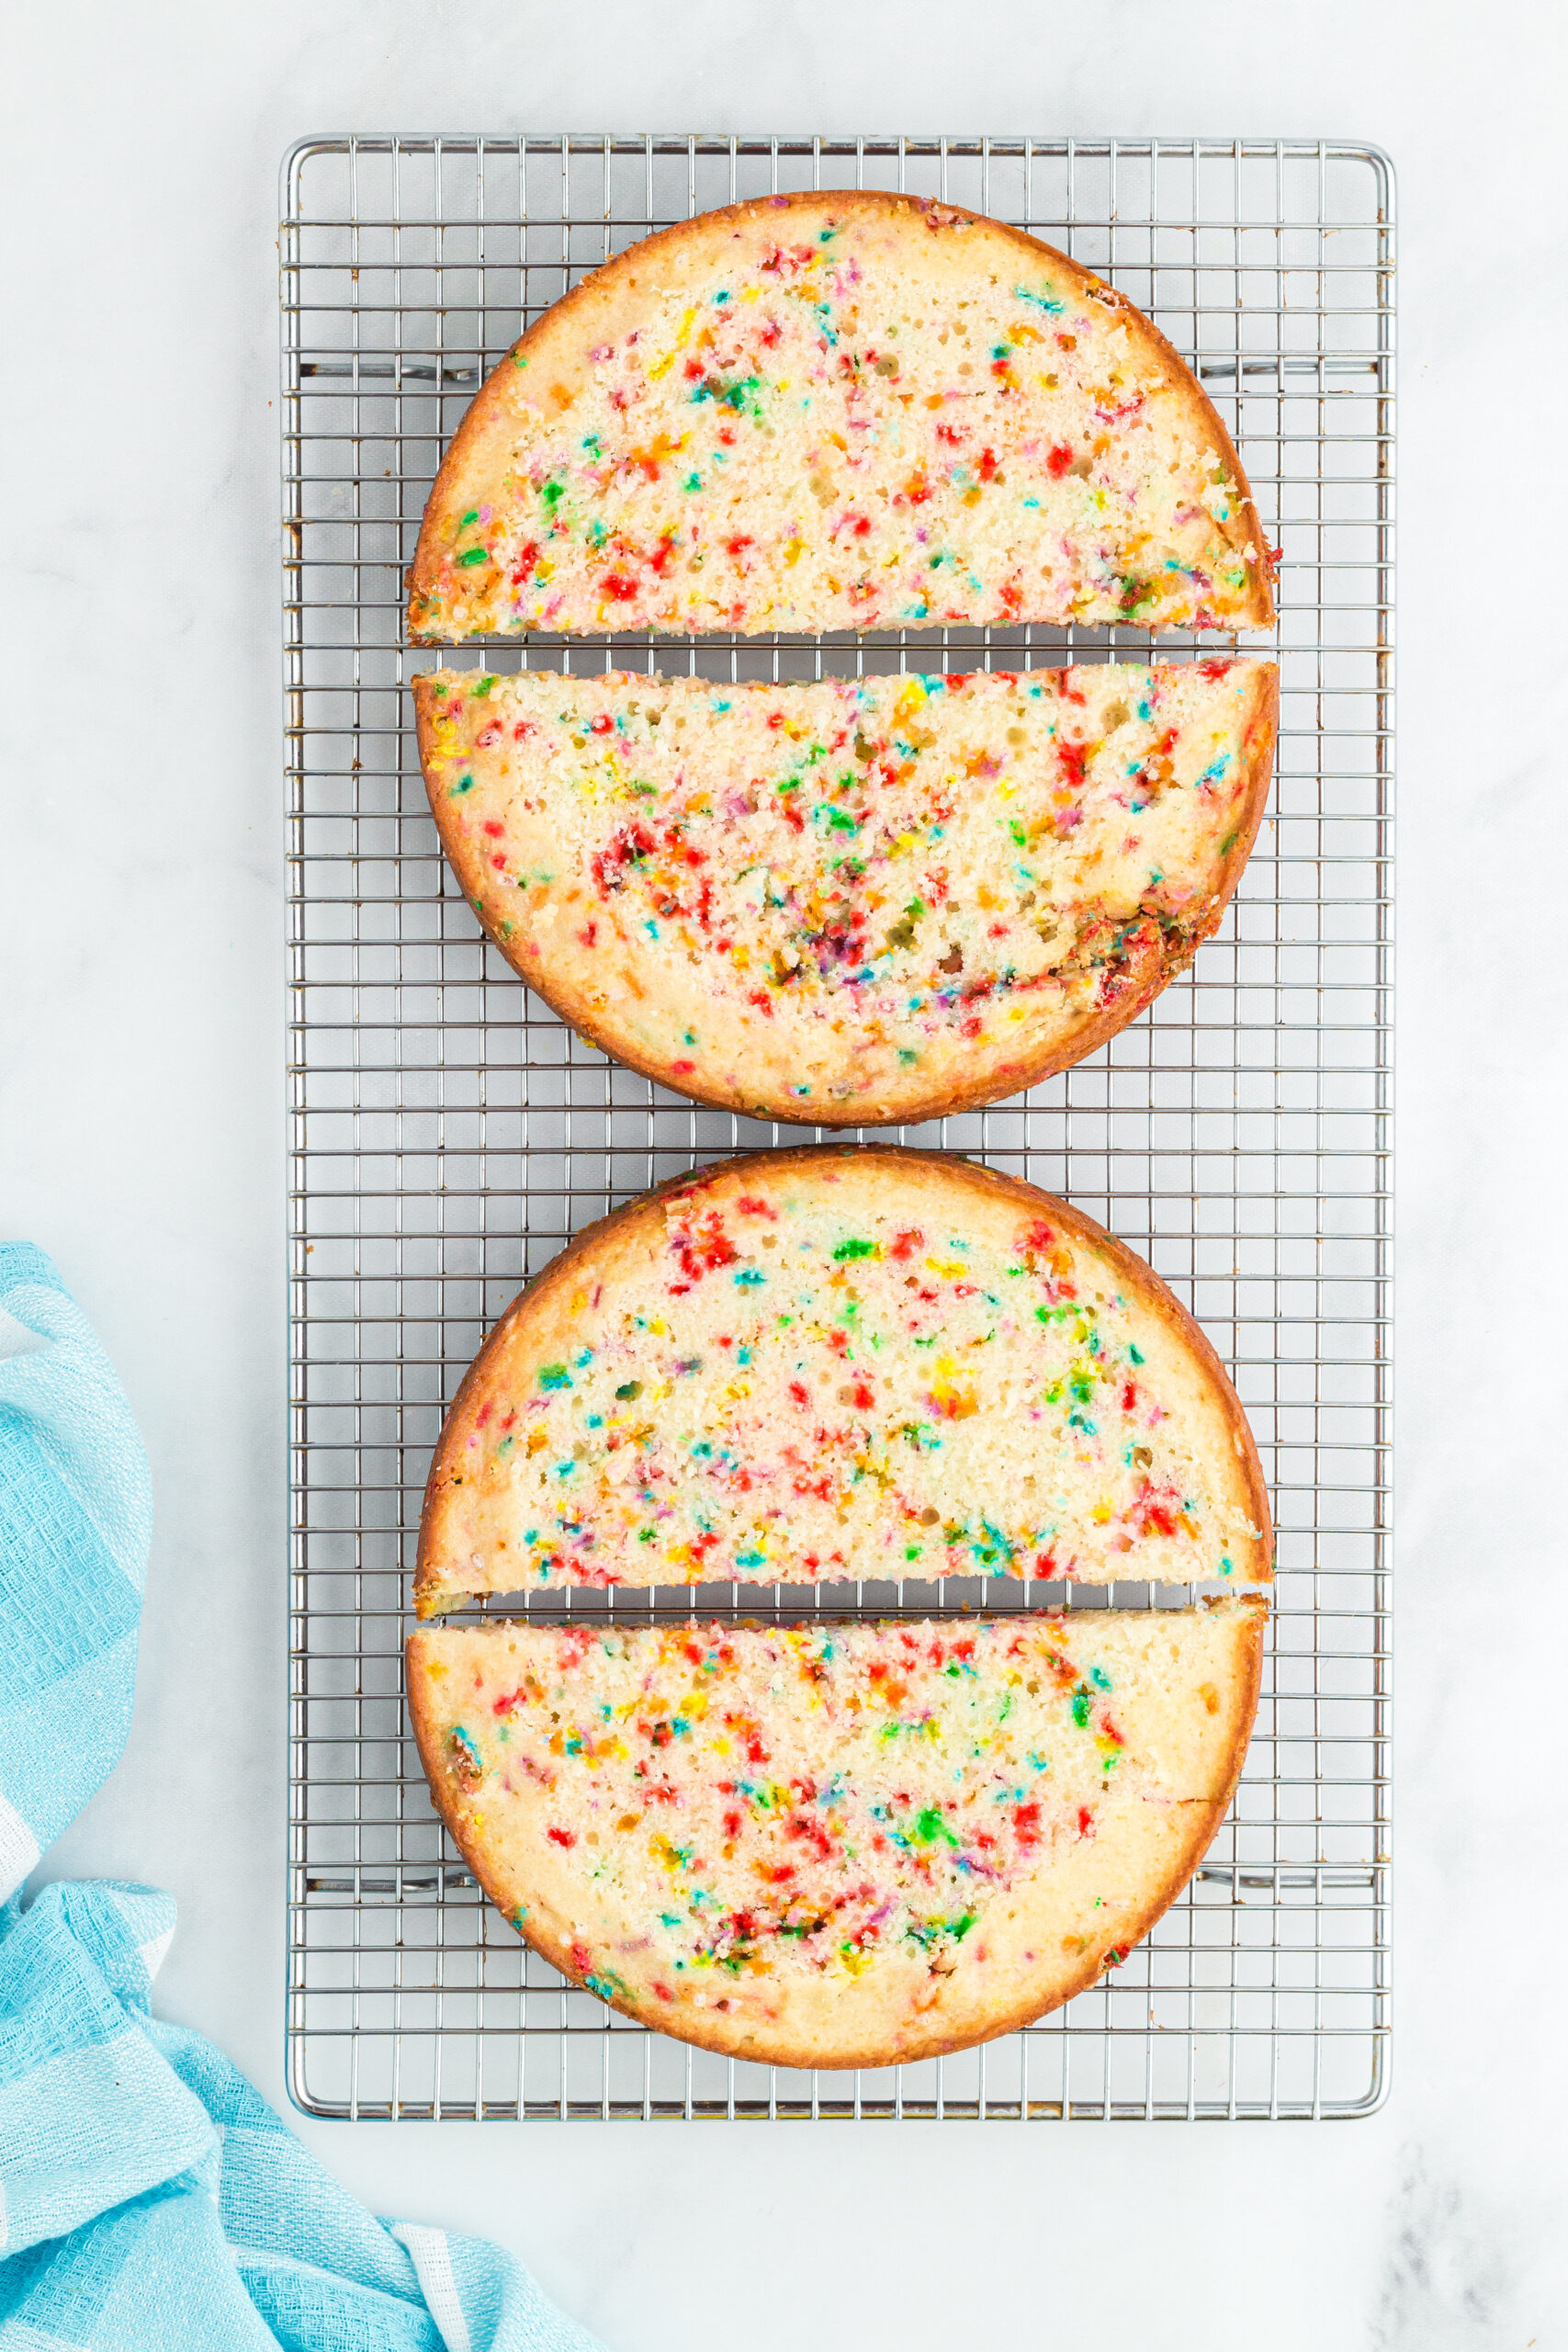
1. The Cake Layers
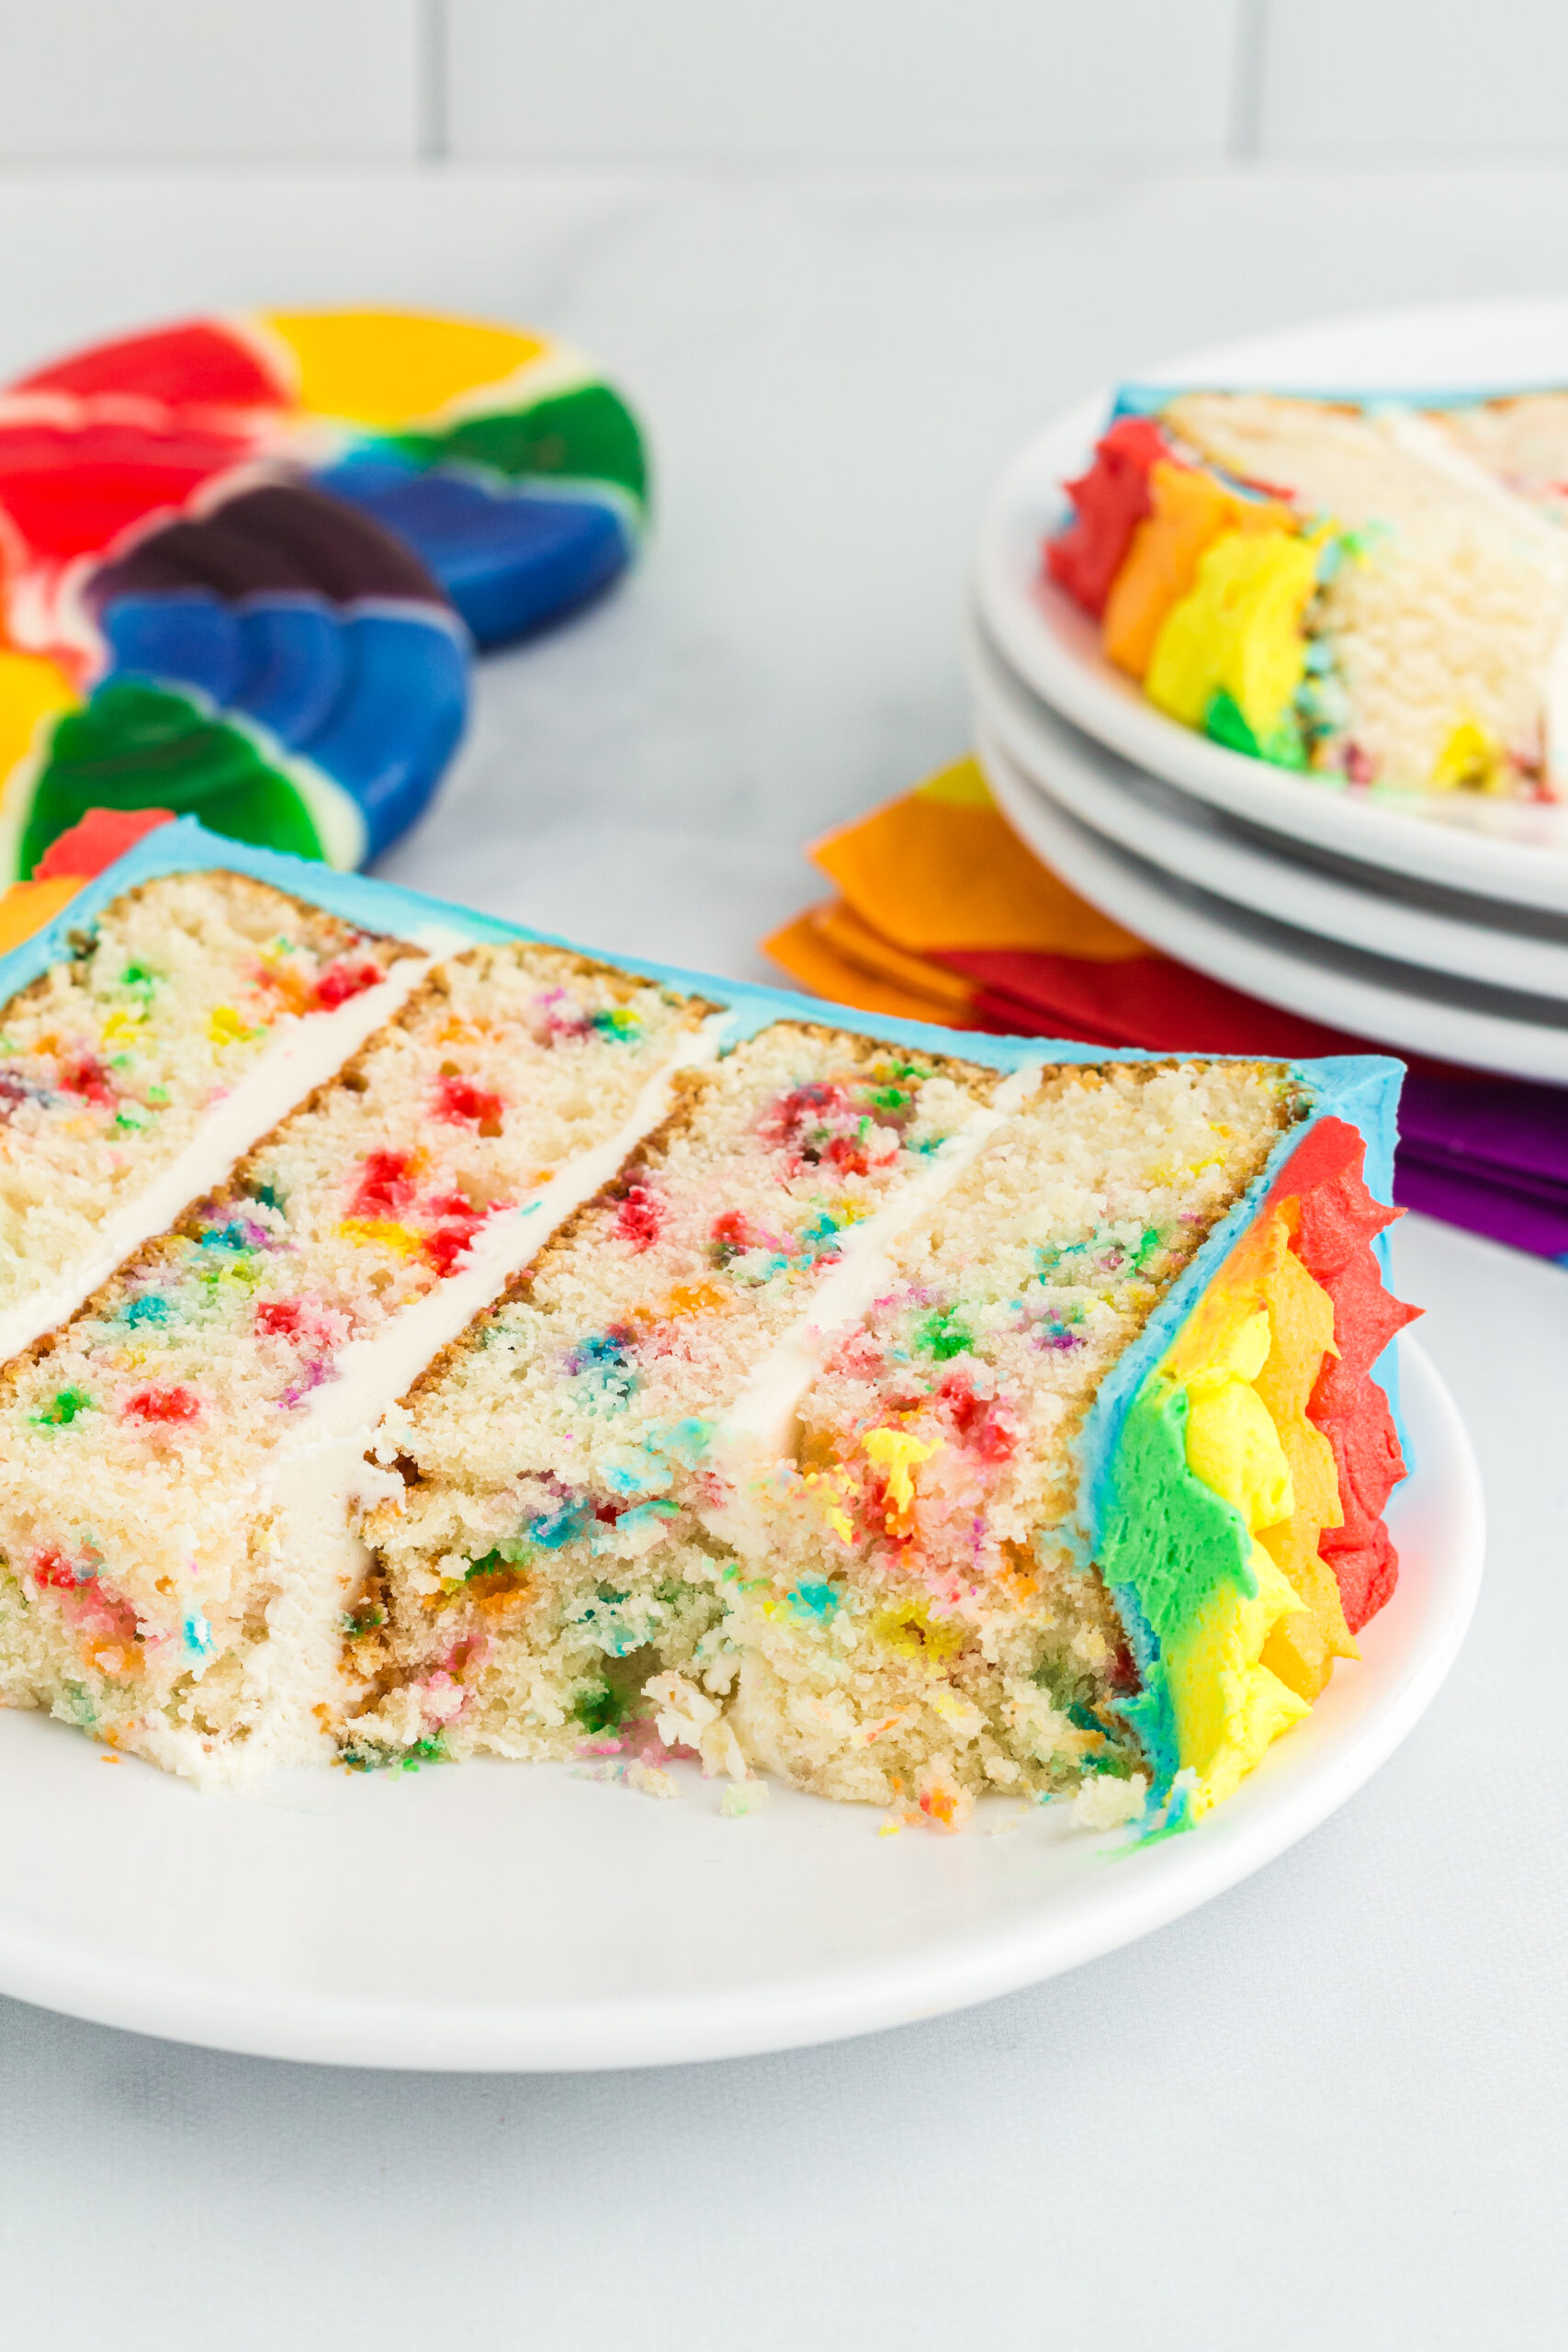
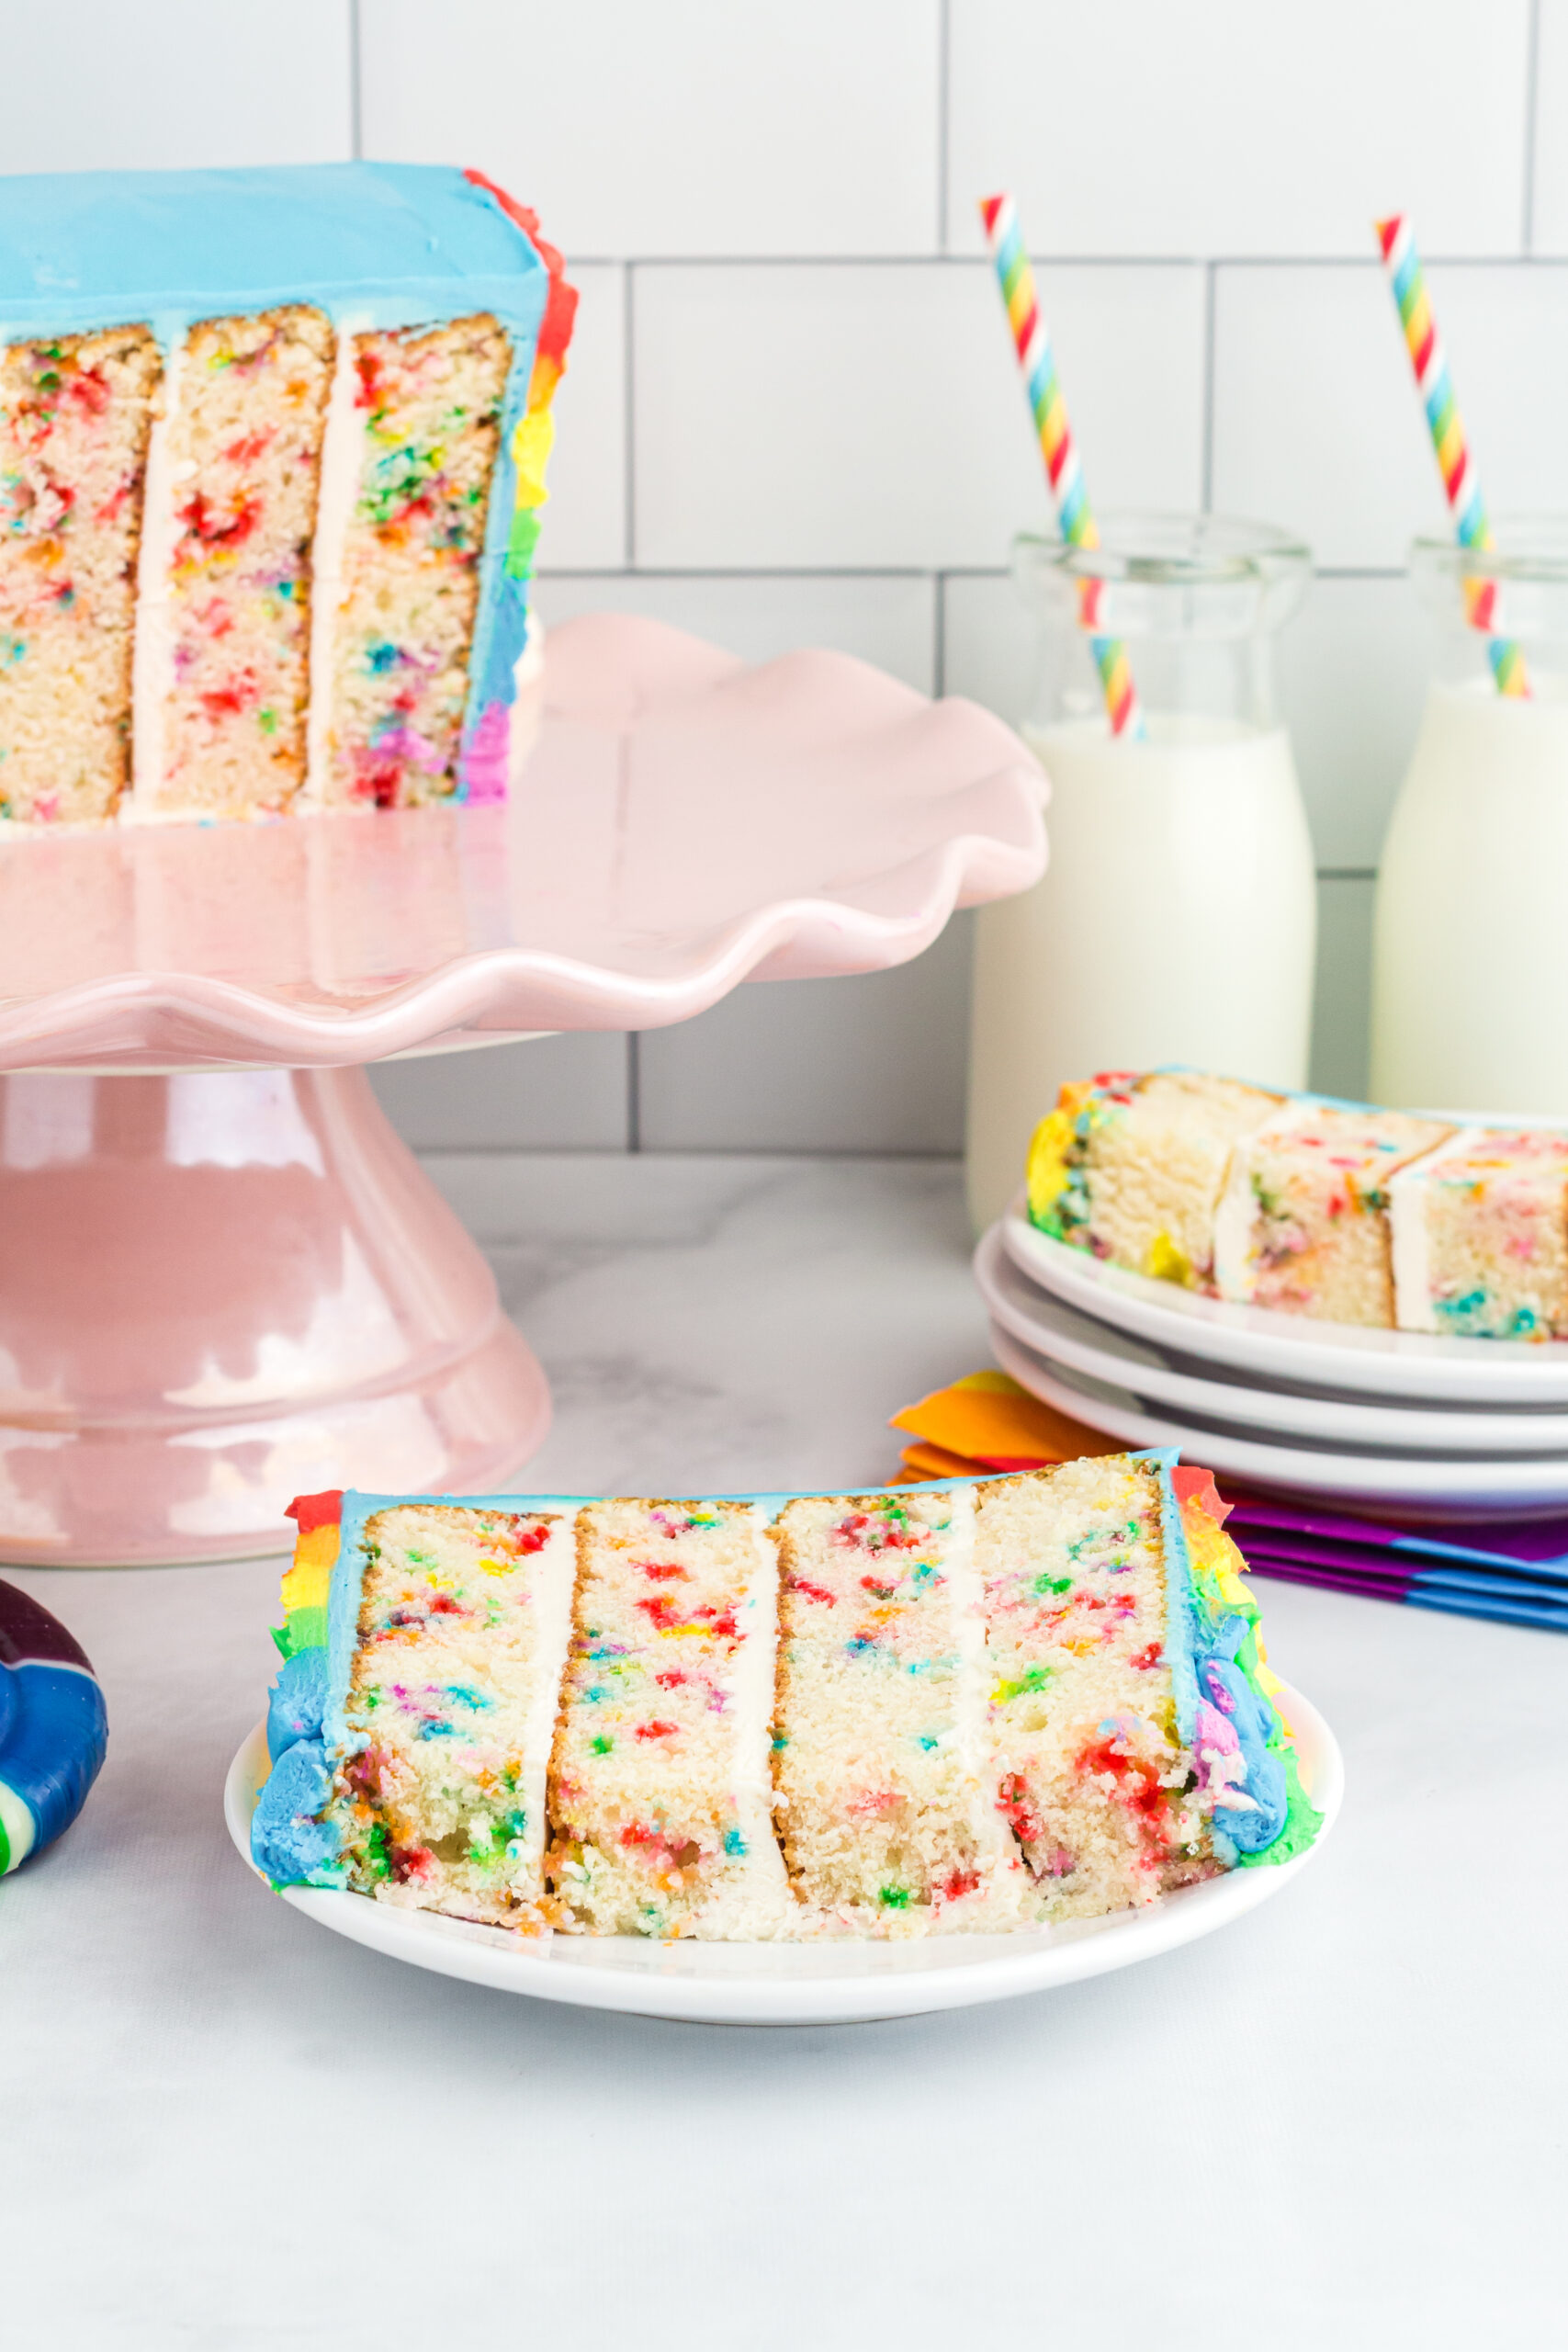
First things first, we'll need to bake the cake layers. A Funfetti Rainbow Cake is usually made up of six layers, each with a vibrant and unique color. But, we are going to prepare a homemade funfetti cake and frost it to look like a rainbow instead.
- Preheat oven to 350 degrees F.
- Line the bottom of two 8” round cake pans with parchment paper and lightly spray the inside of the pans with non-stick baking spray. The parchment paper inside the bottom of the pans is important so that the cake doesn’t stick to the bottom of the pans. Set the cake pans aside for now.
- In a medium bowl, whisk together the flour, baking powder and salt. Set aside for now.
- In a separate large bowl, beat together the butter and sugar on high speed until smooth (about 1 to 2 minutes).
- Add the eggs and vanilla into the butter mixture and beat on high until light and fluffy (about 1 minute).
- On low speed, beat the milk and vegetable oil into the wet ingredients until well blended. The mixture may look a little curdled but that’s okay. It will all come together in the end.
- Beat the flour mixture into the wet ingredients just until fully combined (until you no longer see white streaks of flour). Do not overmix or the cake will have a gummy-like texture once baked.
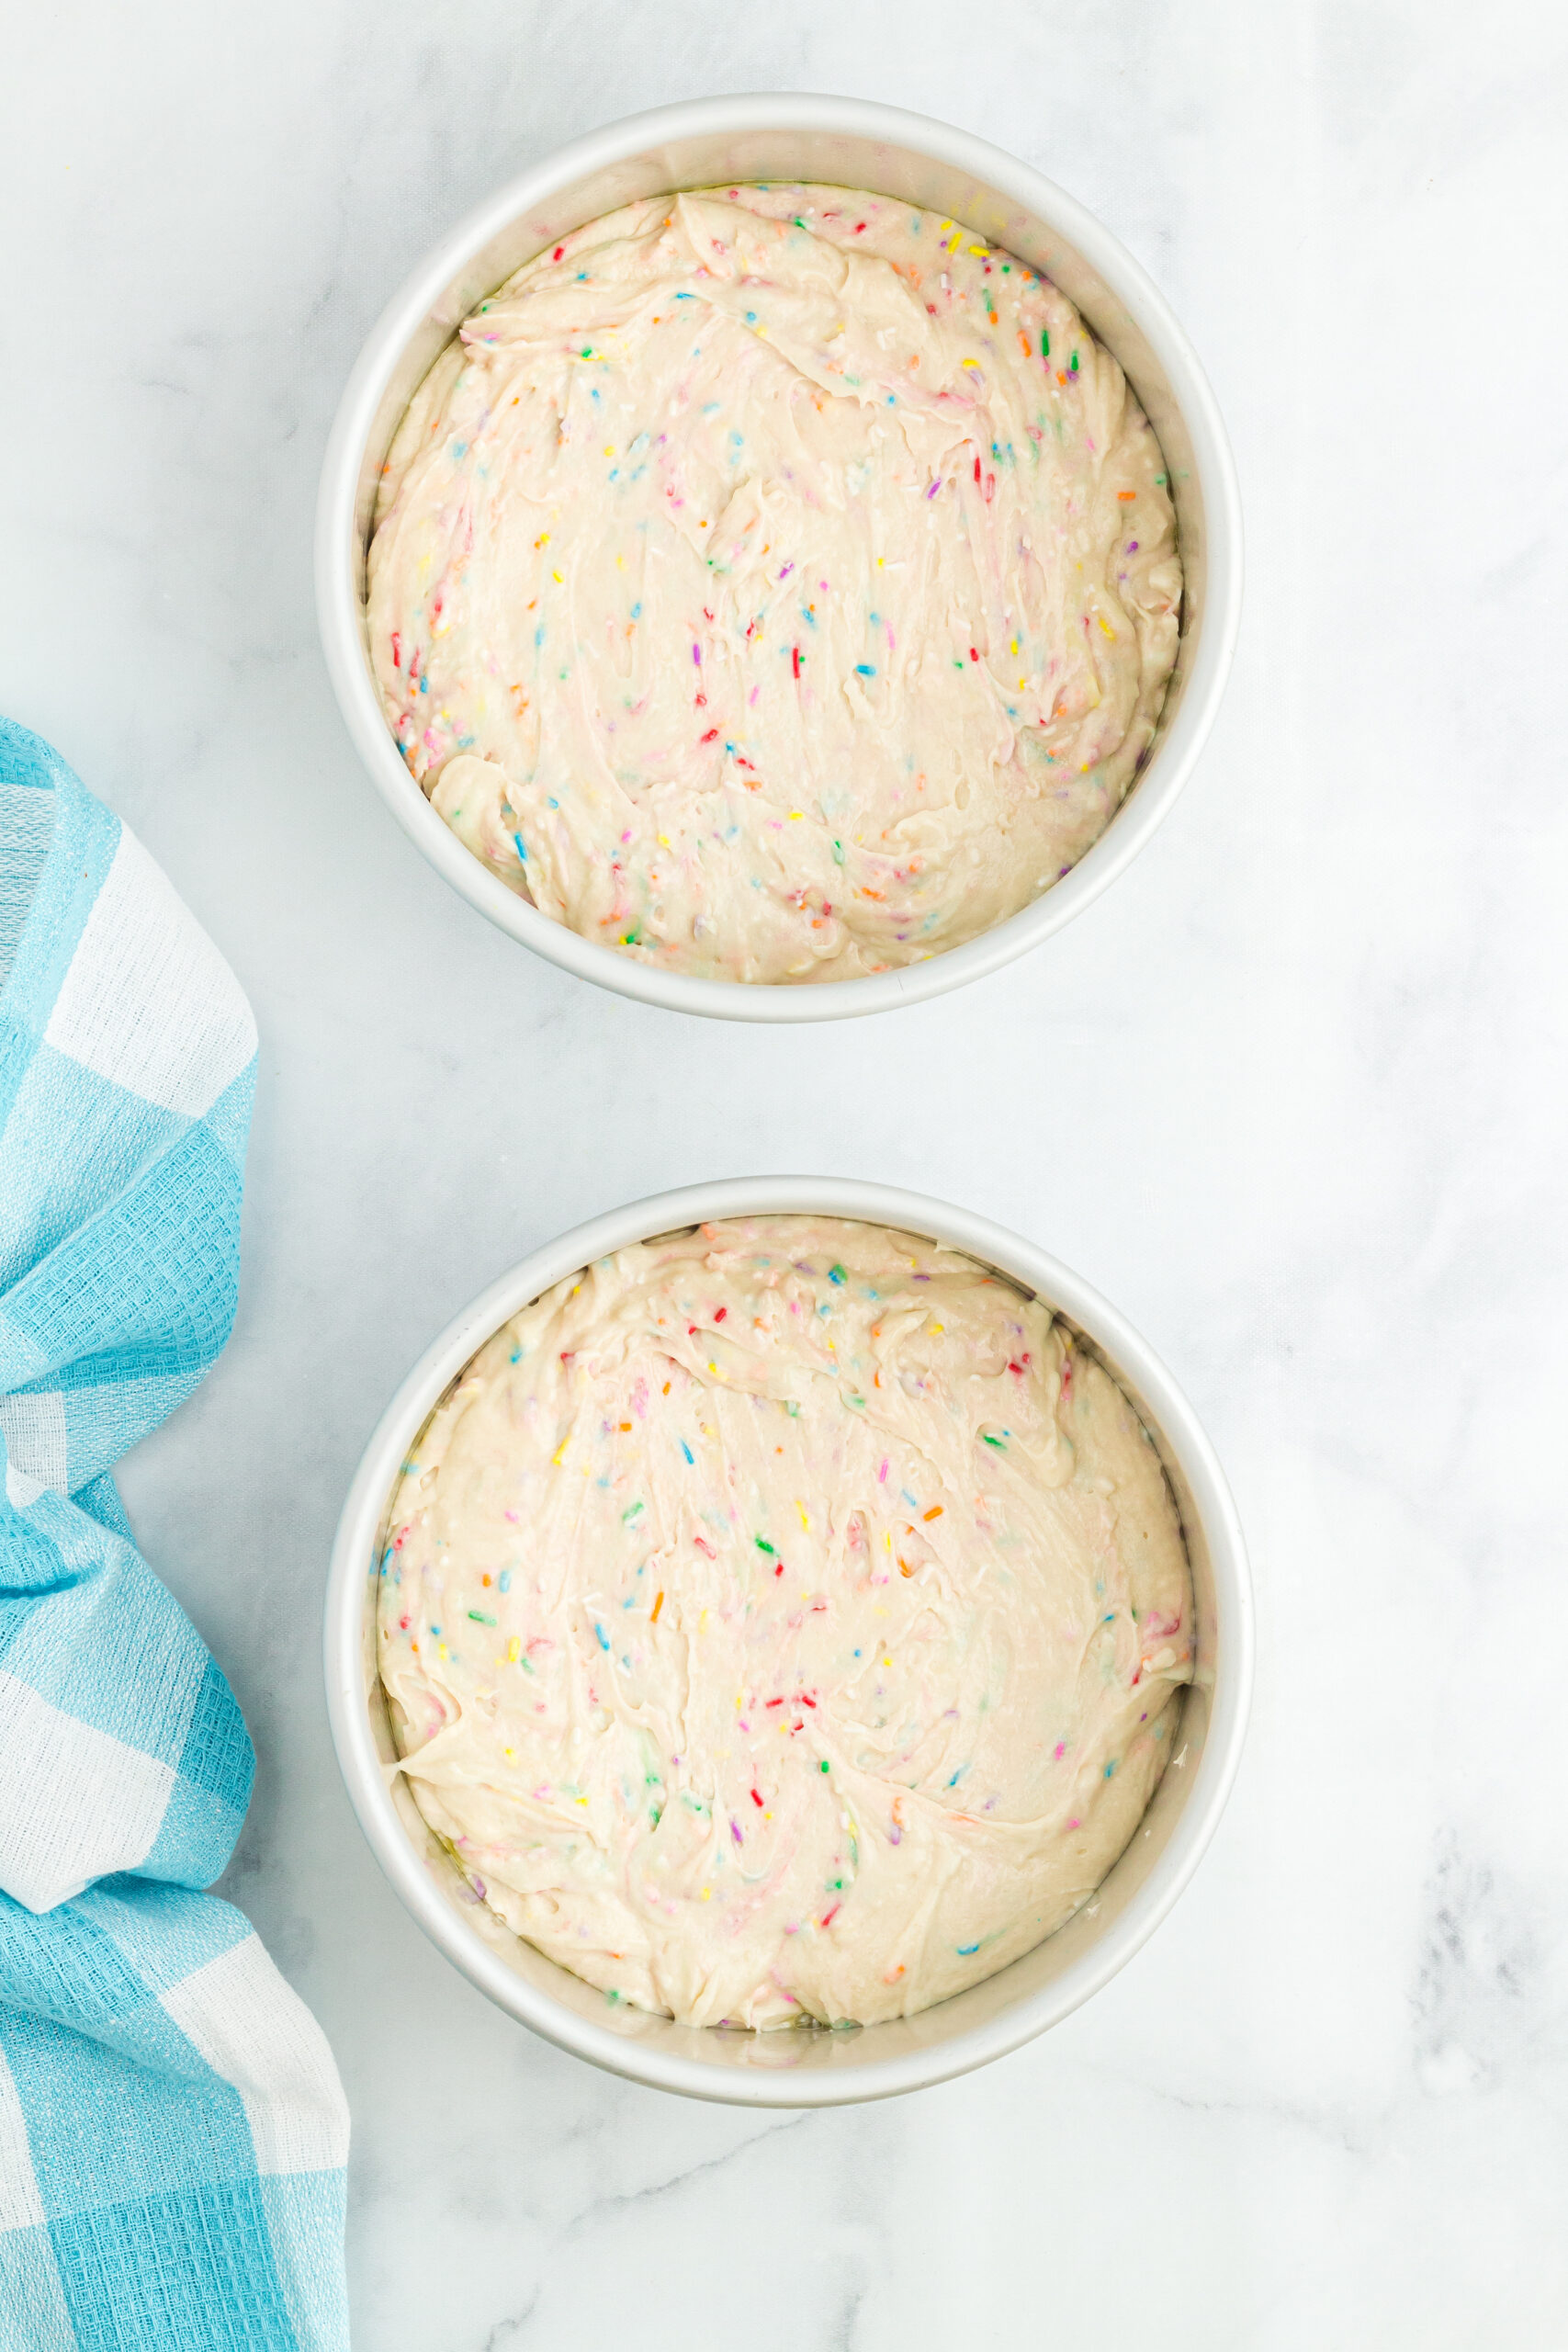
- Gently stir (not beat) sprinkles into the cake batter.
- Pour the cake batter evenly between the two pans. This works out to be about 550 grams of cake batter in each pan.
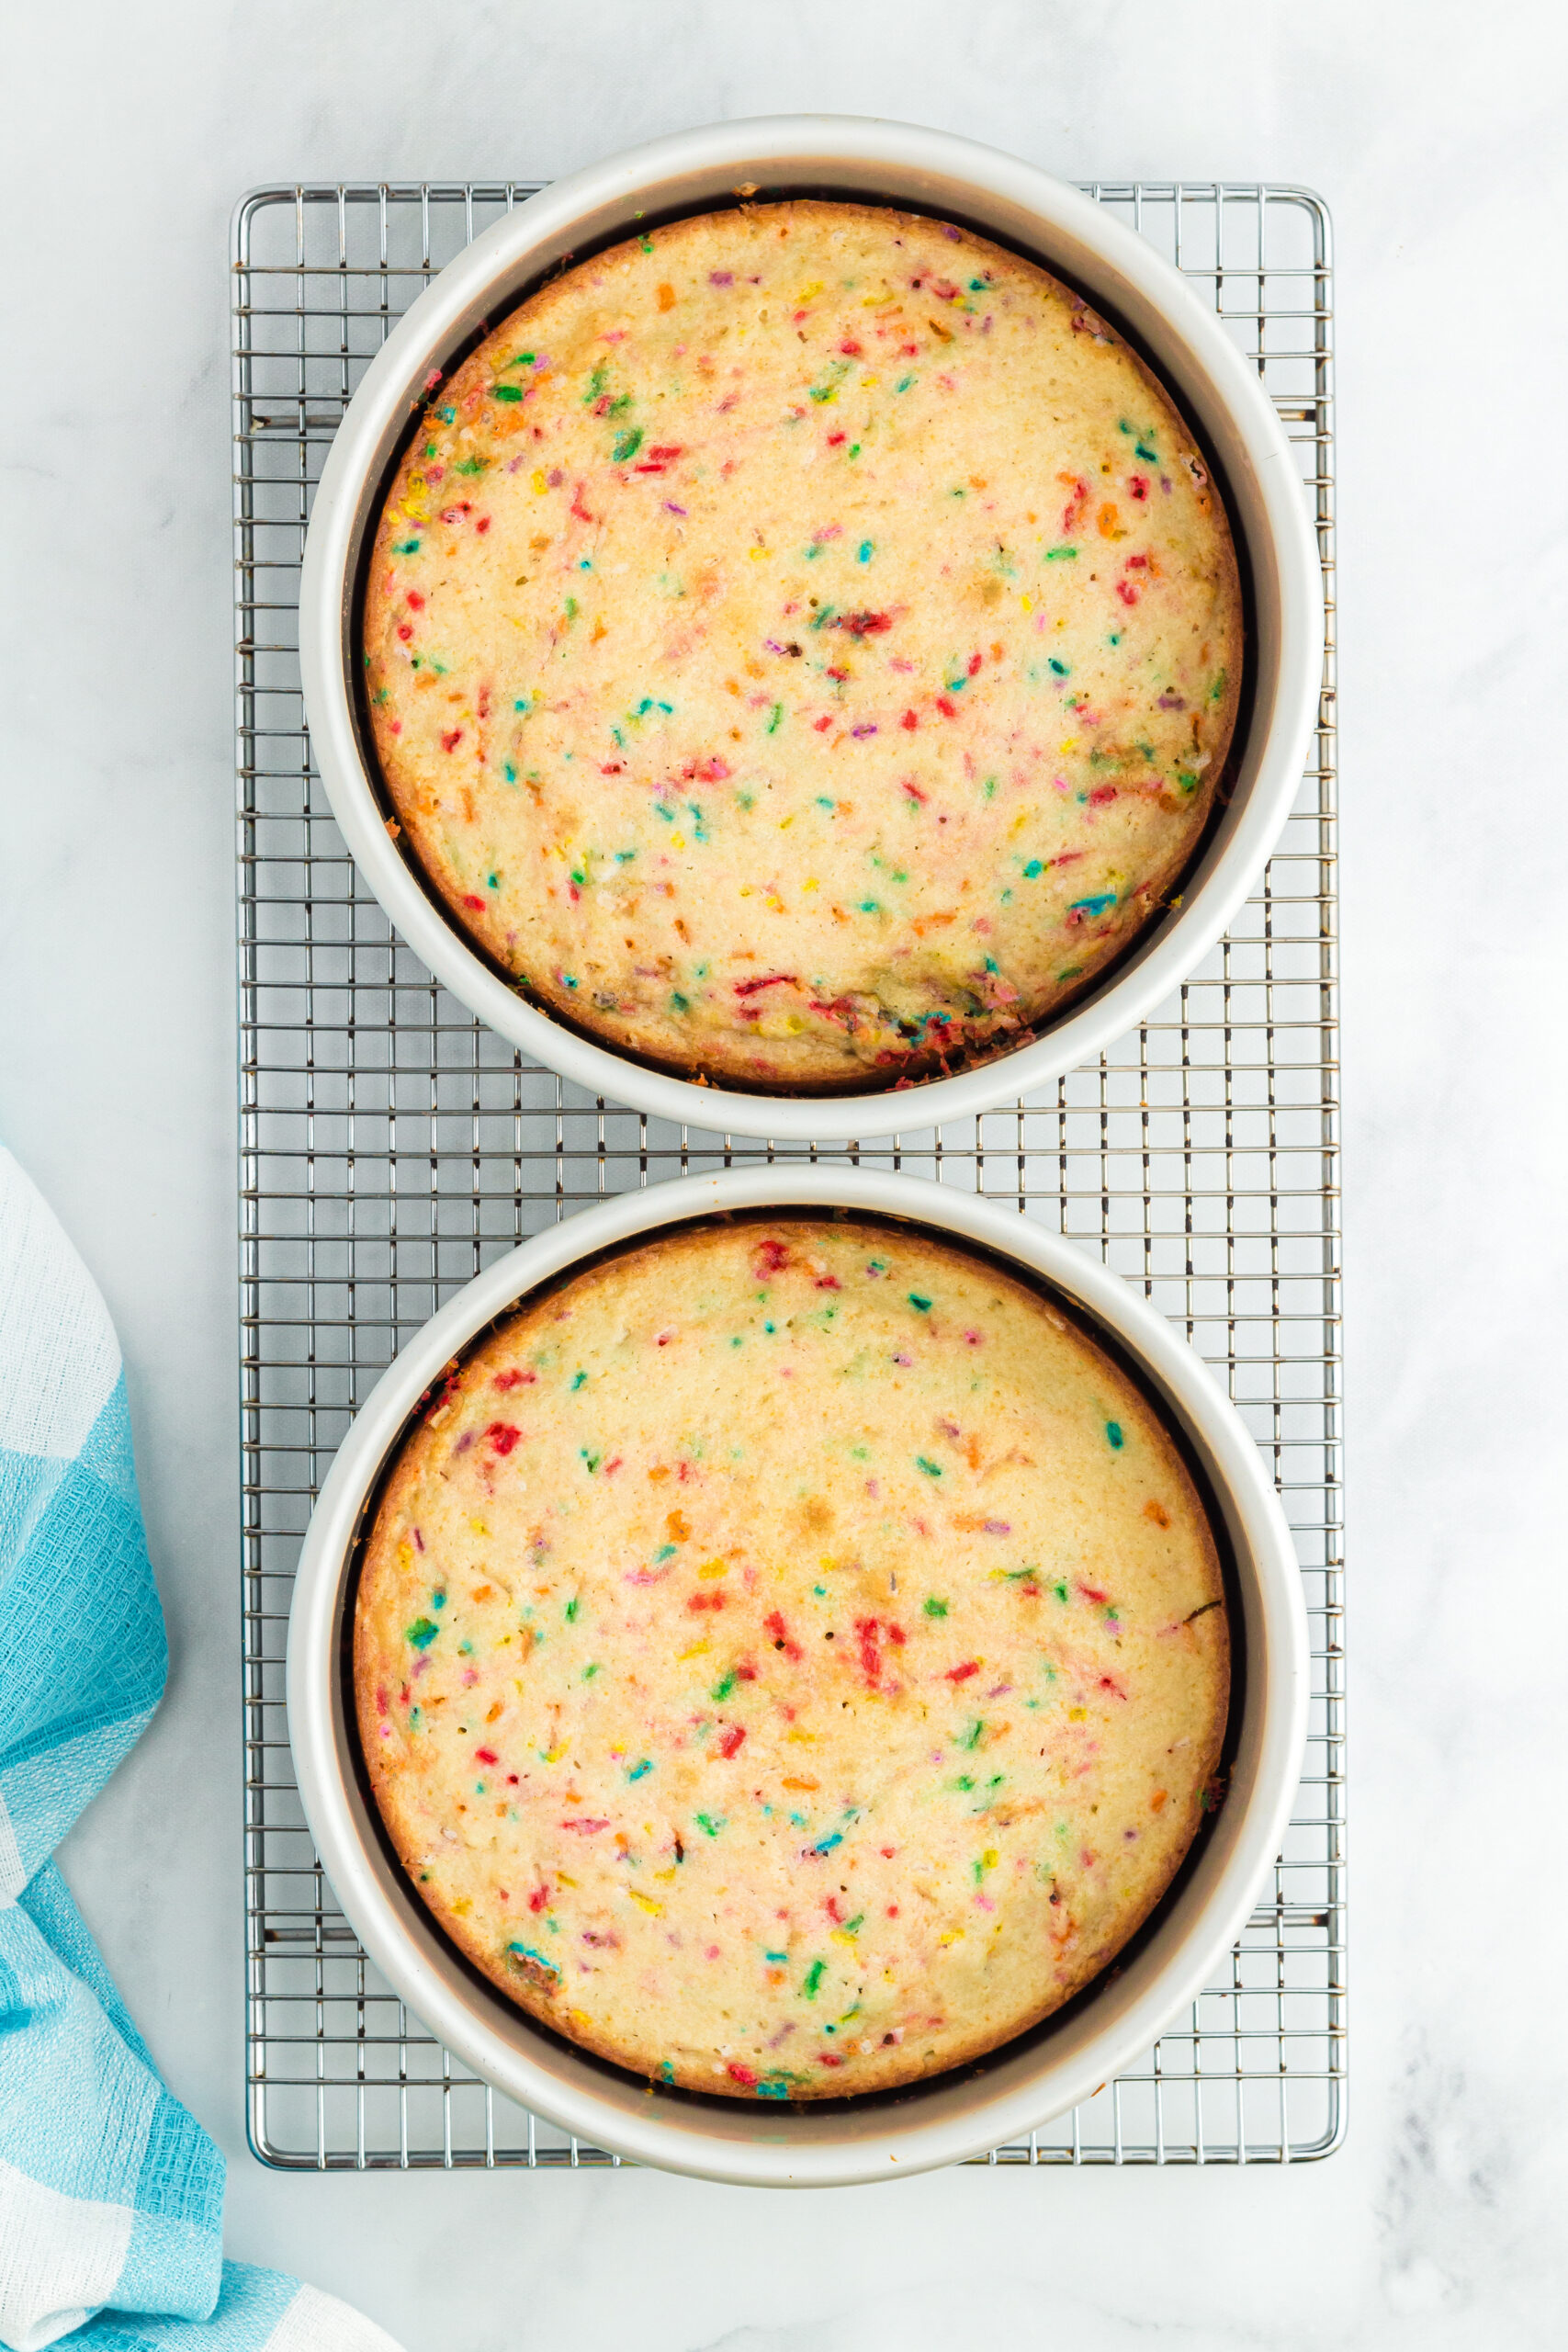
- Bake in oven for 30 - 32 minutes or until toothpick inserted in middle comes out clean.
- Let cake cool in pans (on wire rack) for 15 minutes before removing cakes from pan.
2. The Frosting
Next up, let's whip up some creamy and delicious frosting. To make the frosting, we will beat butter until light and fluffy. Add in confectioners sugar and vanilla extract and beat for 5 minutes until lighter in color and fluffy. If the frosting is too thick, beat in a tablespoon of heavy cream.
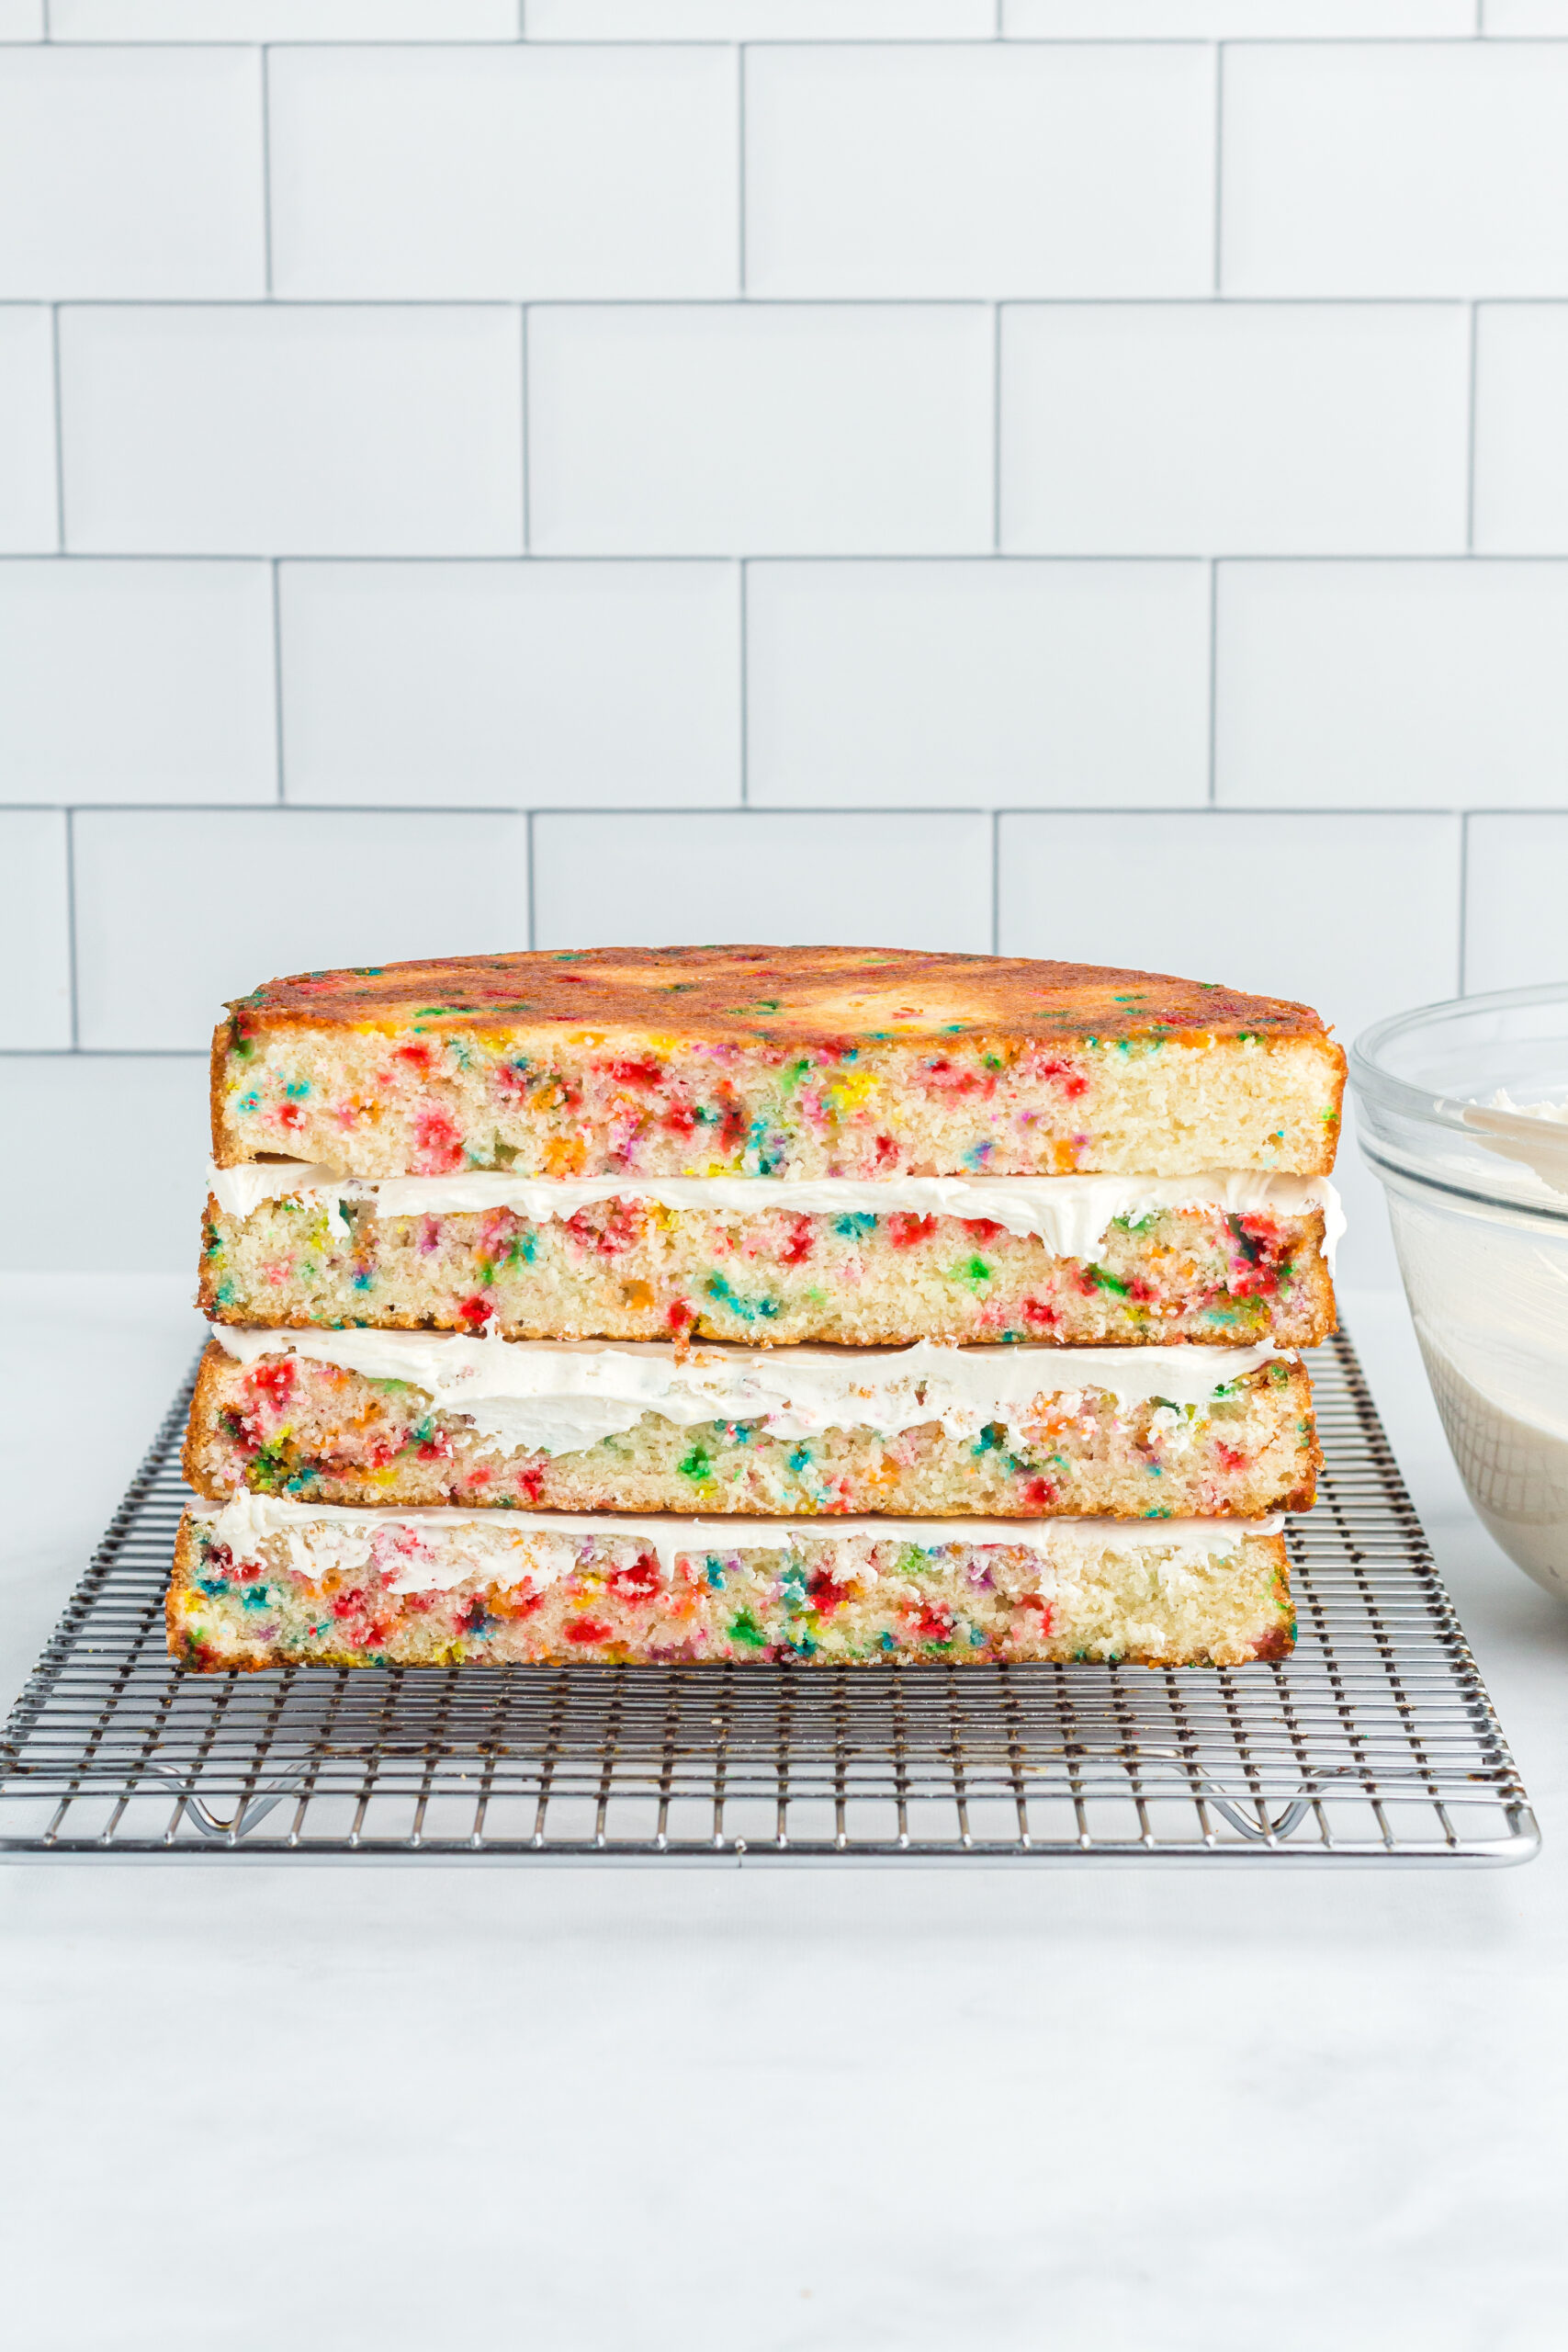
3. The Assembly
Now, it's time to bring everything together and assemble the cake.
- Once cakes have cooled to room temperature, use a large serrated knife to cut the dome tops off both cakes. These cakes don’t rise a lot so there won’t be a lot of top to cut off. You don’t need those dome tops so you can use those for snacking.
- Cut each cake once down the middle so you now have 4 half circles. Be careful to cut these straight down the middle so the half circles are all the same size.
- Line a large baking sheet with parchment paper. Place the cakes on the parchment lined baking sheet and put these into the freezer for 15 minutes. Chilled cakes are going to hold up better to frosting. Without freezing them for a little bit first, the cake may crumble when you start to add frosting.
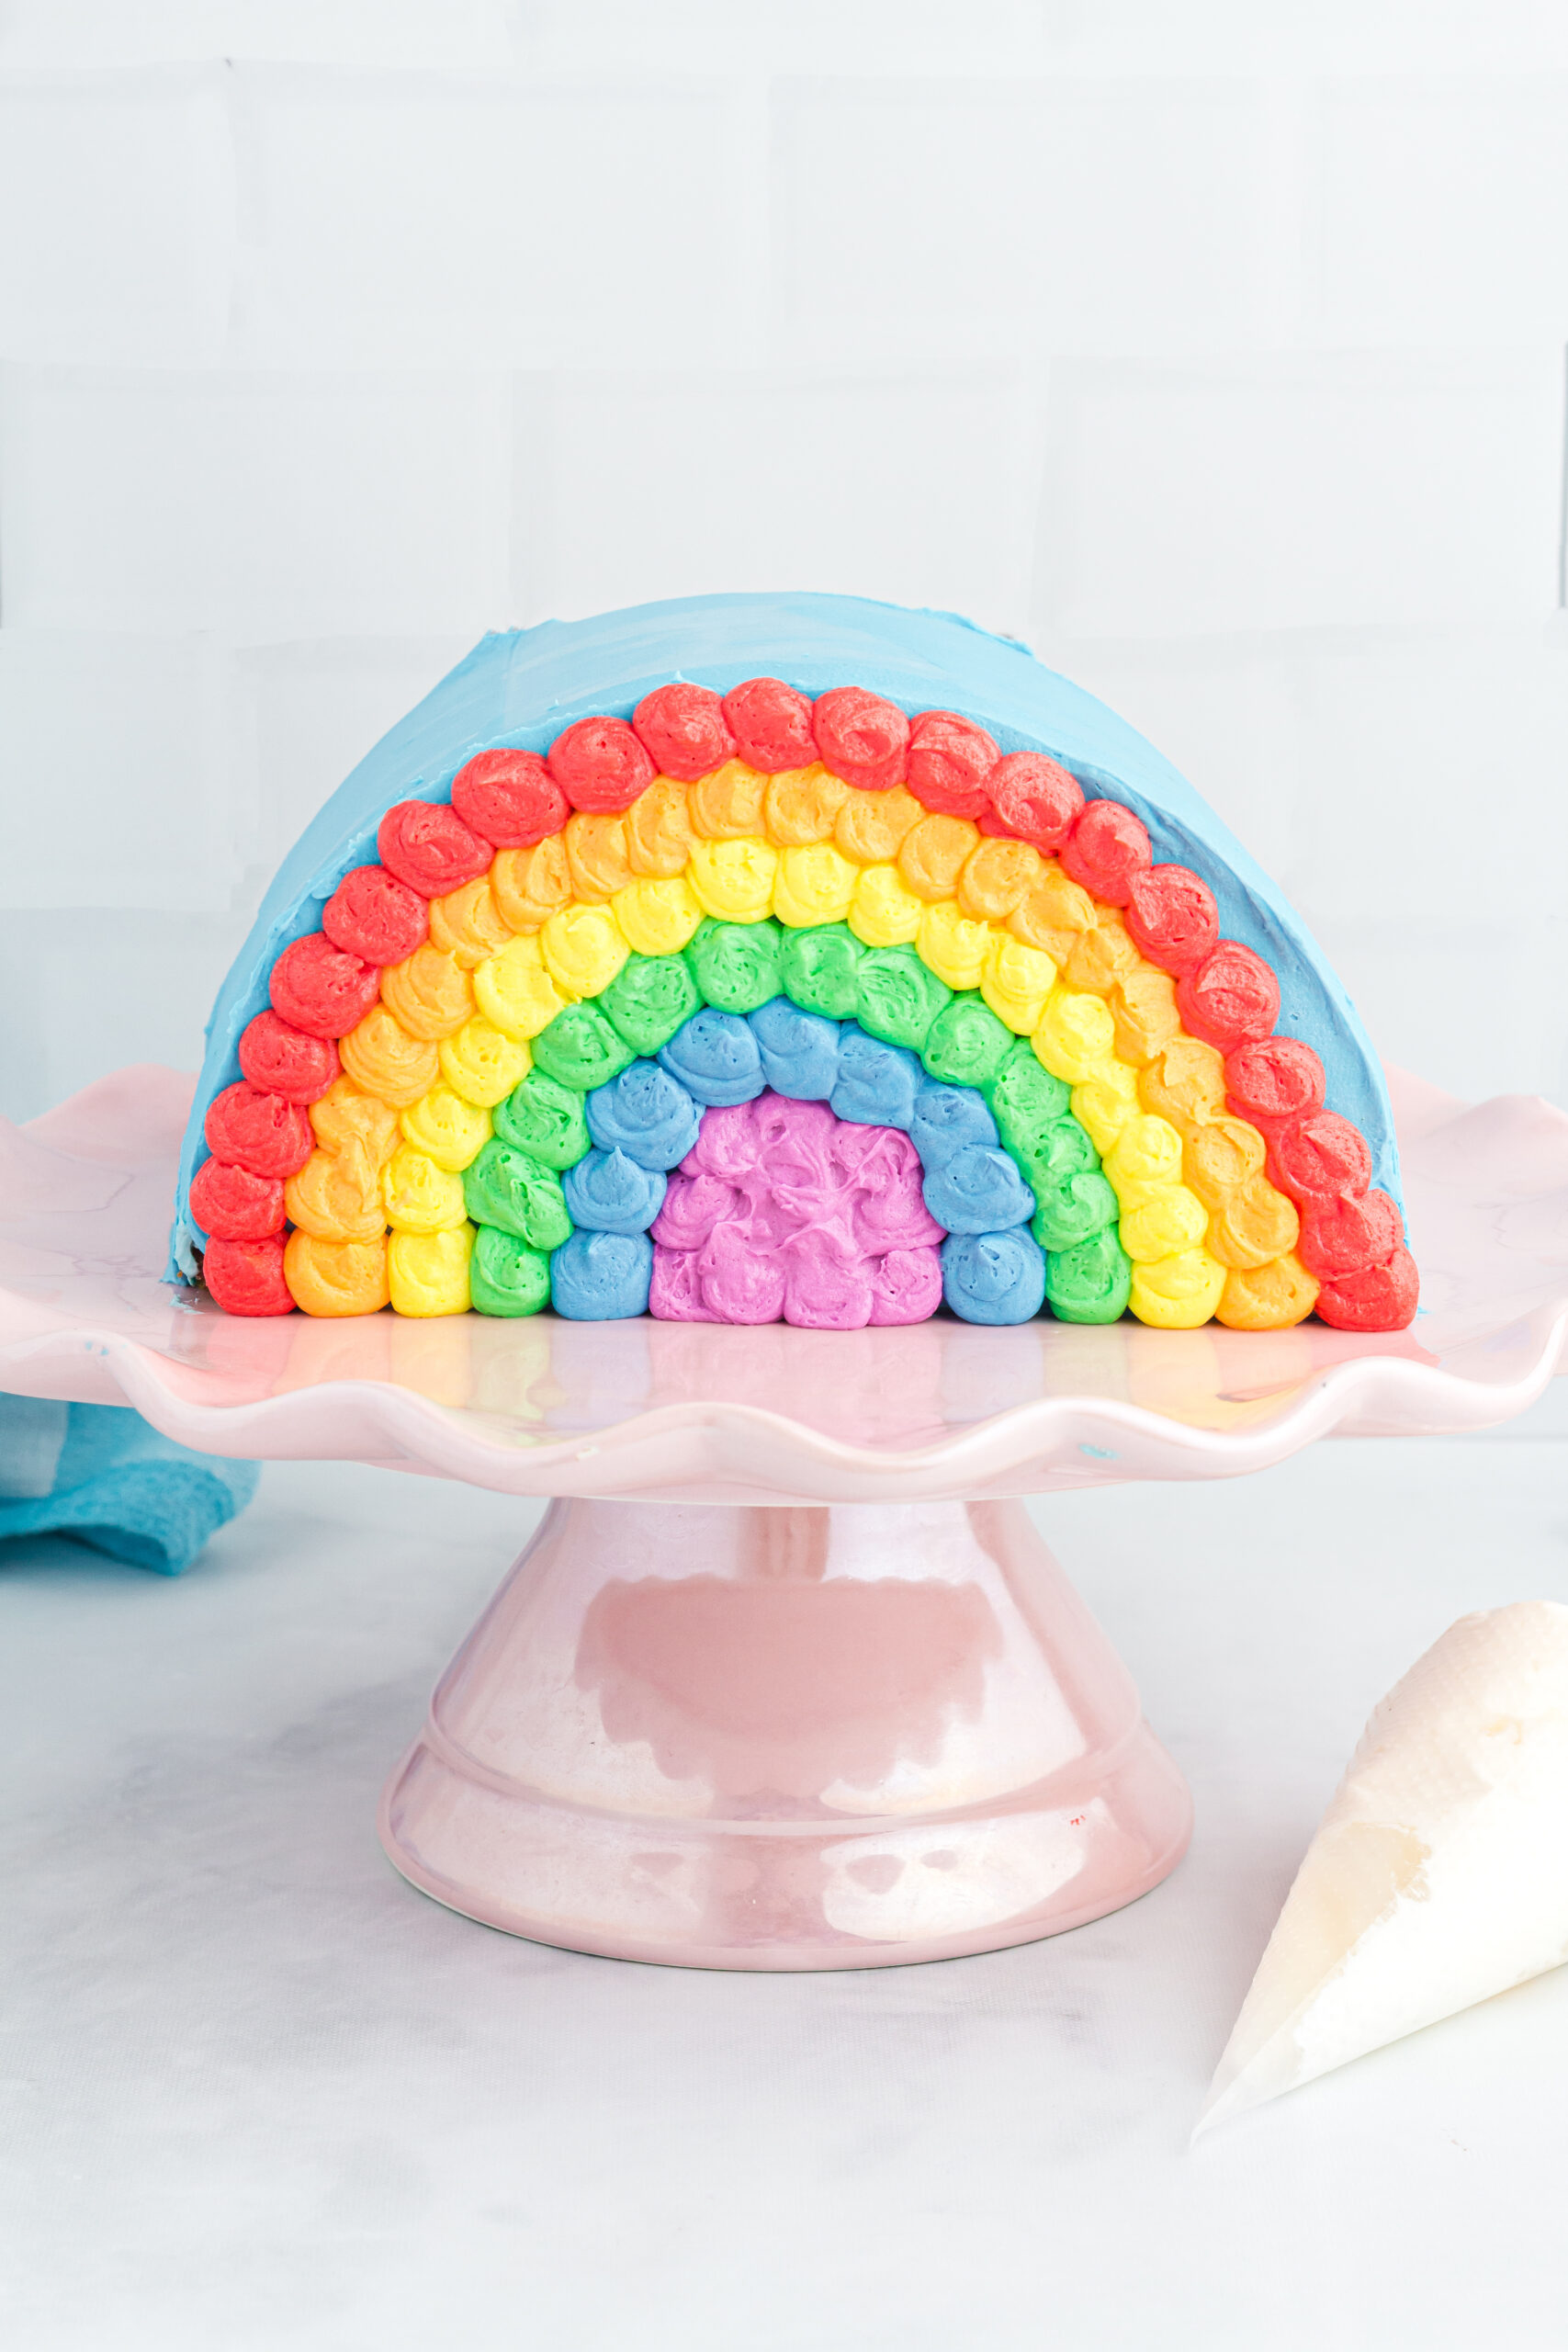
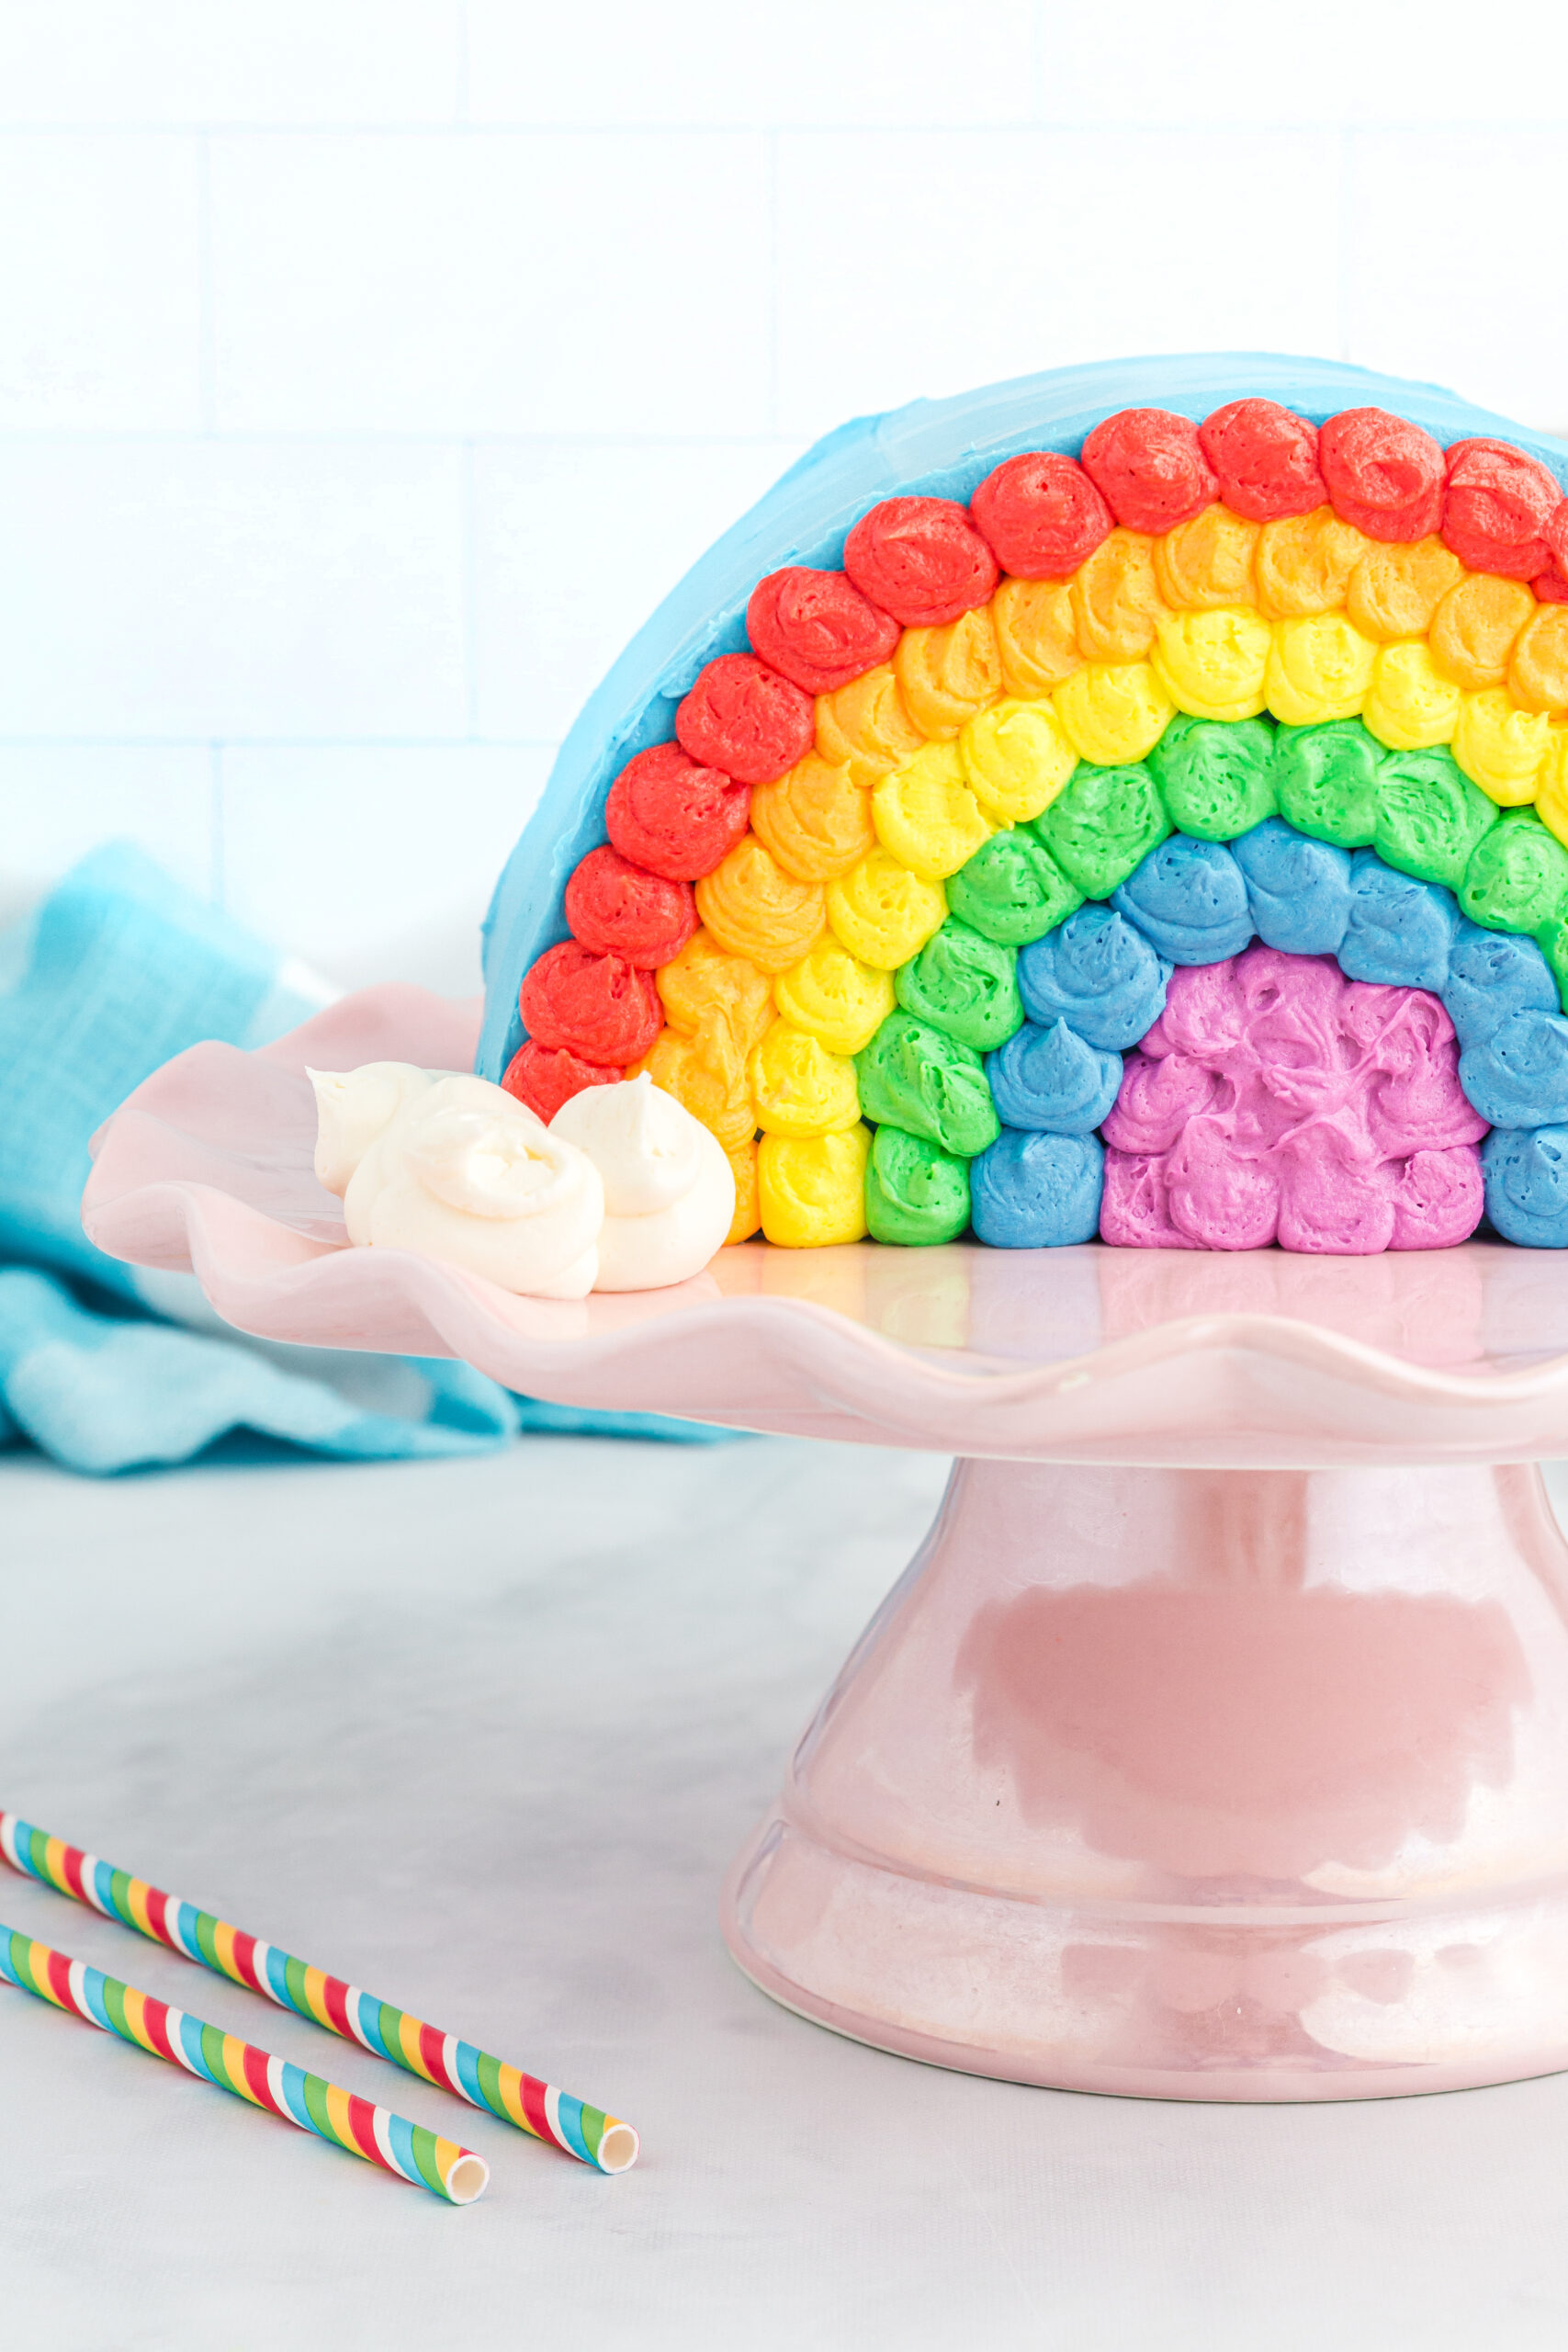
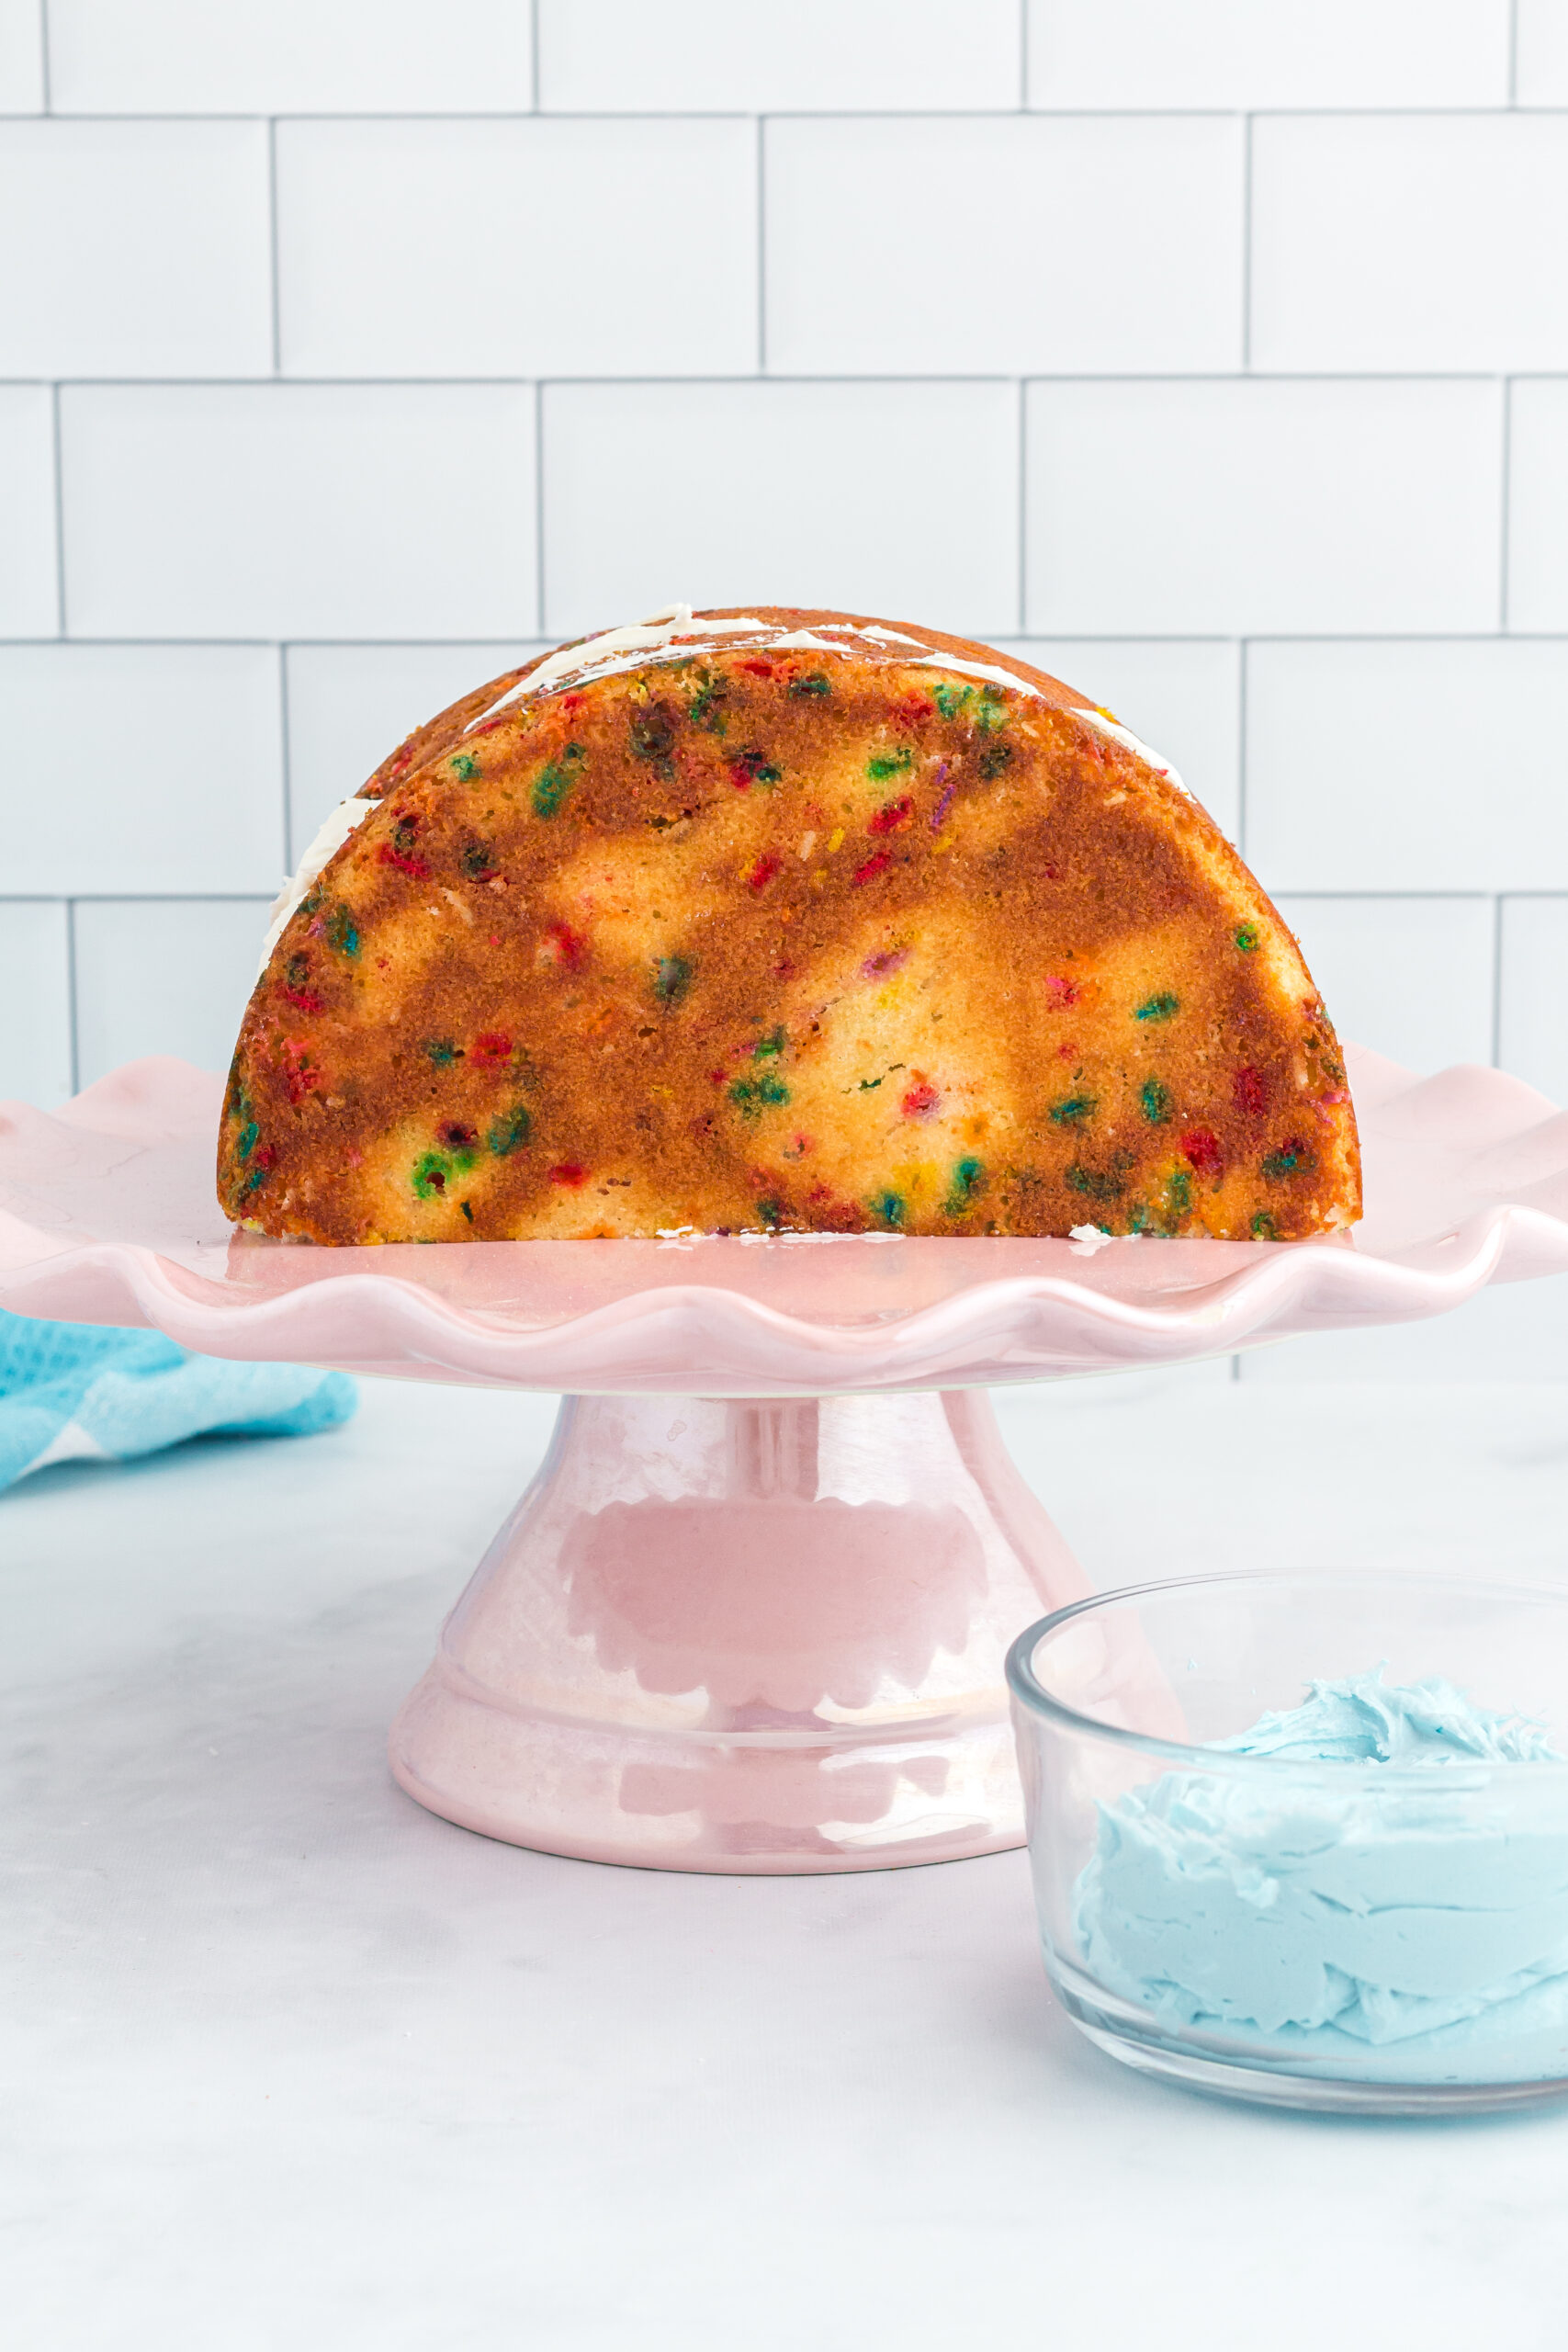
4. The Decorations
Get ready to sprinkle color and fun onto your cake!
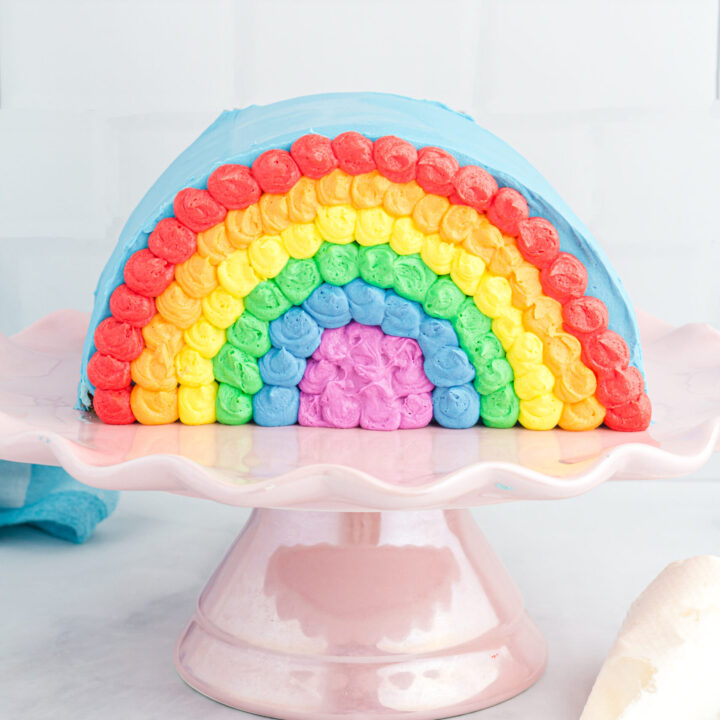
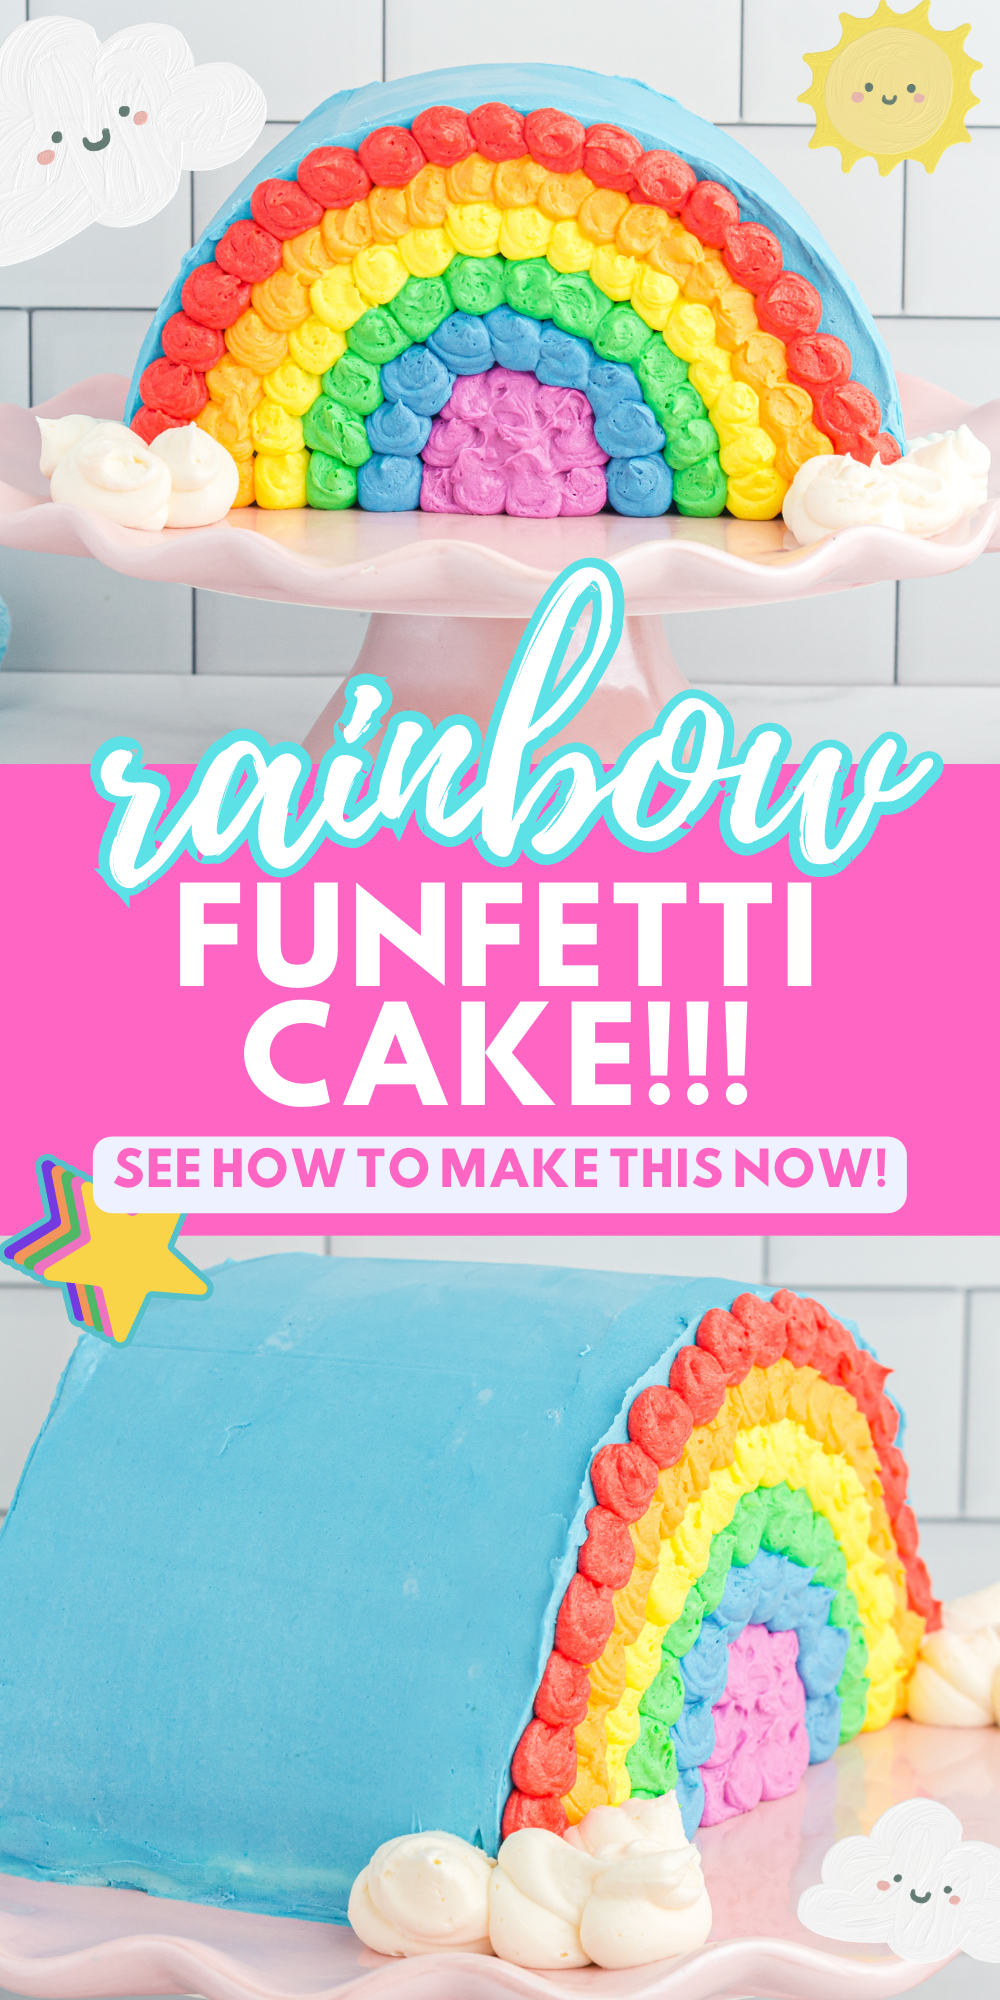
- Color about 2 cups of frosting with a light blue (sky blue color).
- Frost top and sides of cake with a thin layer of sky blue frosting. Smooth this frosting out using a cake scraper tool.
- Pop the cake into the freezer for 5 minutes to allow frosting to harden up a bit.
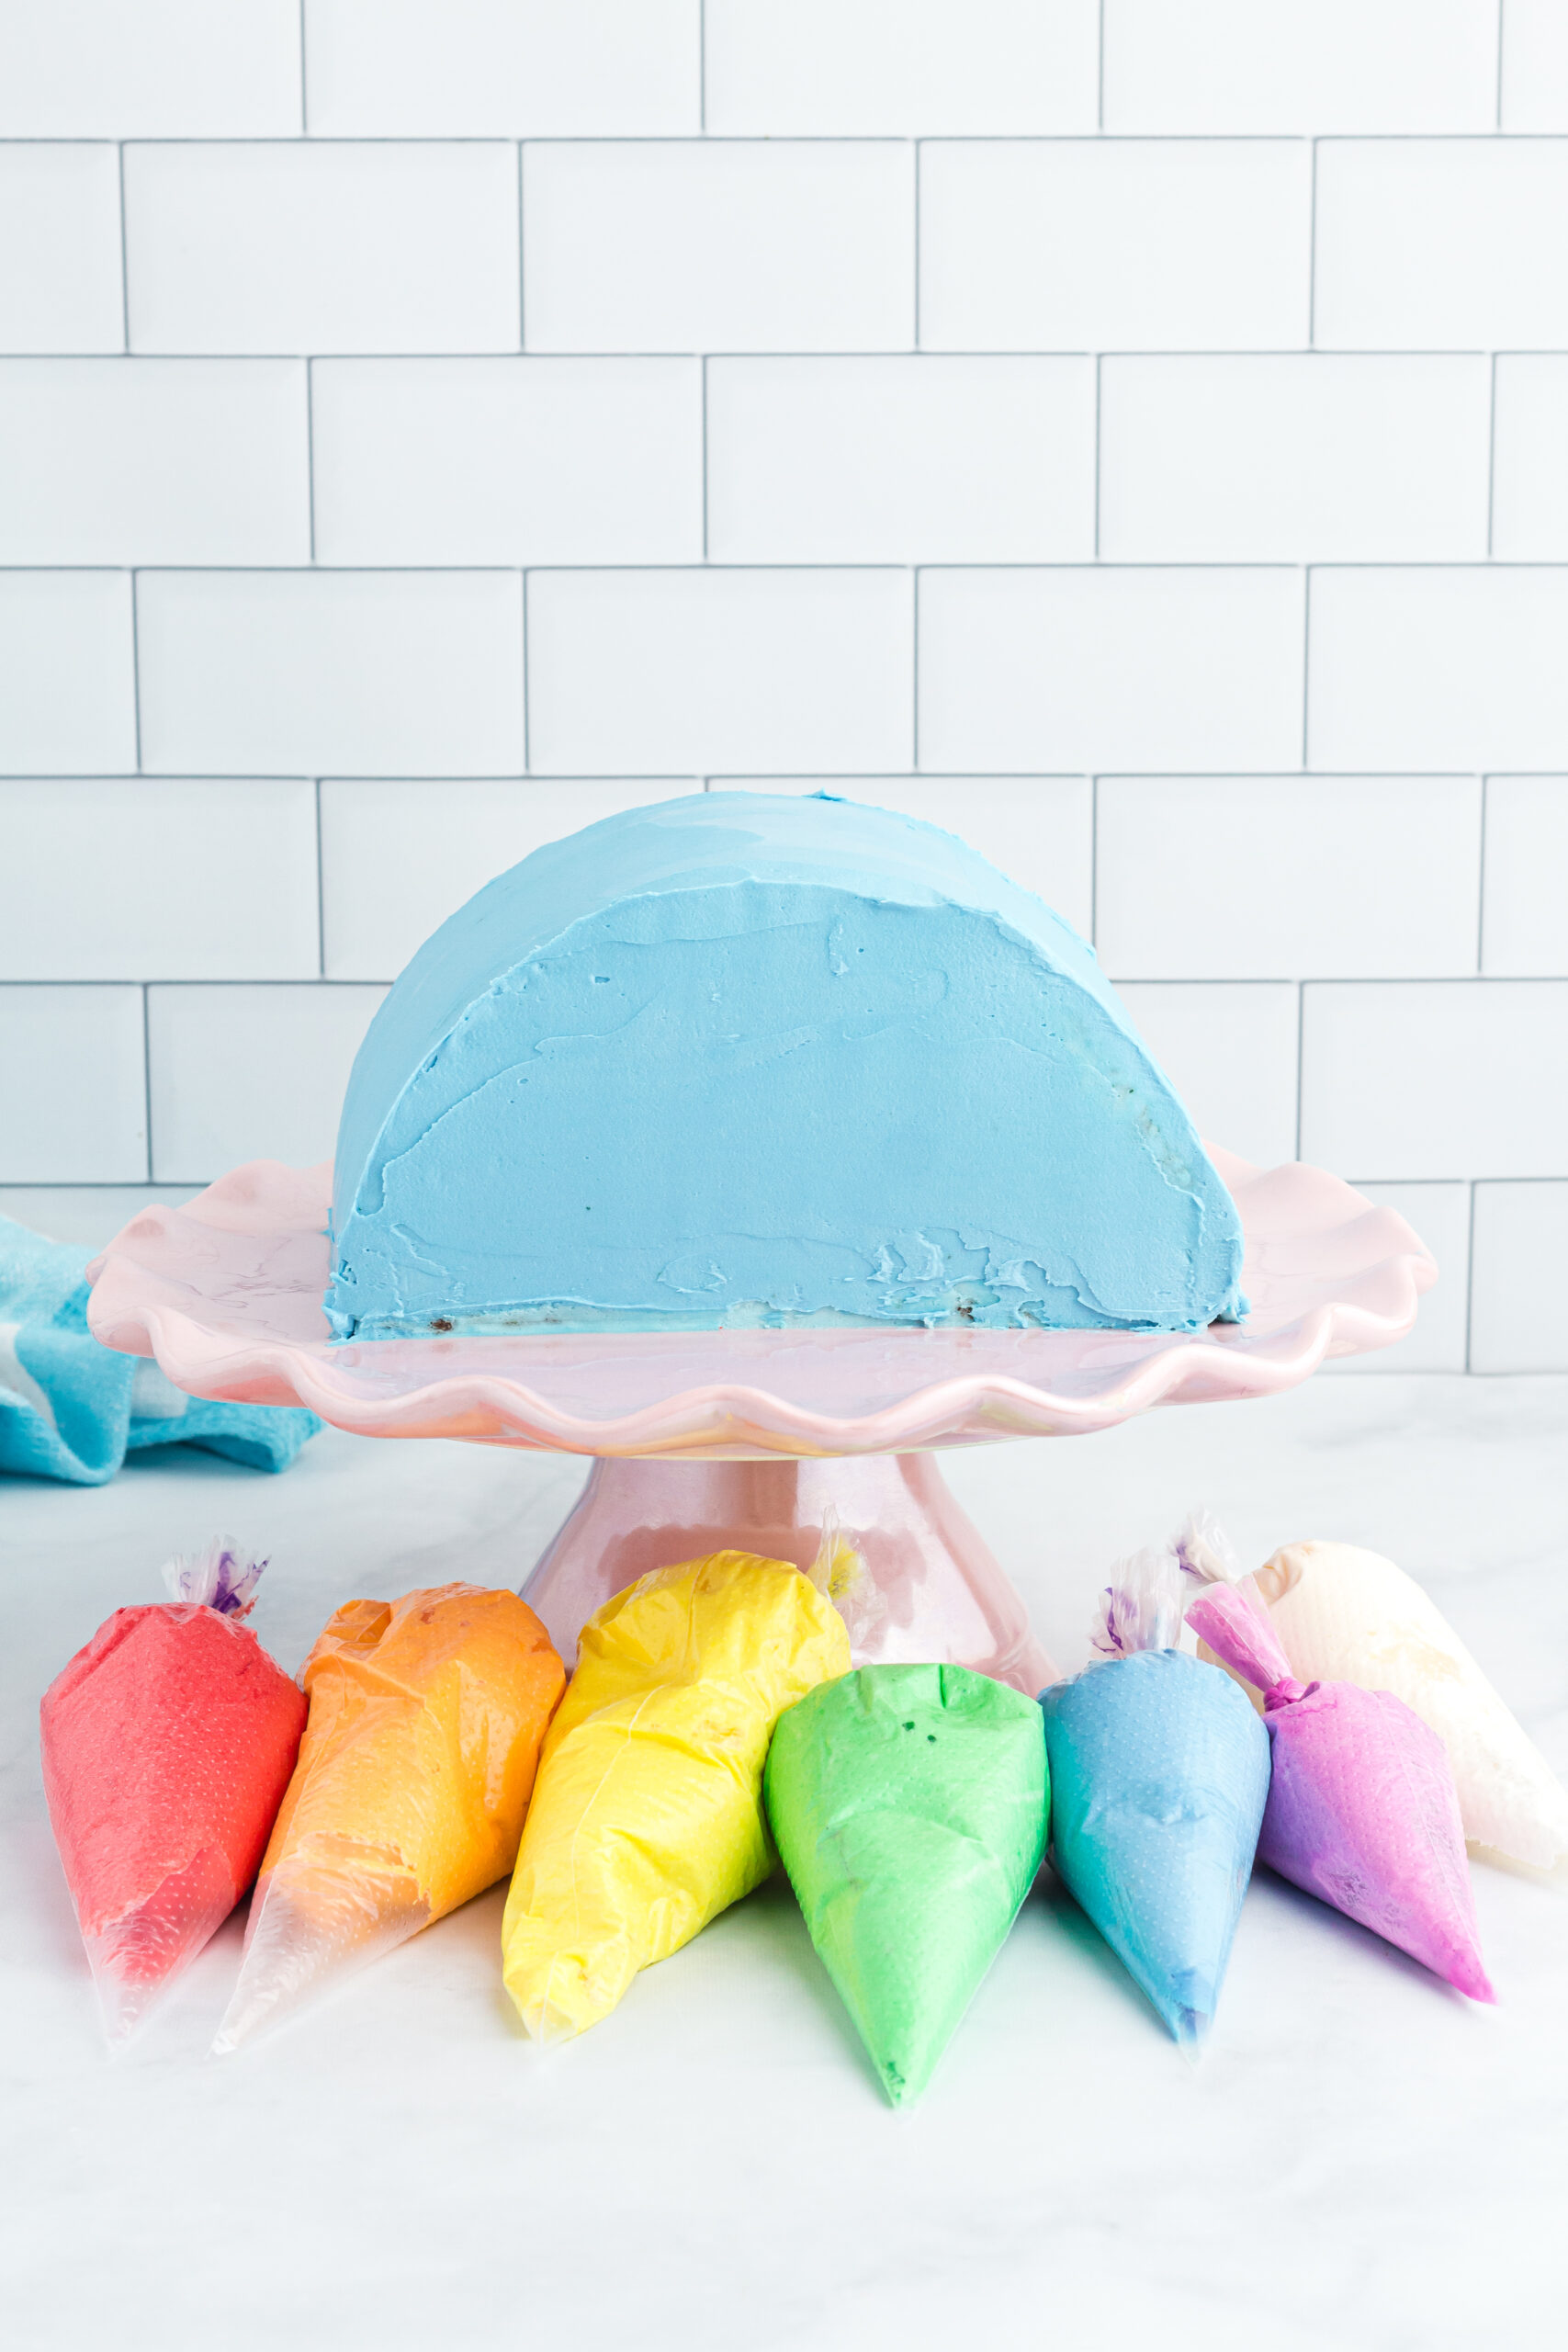
- With the remaining icing, separate it out into 7 bowls for coloring the rainbow colors. You’ll need the most icing for the red, a little bit less of orange, a little less of yellow, a little less of green, a little less of blue and the smallest amount of purple. The last bowl will be about ½ cup of white frosting. Place all these colors (including the white) into their own tipless icing bags. You’ll now have 7 bags of different colored frostings plus about 1 cup left of the sky blue frosting for the base of the cake.
- Remove cake from the freezer and do a second layer of the sky blue color on the top and sides of cake. Use the cake scraper tool to smooth this out.
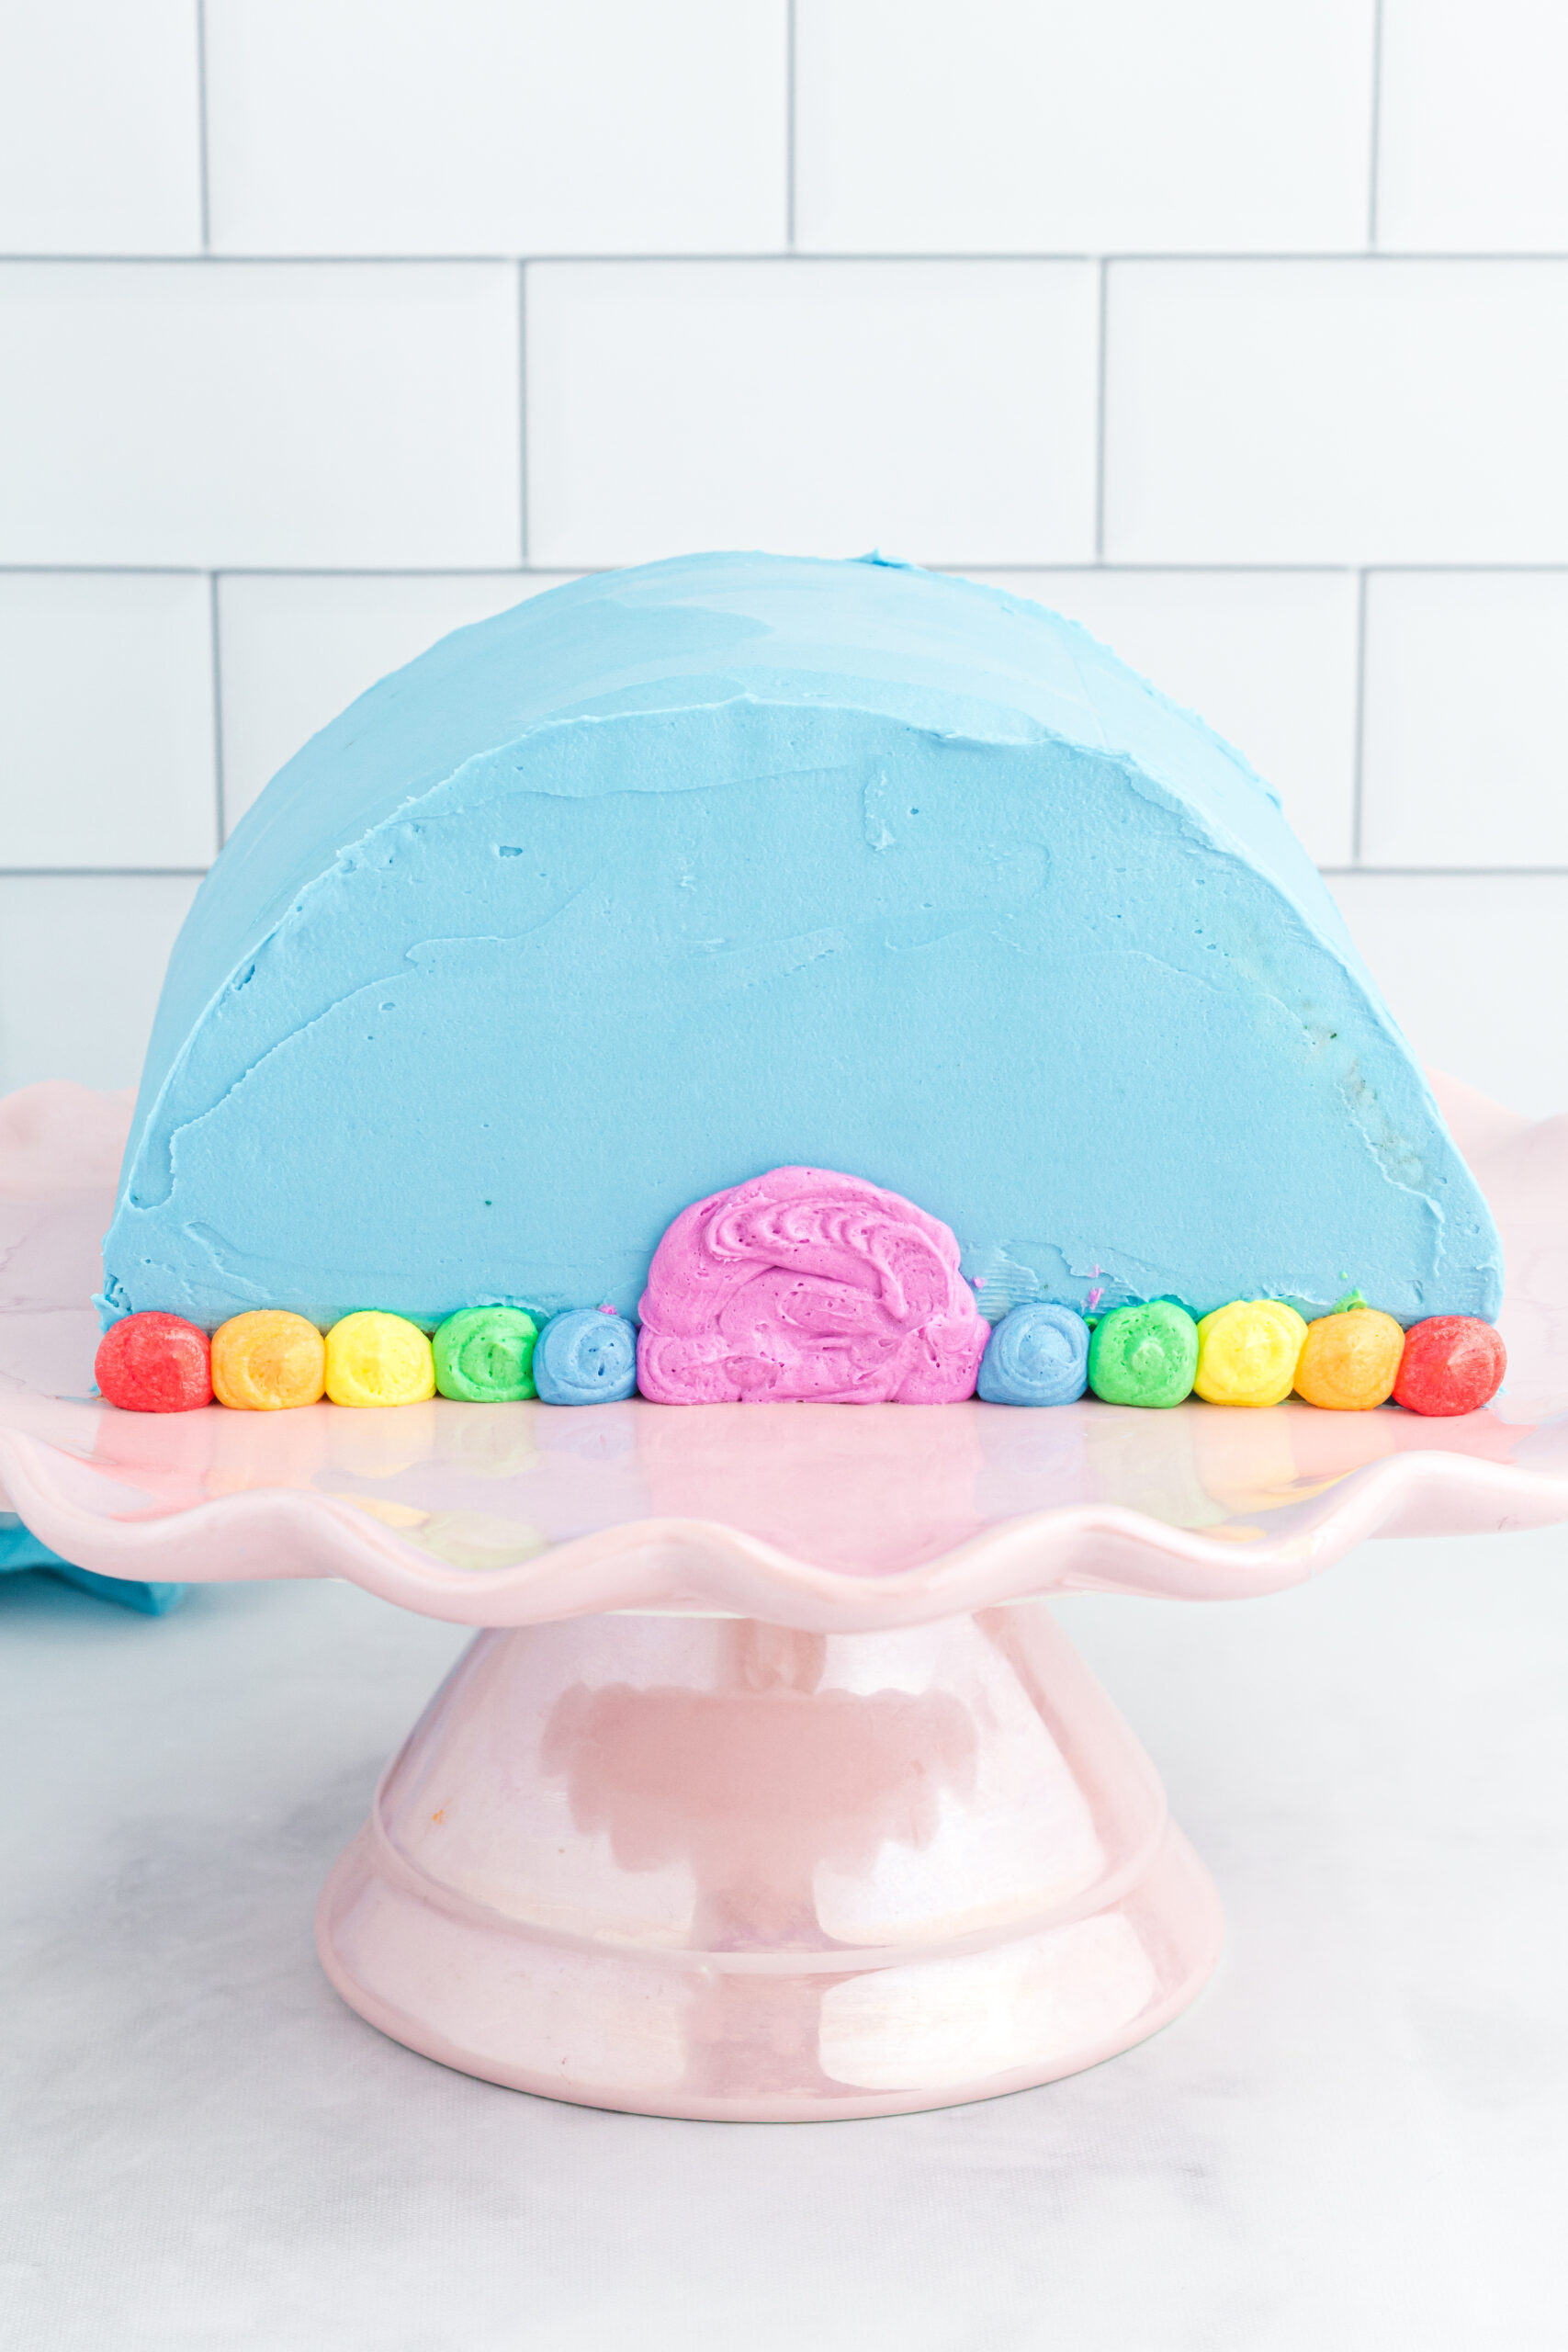
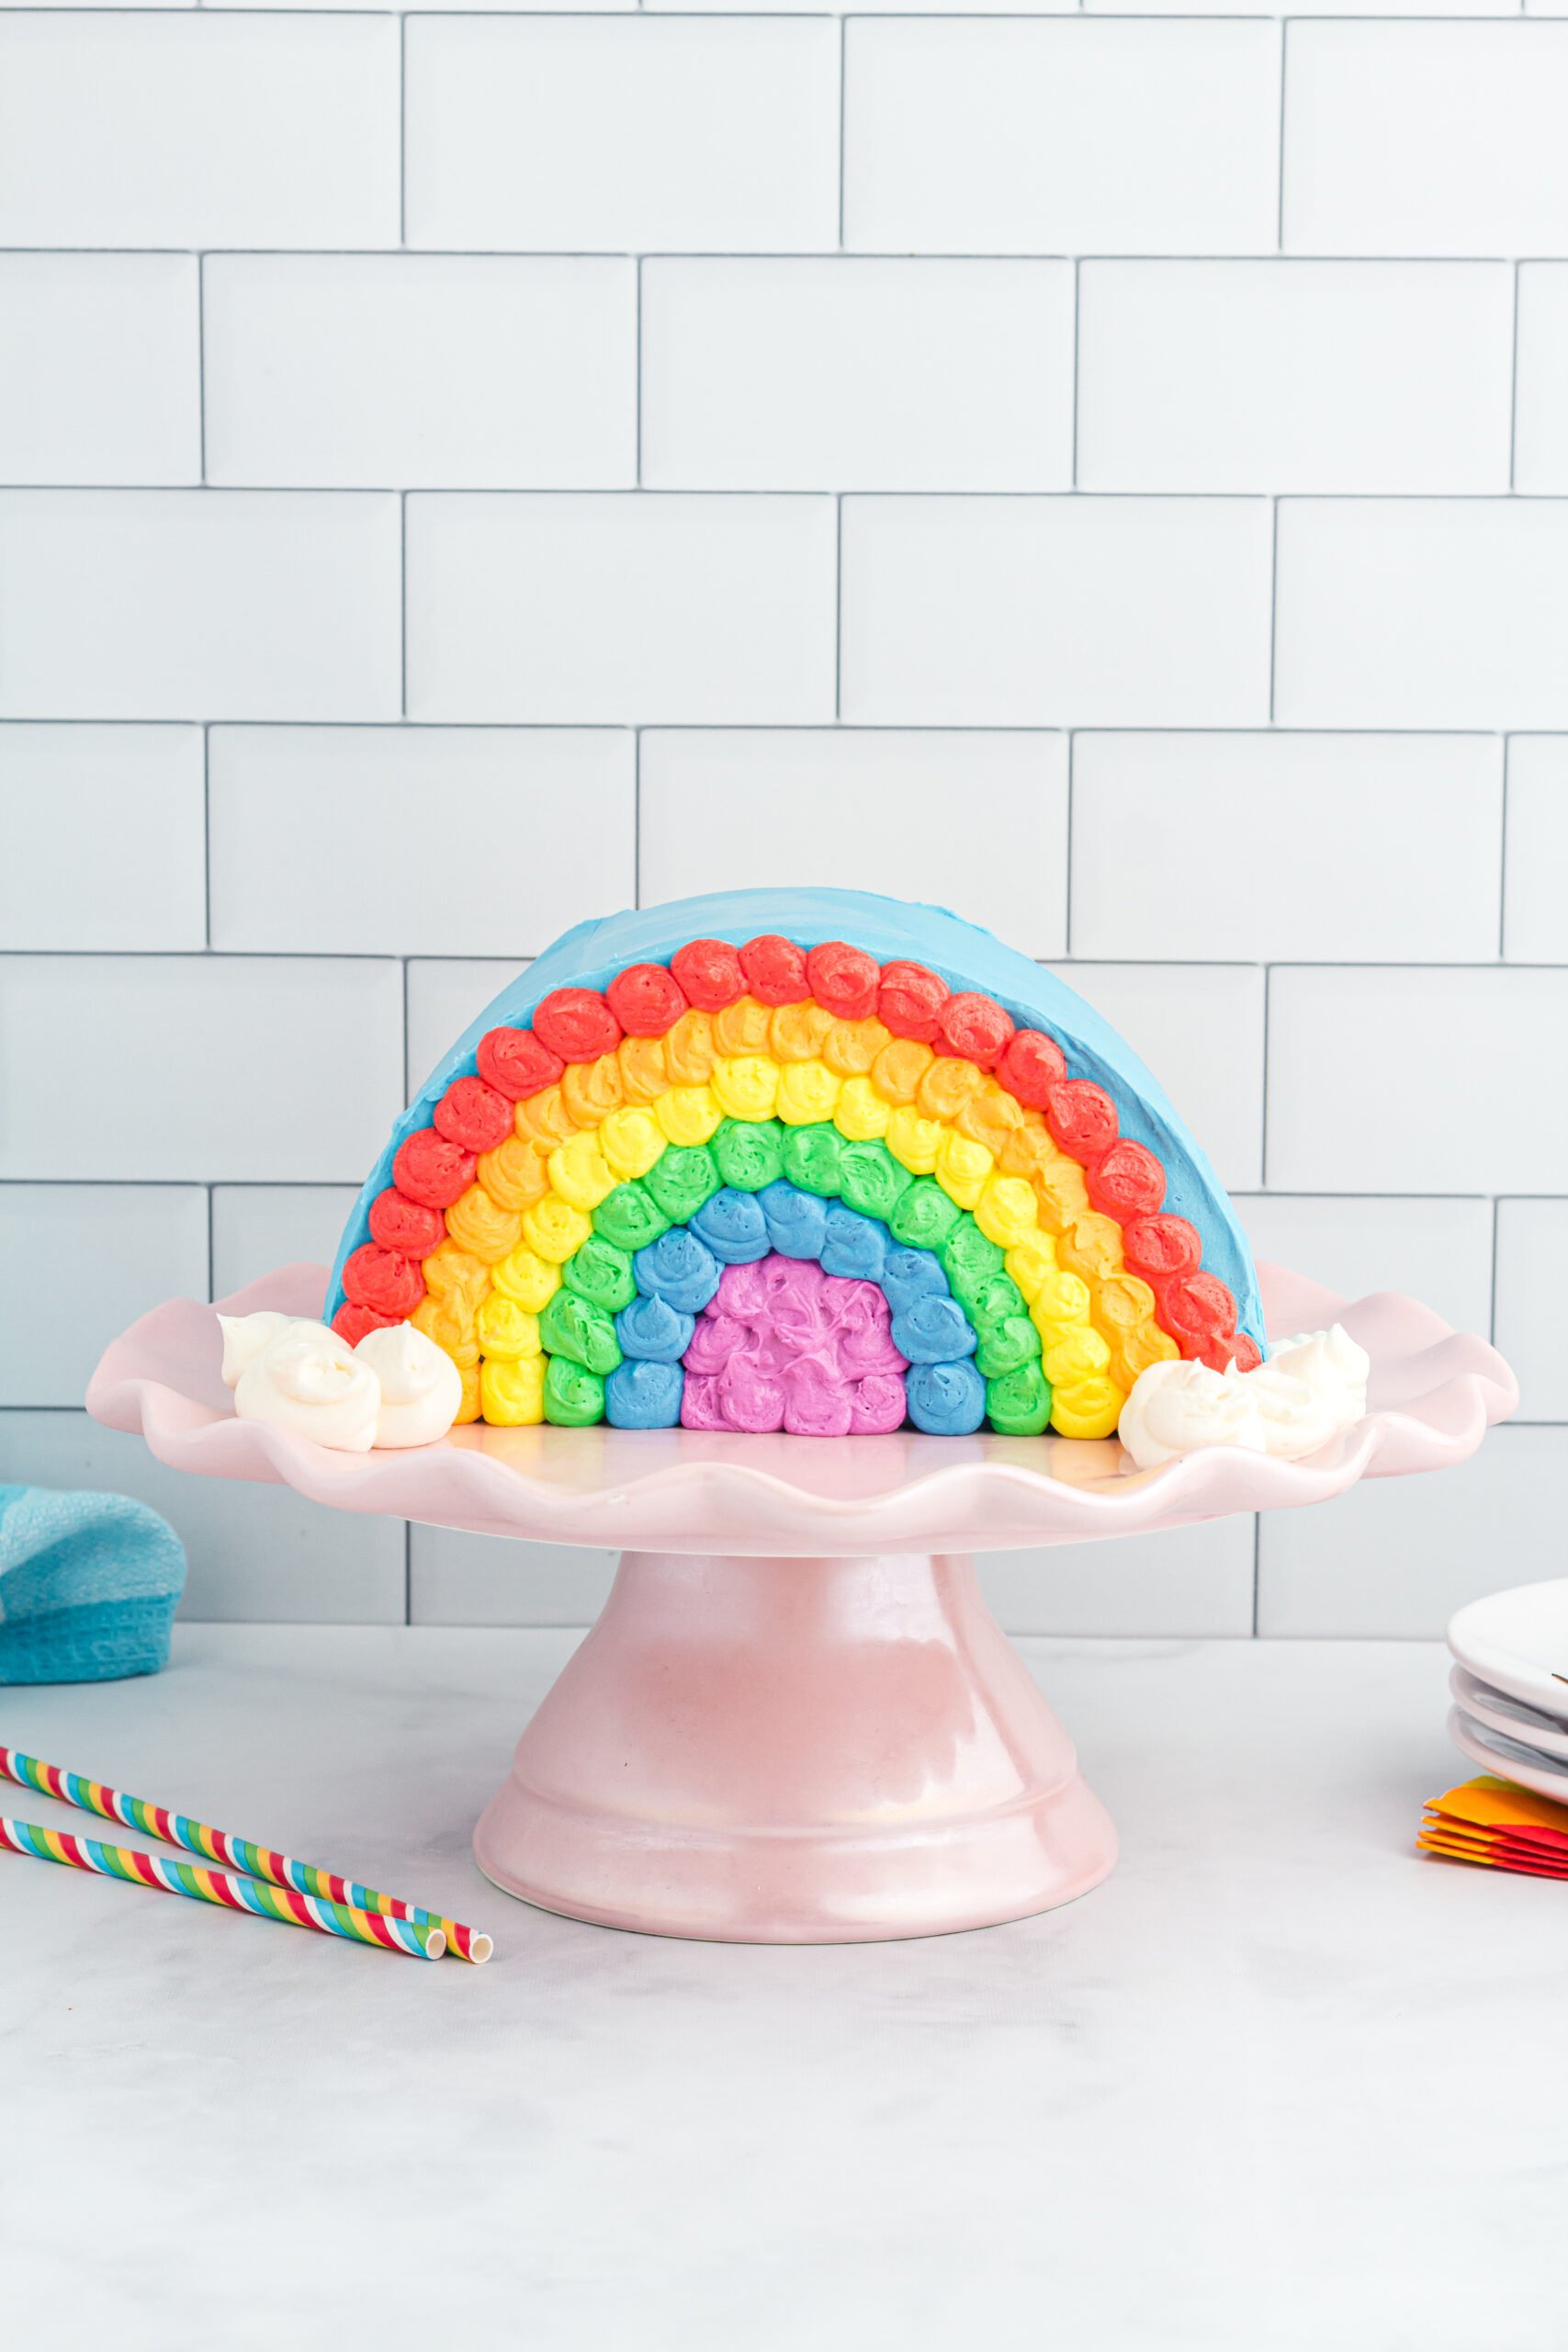
- Now onto frosting the rainbow! Start with one dot of each color of the rainbow starting with purple in the middle then work your way out with blue next, then green, then yellow, then orange and red at the outer edge. Starting with a dot of each will help you to determine how thick each color of the rainbow should be so that you have enough space to get all 6 colors on there.
- Frost the rainbow on both sides of the cake but leave the top rounded part of the cake the light sky blue.
- Use the white frosting to pipe fluffy white clouds around the bottom sides of the cake.
5. The Party Time
It's time to celebrate! Show off your stunning Funfetti Rainbow Cake at the party and enjoy the compliments that'll come your way. Cut into the cake to see the beautiful layered colors and indulge in the soft and moist texture. Everyone will surely want to know the recipe!
RAINBOW CAKE Q & A
What food coloring did you use for these colors?
For these bright colors, I used the brand Chefmaster Liqua-gel in the colors: super red, neon brite orange, lemon yellow, leaf green, neon brite blue and neon brite purple.
My cake isn’t rising properly. What went wrong?
One reason a cake may not rise is that the baking powder may be expired. It’s typically good for 6 months at room temperature after you open it. This cake doesn’t rise a lot so don’t be concerned if it’s pretty flat. As long as the cake isn’t sinking in the middle, you’re good!
Also, be sure not to open the oven during the baking time. A sudden drop in temperature, even just for a second, could cause the cake to fall flat.
RAINBOW DESSERT IDEAS
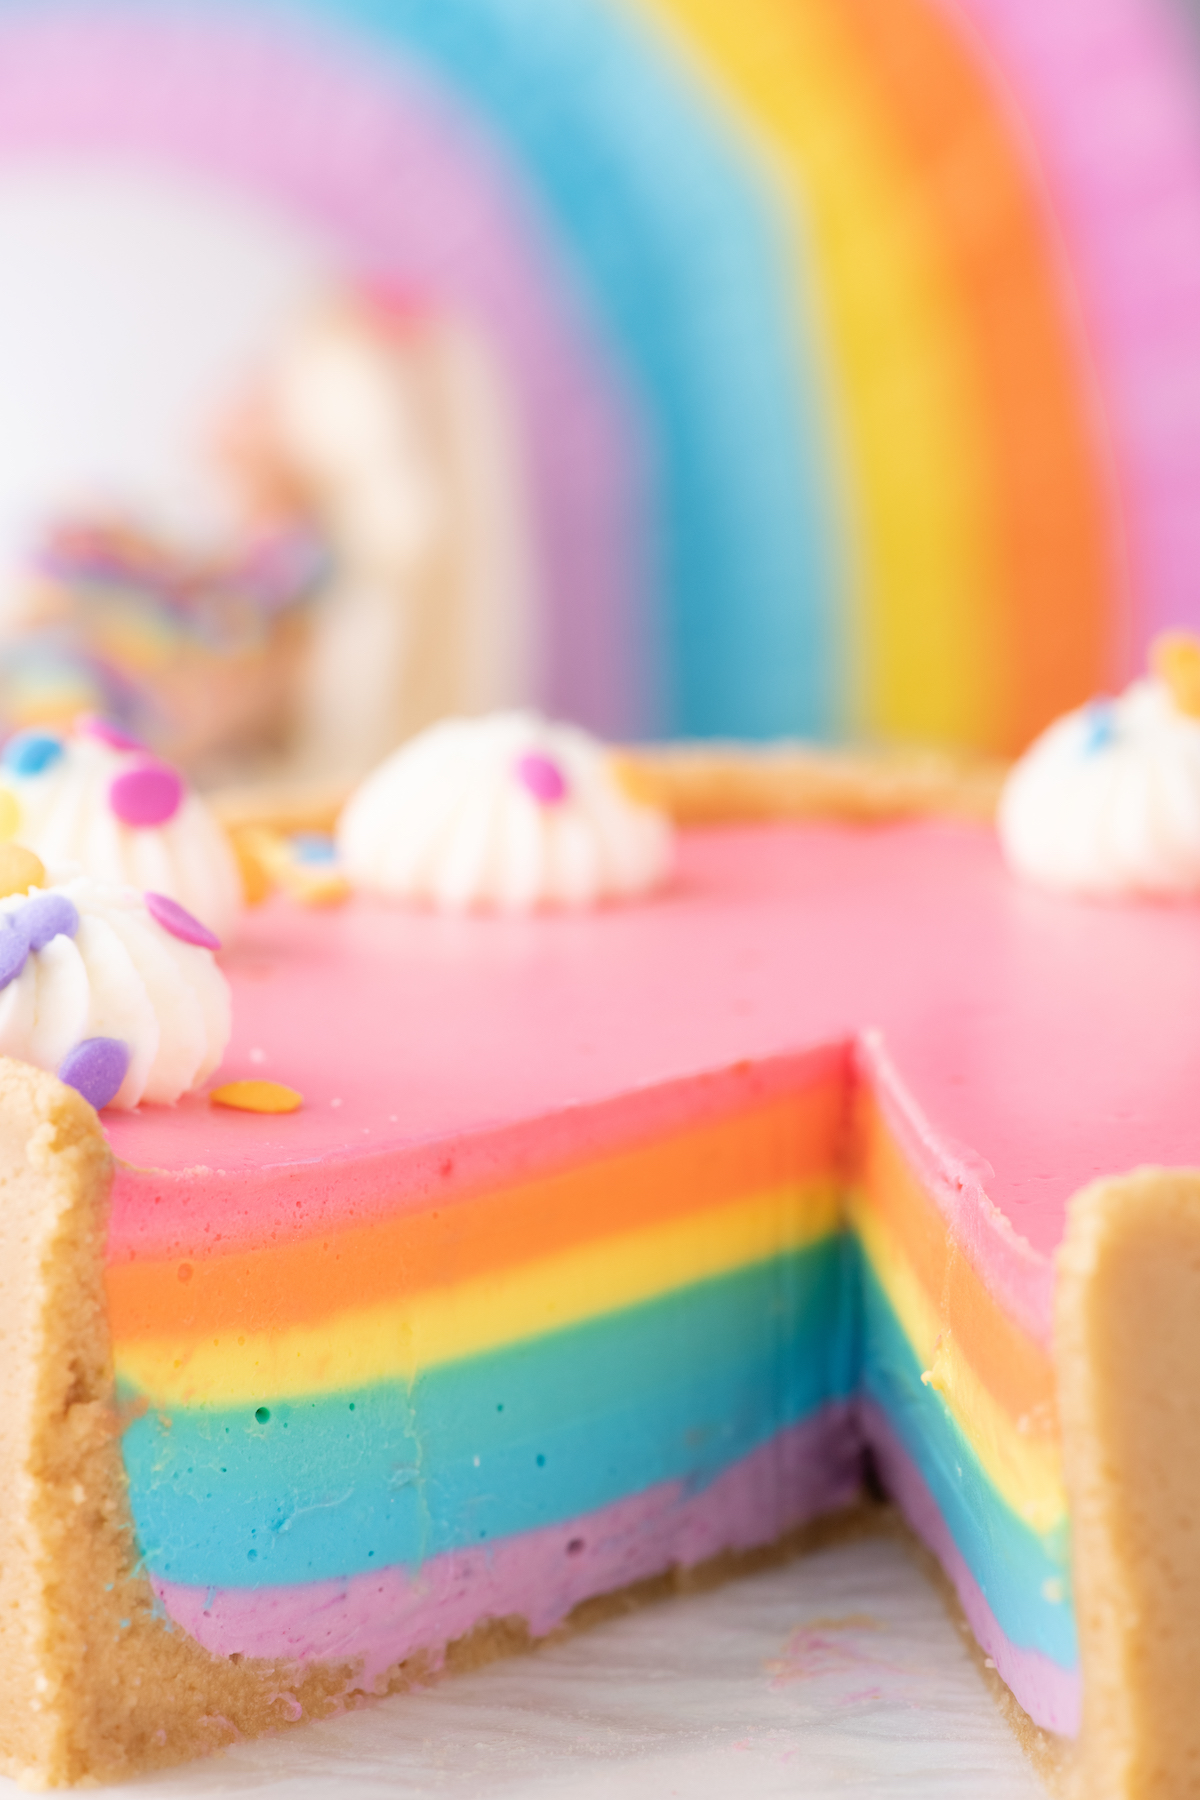
Want another stunning treat to steal the show? Check out this pastel rainbow cheesecake. Bonus, it's no bake.
For another no bake treat, check out this Rice Krispies cake, too.
Need to keep everyone cool? Try these Rainbow Ice Pops.
Funfetti Rainbow Cake
Wonderful funfetti rainbow cake made from scratch. The perfect dessert for any of your celebrations from birthdays and beyond.
Ingredients
- CAKE:
- 2 cups (280 grams) all-purpose flour*
- 1 teaspoon baking powder
- ¼ teaspoon salt
- ¾ cup (170 grams) unsalted butter, softened (if cold from fridge, heat on high in microwave for 30 seconds)
- 1 ¼ cups (250 grams) granulated sugar
- 2 large eggs, room temperature
- 2 teaspoons vanilla extract
- ¾ cup milk, room temperature
- 2 tablespoons vegetable oil
- ½ cup sprinkles**
- FROSTING:
- 1 ½ cups (340 grams) unsalted butter, softened
- 5 cups (600 grams) confectioners’ sugar
- 1 tablespoon vanilla extract
- gel food coloring: red, orange, yellow, green, blue, purple
Notes
* It is important to measure out the flour accurately. Too much or too little flour will affect how the cake turns out. To accurately measure the flour, either use a food scale to measure out the grams exactly or use the spoon and scoop method. The spoon and scoop method means you put the measuring cup on the counter then use a spoon to scoop flour directly out of the bag and lightly place it into the cup. If you use the measuring cup to scoop flour directly from the bag, you’ll likely end up with 25% more flour than you actually need. This is because the flour gets packed down into the cup.
** Use the jimmy style of sprinkles (long oval style) not the nonpareils (small ball style) as the nonpareils tend to bleed color into the batter.
Recommended Products
As an Amazon Associate and member of other affiliate programs, I earn from qualifying purchases.


Making a Funfetti Rainbow Cake is not as complicated as it seems. With the right ingredients, creativity, and some patience, you can create a colorful masterpiece that's sure to impress anyone at the party.
Don't be afraid to play around with different colors and decorations to make it unique!
So, go ahead and bake this cake for your next celebration and watch as your guests enjoy every bite. Happy baking!
If you make this magical cake, I would love to see it! Tag @cutefetti on social media!