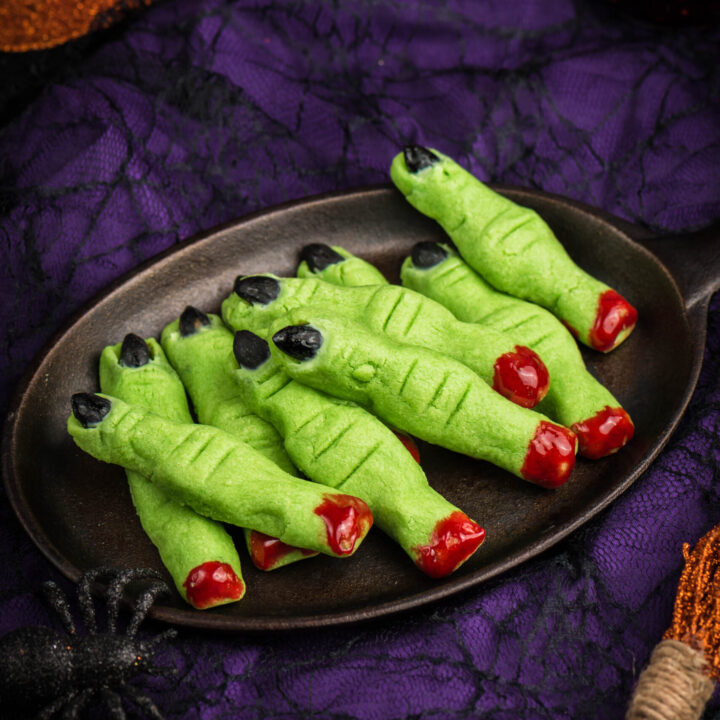
Sugar Cookie Witch Fingers for Halloween
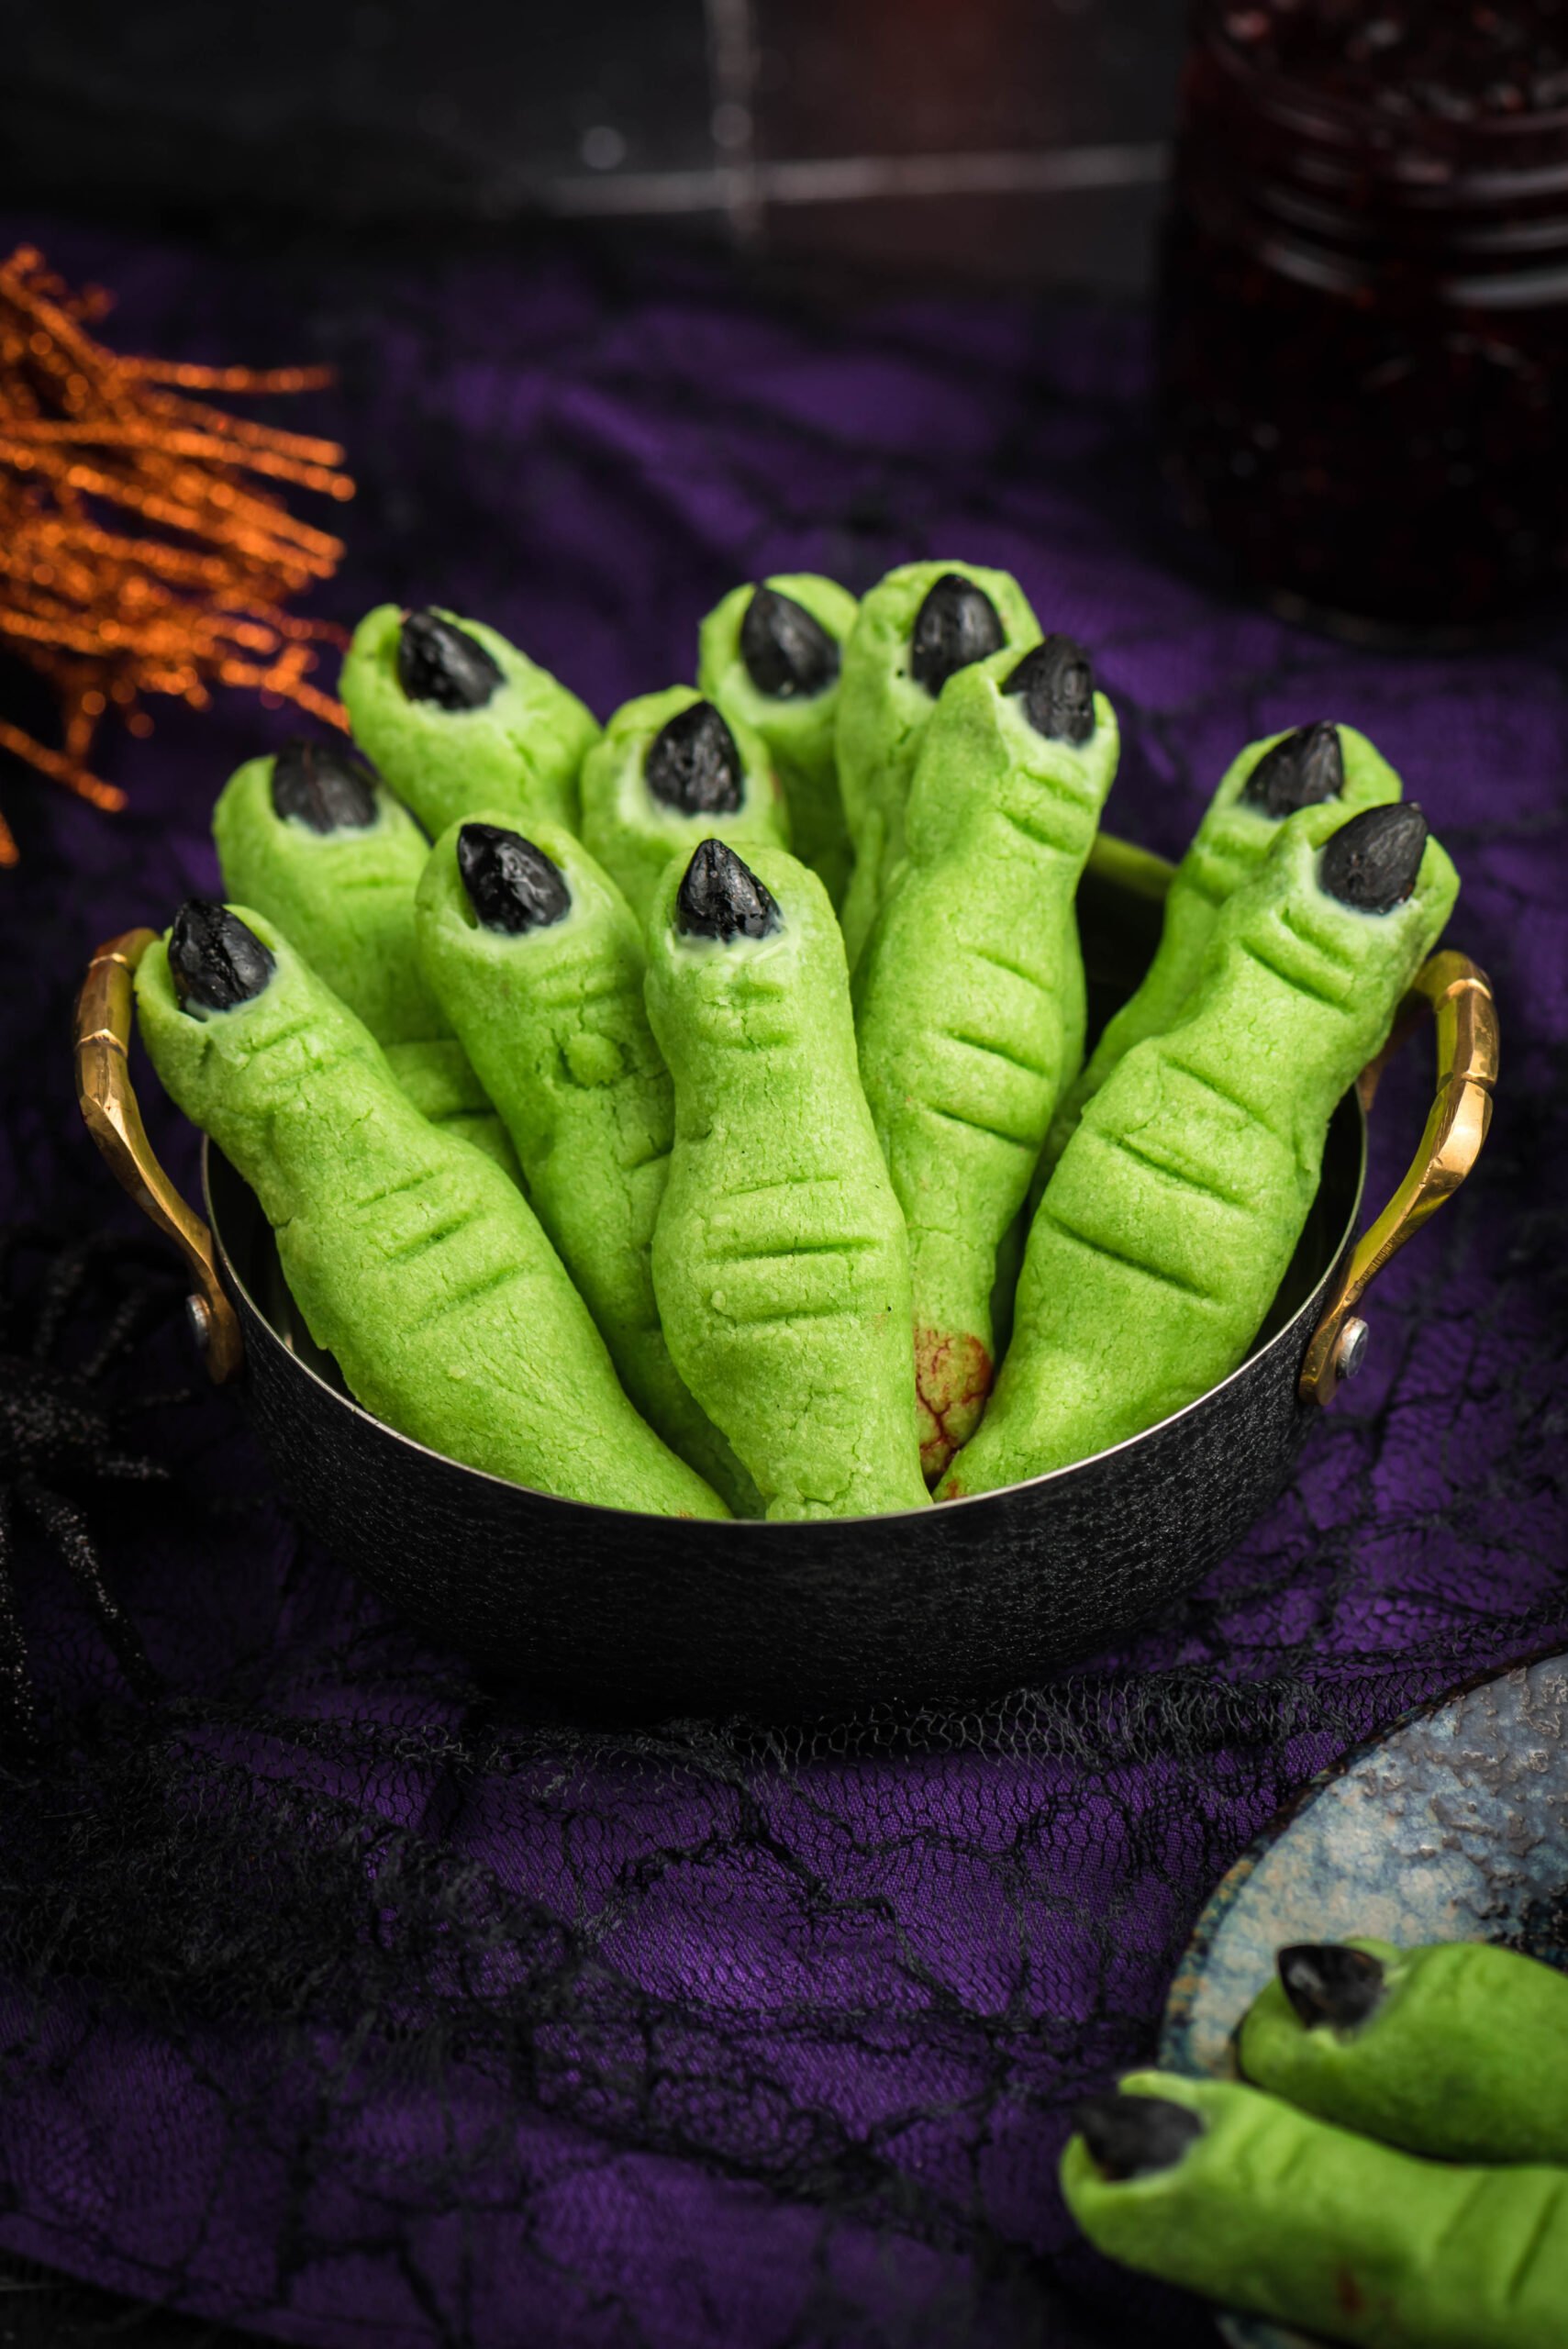
If you're looking for a tasty Halloween treat that is not only delicious but also green, then these Witch Finger Cookies are the perfect choice. These sweet sugar cookie witch fingers are as ugly as they are cute! Witch better have my... cookies!

Halloween is coming up soon, which means it's time to make some spooky treats!
Let's get our creep on.
GREEN WITCH FINGER COOKIES FOR HALLOWEEN
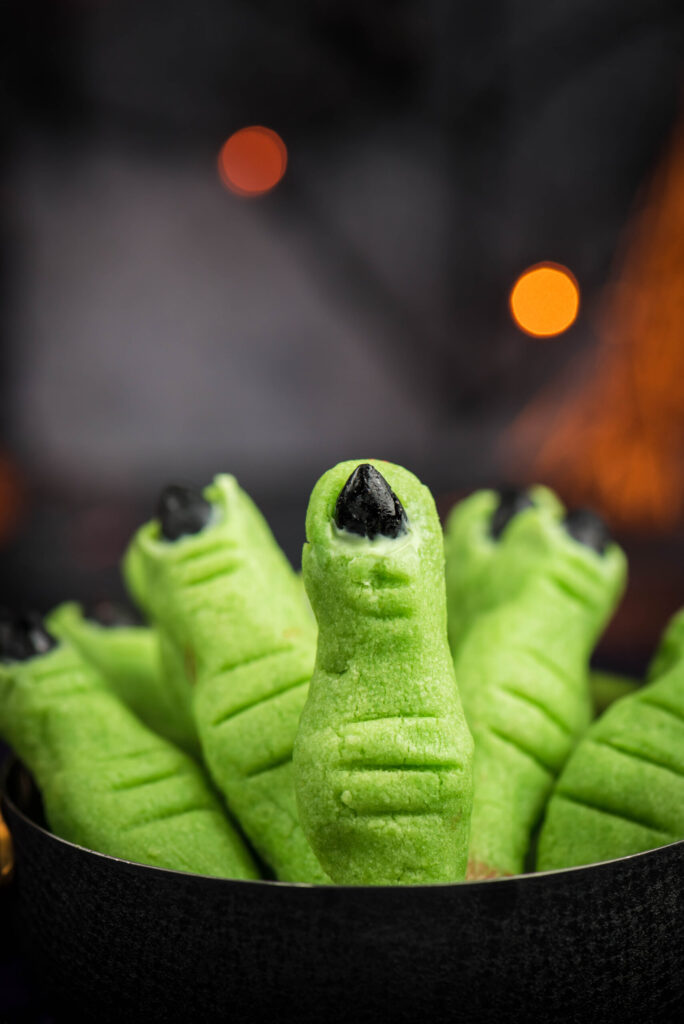
Green witch fingers with black fingernails will make for the best Halloween party food.

GREEN WITCH FINGERS COOKIES INGREDIENTS
This recipe for green witch finger cookies is perfect for Halloween.
The ingredients are pretty simple and you can make them with your kids!
Here is a list of the ingredients here and then scroll down to read all the steps to follow this easy recipe are listed below.
- Non Stick Cooking Spray or Parchment Paper
- All Purpose Flour
- Baking Powder
- Salt
- Salted Butter
- Sugar
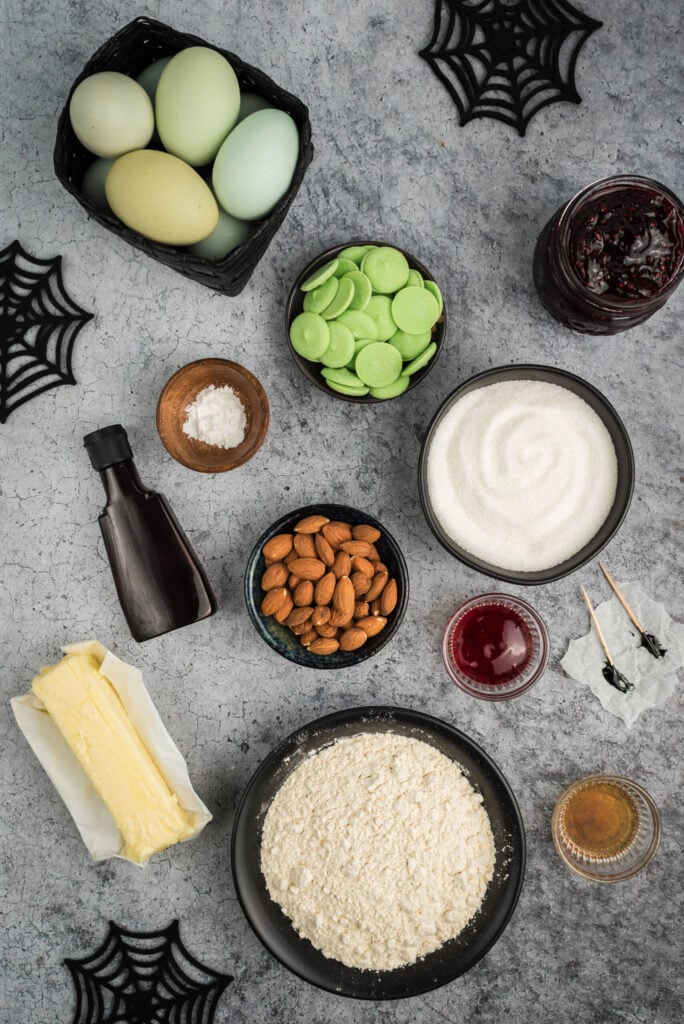
- Egg
- Almond Extract
- Vanilla Extract
- Green Food Coloring, Liquid or Gel
- Raw WholeAlmonds
- Black Food Coloring Gel
- Green or Red Candy Melt
Optional: Raspberry or strawberry jam and Wilton Blood Red Glaze or Wilton Red Sparkle Gel.
HOW TO MAKE GREEN WITCH FINGERS COOKIES
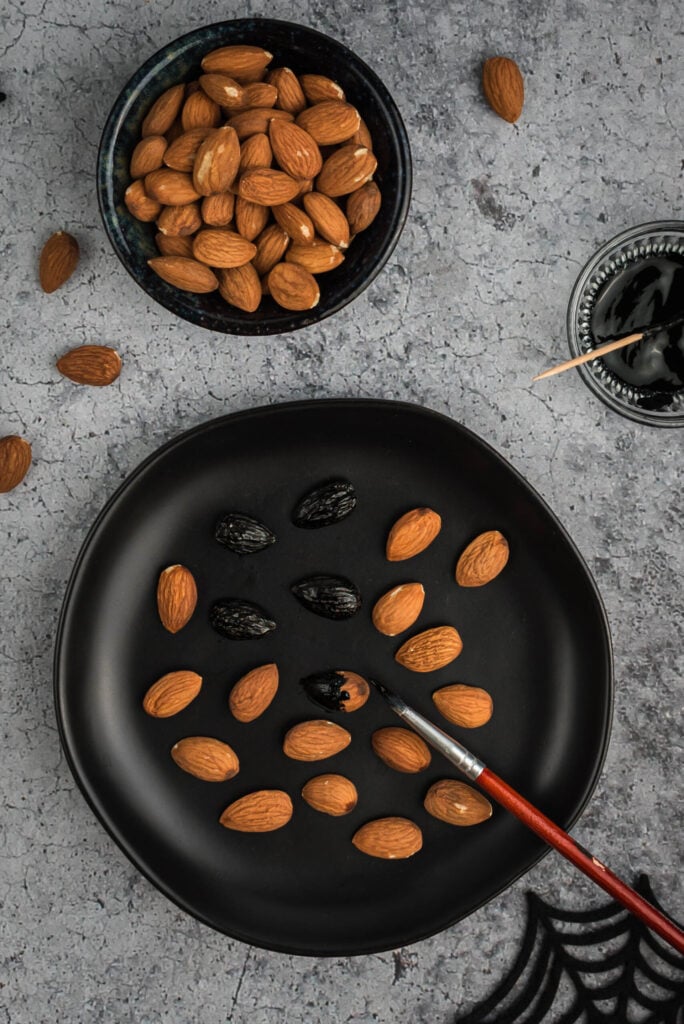
To get started, we will first roast the almonds on an ungreased baking sheet. Then, after they cool, it's time to paint them black.
Get the full step by step printable at the bottom of this post.
Then, we will start preparing the cookie dough by whisking the dry ingredients together in a small bowl and set aside.
Next, beat butter and sugar with a handheld mixer on medium speed in a medium bowl.
When the mixture is light and fluffy, it's time to add almond and vanilla extract as well as a small drop of green food coloring, and egg until blended.
Add the flour mixture to the wet mixture on low speed for 1 minute on medium low speed. Scrape down sides of bowl until the mixture is combined and you no longer see any dry flour. The dough will be crumbly, but will hold together.
Cover the dough with plastic wrap and then make sure to chill in the refrigerator for at least 30 minutes.
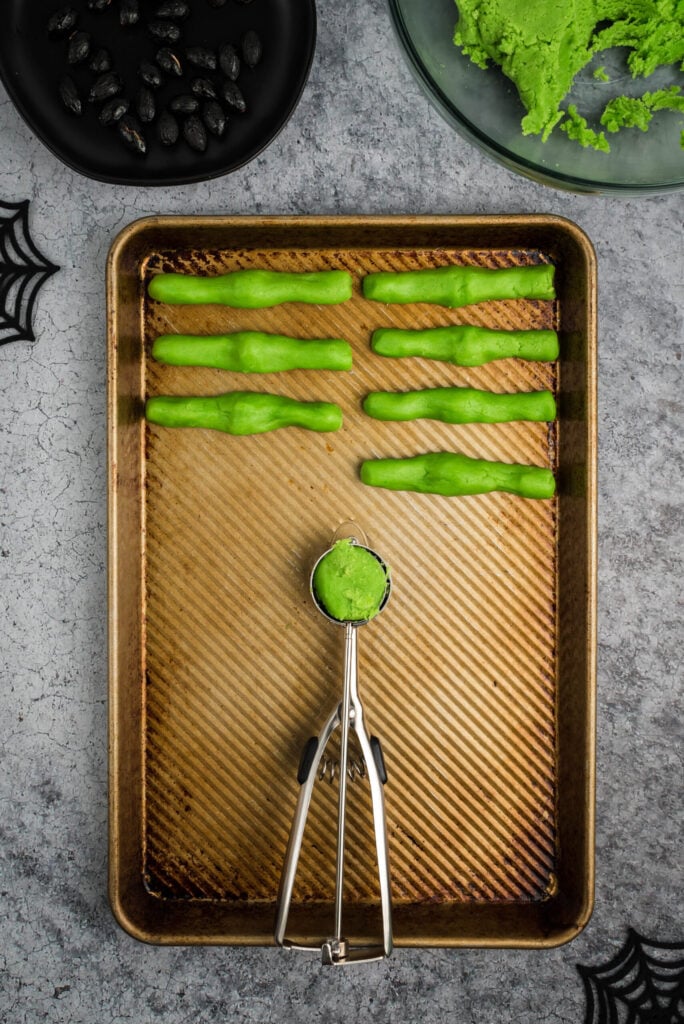
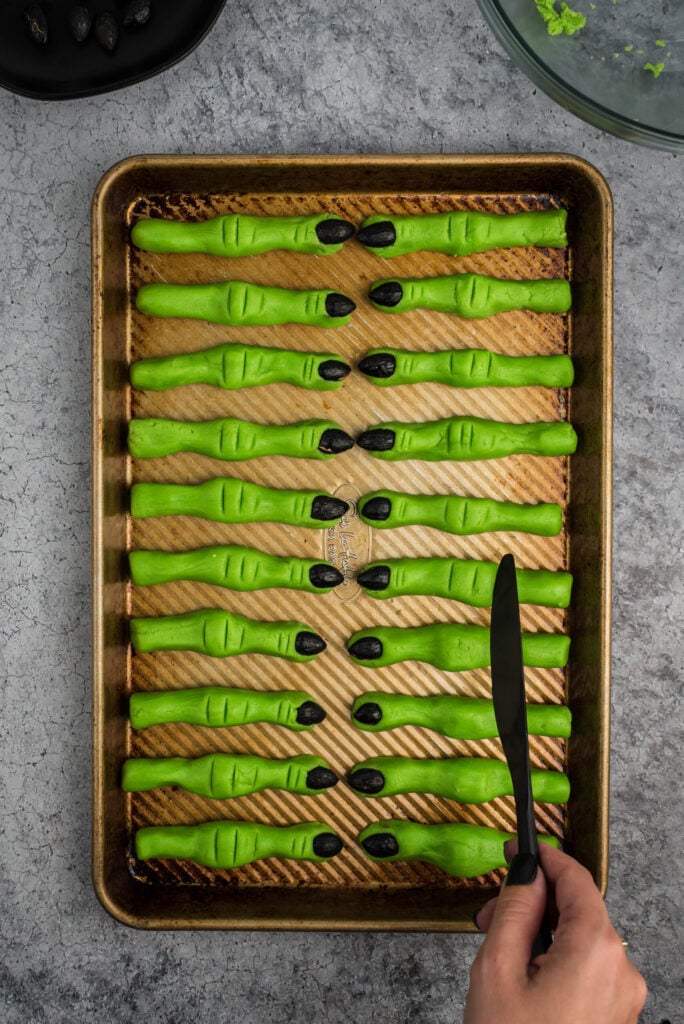
Make even sized balls of the green dough using a 1 ½ Tablespoon sized cookie scoop. Using your own index finger as a guide, shape each ball into long finger shapes.
The cookies will expand during baking, so be sure not to shape them too wide.
Insert almonds into finger tip area at the top of each cookie.

Using your fingers to squeeze just below and above where you’d like the knuckle to be.
Then, use a small butter knife to make small indents on the knuckle and a couple more just below the almond fingernail.
Arrange the cookies on a baking sheet with at least 1” spacing between each. Then, chill the cookies on the baking sheet for 20 minutes.
Once chilled, immediately bake the cookies on middle and top rack for 15-18 minutes. Rotate the baking sheets halfway through the baking process, until the underside is just starting to turn golden brown, and cookies appear dry on top. Keep an eye on them so as to not over bake.
If the cookies expand too much during the baking process, immediately take two butter knives or the back of two small spoons and gently press the cookies back into shape with the flat sides of the knives/spoons. Then, cool the cookies completely.
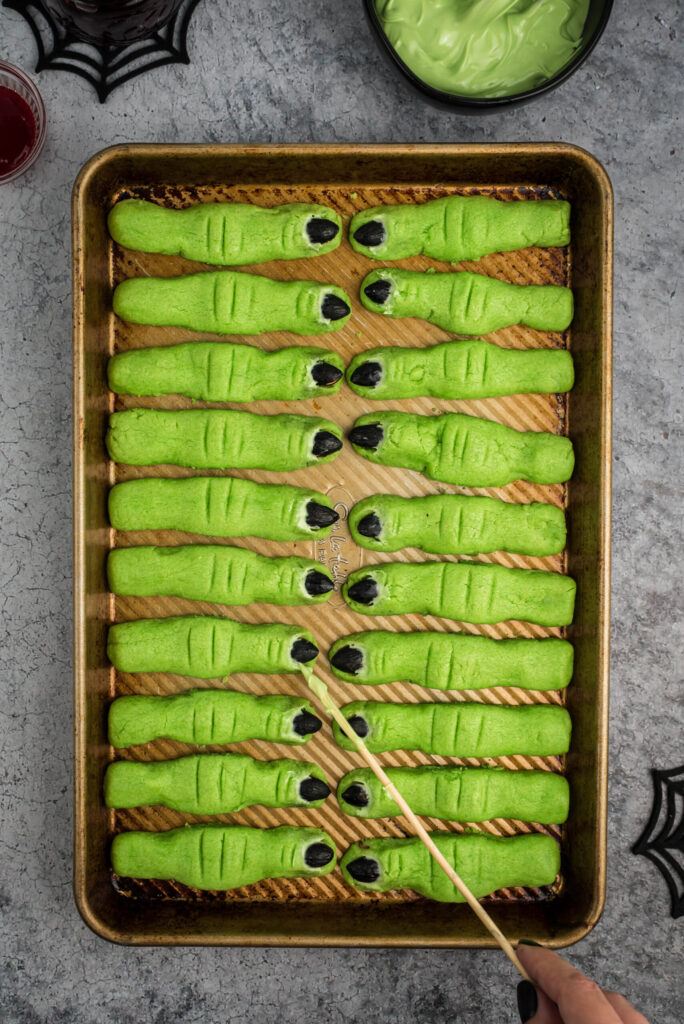
Meanwhile, melt your choice of green or red candy melts, following the melting instructions on bag. Create a gross "cuticle by using a toothpick to put a small ribbon of candy melts between the almond and the cookie.
This is important because it will help the almond stay in place. Wipe excess candy melts off cookie and almond.
Once the candy melts firm up, the cookies are ready to enjoy.
HOW TO SERVE WITCH FINGERS HALLOWEEN COOKIES?
As a final step to make the cookies stand out, you can dip the blunt end of the finger in warm raspberry jam, or drizzle with blood red glaze or sparkle gel.
You can also store the cookies in freezer for up to 2 weeks.
Let the kids go wild shaping gnarly, lumpy and bumpy finger cookies, don’t forget to add on a few warts!
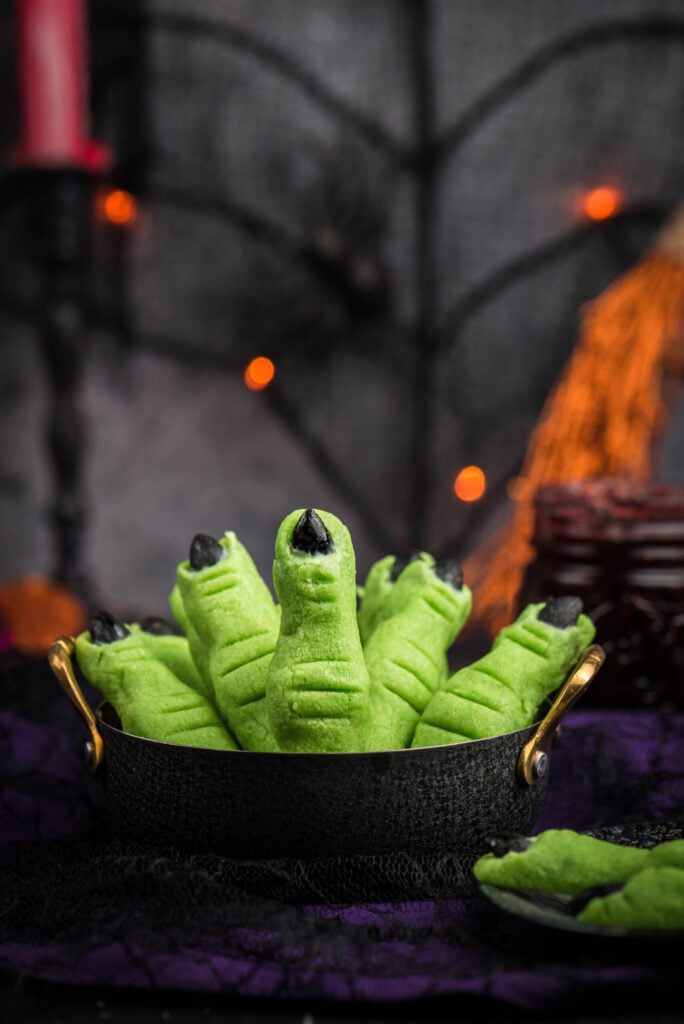
Serve with warm raspberry or strawberry jam.
SPOOKY HALLOWEEN COOKIES
Looking for more Halloween cookies for your spooky plans? Here are a few more recipes that I think you will love.
Halloween is just around the corner which can only mean one thing: it's time for spooky foods that will get everyone in the Halloween spirit!
With this season comes all kinds of awesome snacks like ghost-shaped pizza but my personal favorite has got to be Halloween themed desserts.
These are some more super cute and creepy Halloween Cookies for you to try.
Learn how to make easy Halloween cookies. These cute and funny green sugar cookies are perfect for a party or just enjoying with your family at this spooky time of year!
Green Sugar Cookie Witch Fingers
Ingredients
- Non stick cooking spray or parchment paper
- 2 cups all purpose flour
- ½ teaspoon baking powder
- ¼ teaspoon salt
- ½ cup salted butter, room temp
- 1 cup sugar
- 1 large egg, room temp
- ½ teaspoon almond extract
- 1 teaspoon vanilla extract
- Green food coloring, liquid or gel
- 26 raw whole almonds, unsalted
- Black food coloring gel (optional)
- ¼ cup green or red candy melts
- Raspberry or strawberry jam (optional)
- Blood red glaze (optional)
- SPECIAL TOOLS:
- Small paint brush
- Toothpicks
Instructions
- Preheat oven to 325℉. Spray 2 large baking sheets with non stick cooking spray, or line with parchment paper, set aside.
- Roast the almonds. Roast almonds on a small ungreased baking sheet for 5 minutes at 325℉. Cool to room temp.. If you want black finger nails; Working on a small ungreased baking sheet, use a toothpick to remove a drop of black gel food coloring from jar and add to a small bowl. Add about 5-8 drops of water and stir with toothpick to thin food coloring gel. Use a small paintbrush to paint a VERY thin layer of food coloring onto one side of each almond, holding almond with a gloved hand to avoid staining. Roast 5-7 minutes. Cool. *See notes*
- In a small bowl, whisk together the flour, baking powder, and salt. Set aside.
- In a large bowl, beat butter and sugar with a handheld mixer on medium speed until light and fluffy. Add almond extract, vanilla extract, a small drop of green food coloring, and the egg. Mis until just combined.
- Mix in the flour mixture into the wet mixture on low speed for 1 minute. Scrape down sides of bowl. Mix on medium low speed until combined and you no longer see dry flour. It will be crumbly, but hold together and look shiny when squeezed. Cover dough with plastic wrap and chill for at least 30 minutes.
- Use a 1 ½ Tablespoon cookie scoop, form balls of dough into long finger shapes, using your own index finger as a guide for size. They will expand during cooking, so do not make them too wide. Squeeze just below and above where you’d like the knuckle. Insert almonds into finger tips. Use a small butter knife to make small indents on the knuckle and just below the almond fingernail. Arrange cookies with at least 1” spacing between each. Chill for 20 minutes.
- Bake cookies on middle and top rack for 15-18 minutes, rotating pans halfway through, until the underside is just starting to turn golden brown, and cookies appear dry on top. Do not over bake.
- If cookies expand too much during cooking; as soon as cookies come out of the oven, take two butter knives or the back of two small spoons and gently press the cookies back into shape with the flat sides of the knives/spoons. Work quickly and carefully. Cool completely.
- Melt green or red candy melts, following melting instructions on bag. Use a toothpick to put a small ribbon of candy melts between the almond and the cookie, creating a gross “cuticle” which helps the almond stay in place. Wipe excess candy melts off of cookie and almond.
- If desired, dip the blunt end of the finger in warm raspberry jam, or drizzle with blood red glaze! Cool completely. Serve right away with a bowl of warm jam for dipping, or store cookies in freezer for up to 2 weeks.
Notes
This spooky dessert is sure to be an instant hit at your Halloween party or get-together so don't forget about them when it's time to plan your festive celebrations!
If you make these Halloween cookies, tag @cutefetti so I can see them!


If you use the cocoa roasted almonds- they stick to the cookie, you don’t have to paint and they darken as they cook-
I tried painting and it pushed me over the edge-but this worked great!