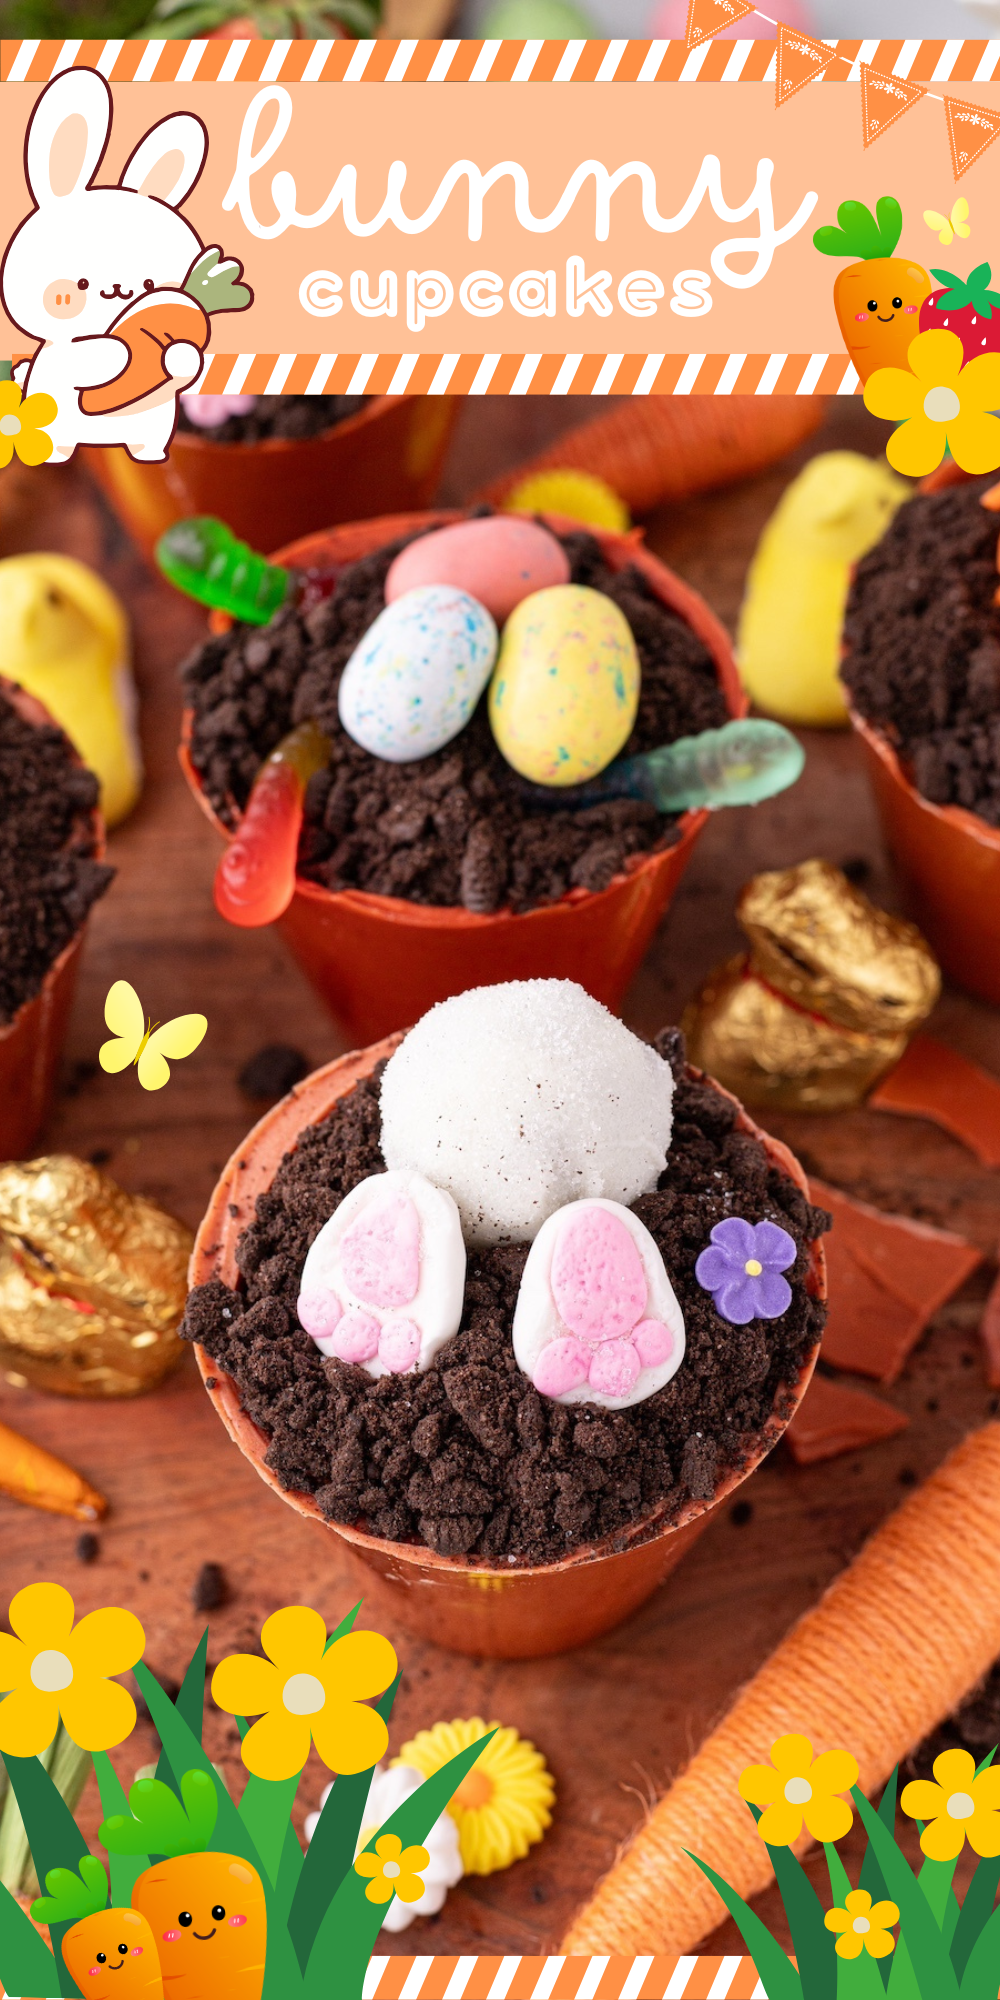
How to Make The Cutest Flower Pot Cupcakes
Make spring sweeter with Flower Pot Cupcakes! Enjoy layers of brownies, pudding, and Oreos topped with playful bunny-themed designs everyone will love. This post may contain affiliate links.
Flower pot cupcakes are a creative and delightful treat that'll brighten up any celebration. Whether you're planning for a birthday, a themed party, or just looking for a fun activity to enjoy with kids, these edible "flowerpots" are as enjoyable to make as they are to eat. They combine playful designs with delicious layers for a dessert that truly stands out.
Why You'll Love It
They're an Adorable Showstopper
Flower Pot Cupcakes are not just a dessert—they’re a conversation piece! The vibrant designs mimic real flower pots, making them a feast for the eyes before they’re ever eaten.
Perfect for Any Occasion
From springtime brunches to tea parties, these cupcakes bring a special touch to any event. You can customize them to match seasonal decor or a specific theme. They’re versatile enough to feature on the dessert table at a birthday party or shine as a stand-alone gift.
Easy and Fun to Customize
What’s even better than enjoying a cute dessert? Making it your own! Personalizing Flower Pot Cupcakes is a breeze. Switch up the colors, add edible decorations, or try a new flavor combination. The options are as endless as your imagination!
Add edible flowers to cups with these Sunflower Cookies with Candy Ladybugs.
Kid-Friendly Entertainment
These cupcakes are a hit with kids and adults alike. Little ones will have a blast helping to assemble and decorate them. As a no-fail addition to family activities, they blend baking, crafting, and snacking into one fun-filled afternoon.
No Design Skills Required
Think you need advanced decorating skills to nail the flowerpot look? Not at all! With simple tools and ingredients, you can create edible masterpieces that look like they came from a bakery.
Pro tip: Use thin plastic cups for shaping the chocolate pots—it makes the process hassle-free and guarantees perfect results.
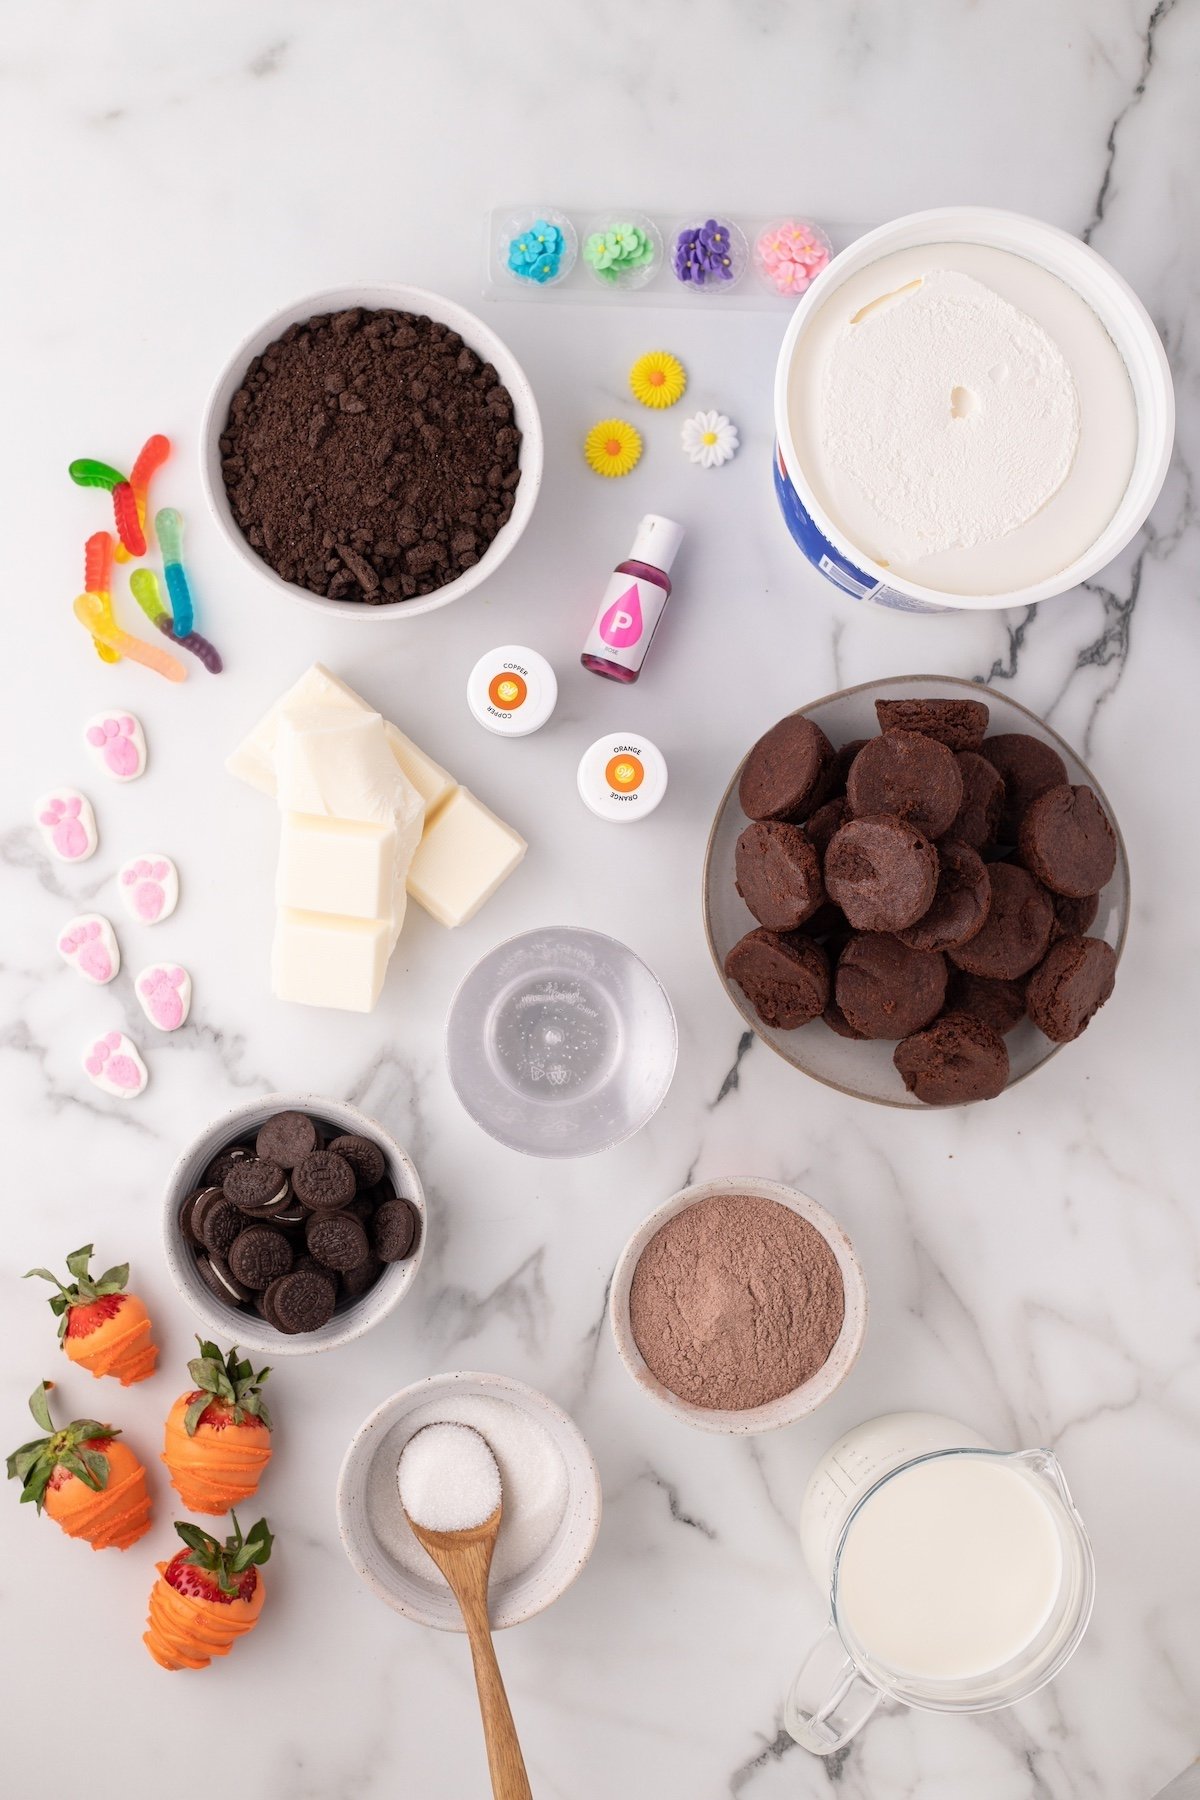
Ingredients
- Whole Milk
- Instant Chocolate Pudding
- Cool Whip
- Crushed Oreos
- Two Bite Brownies
- Plastic Wine Stemless Cups
- Vanilla Almond Bark
- Copper Food Gel and Orange Food Gel
- Pink Food Gel
- Fondant, for bunny feet
- Strawberries, optional for “carrots”
- Sugar Sprinkles
- Gummy Worms
- Candied Flowers
How to Make Adorable Flower Pot Cupcakes
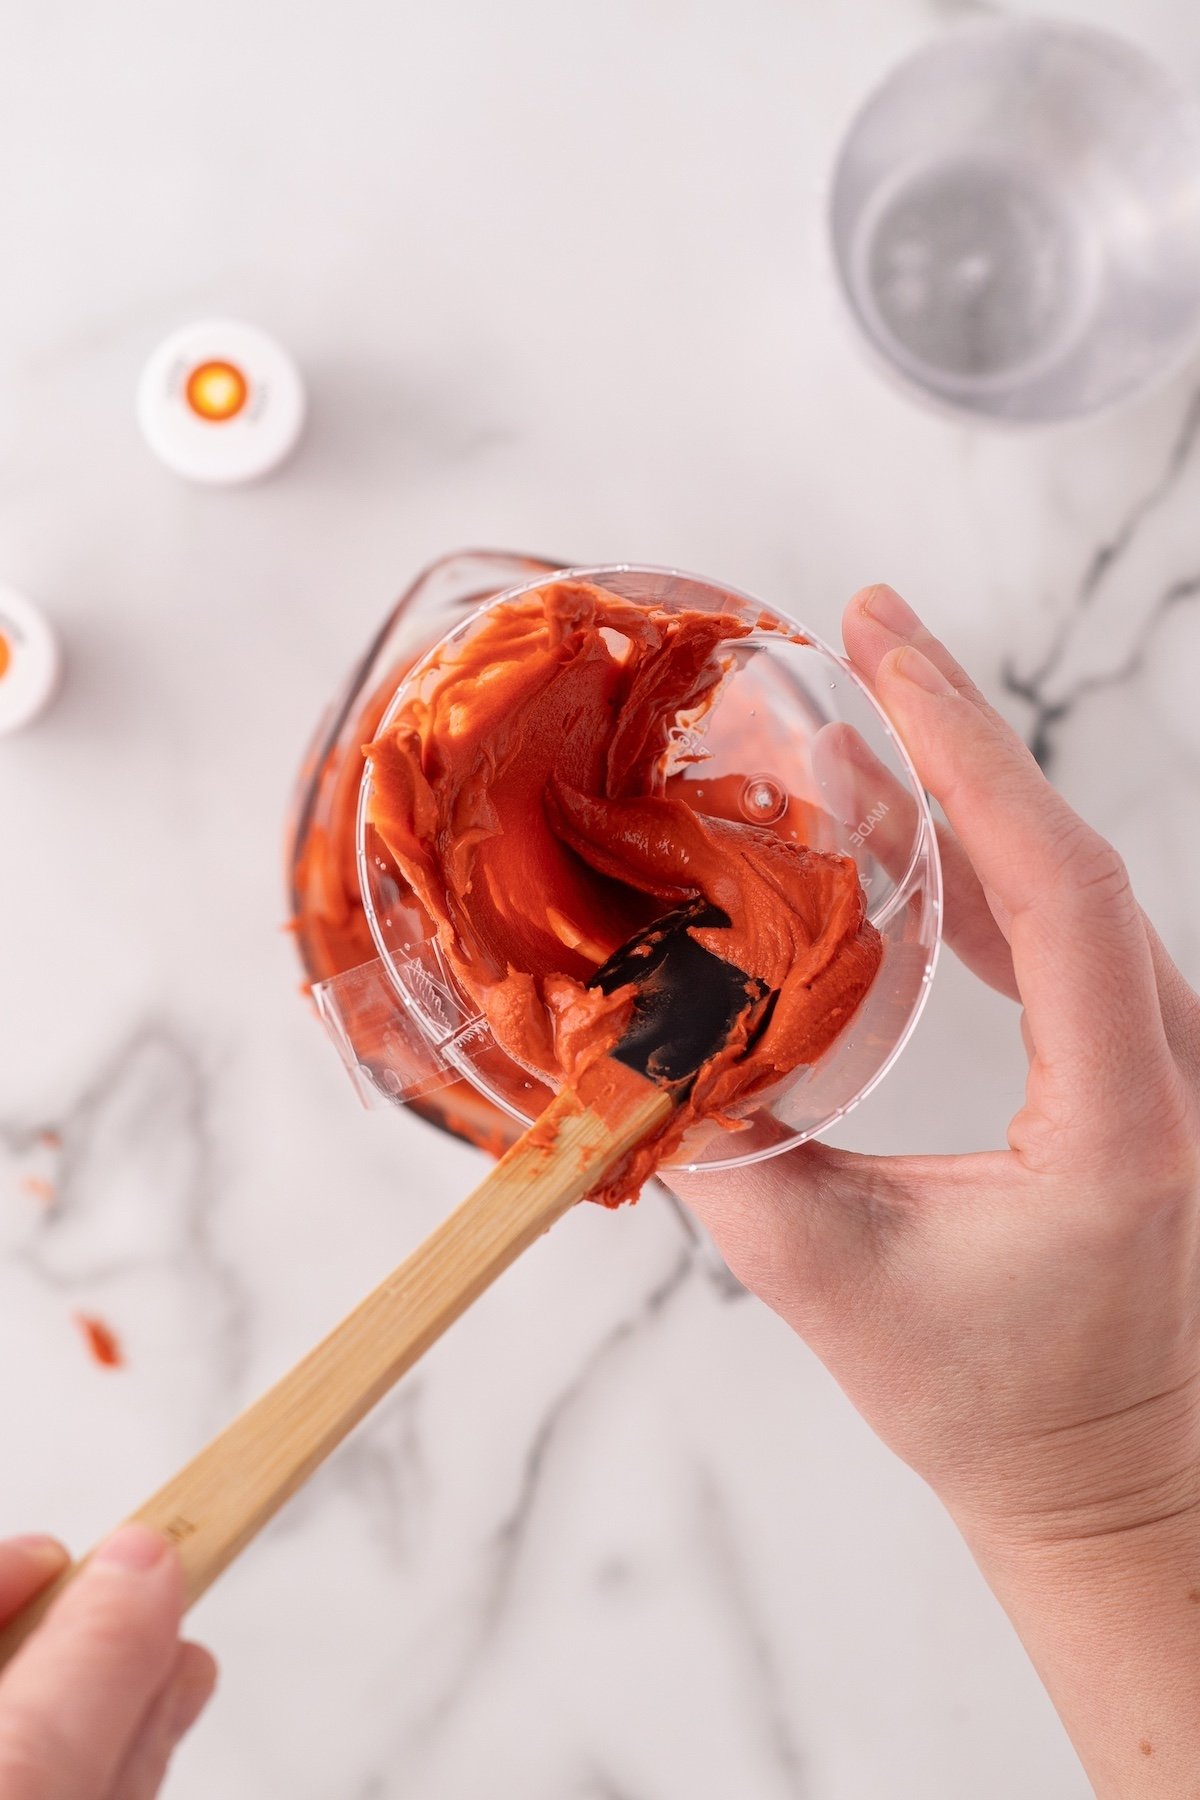
Melt the almond bark in a microwave-safe bowl. Heat in 30-second bursts, stirring each time, until smooth.
Add 3 drops of copper gel coloring, 1-2 drops of orange gel coloring, and 2 teaspoons of coconut oil to the melted almond bark. Mix well to get that terracotta color for your flowerpot.

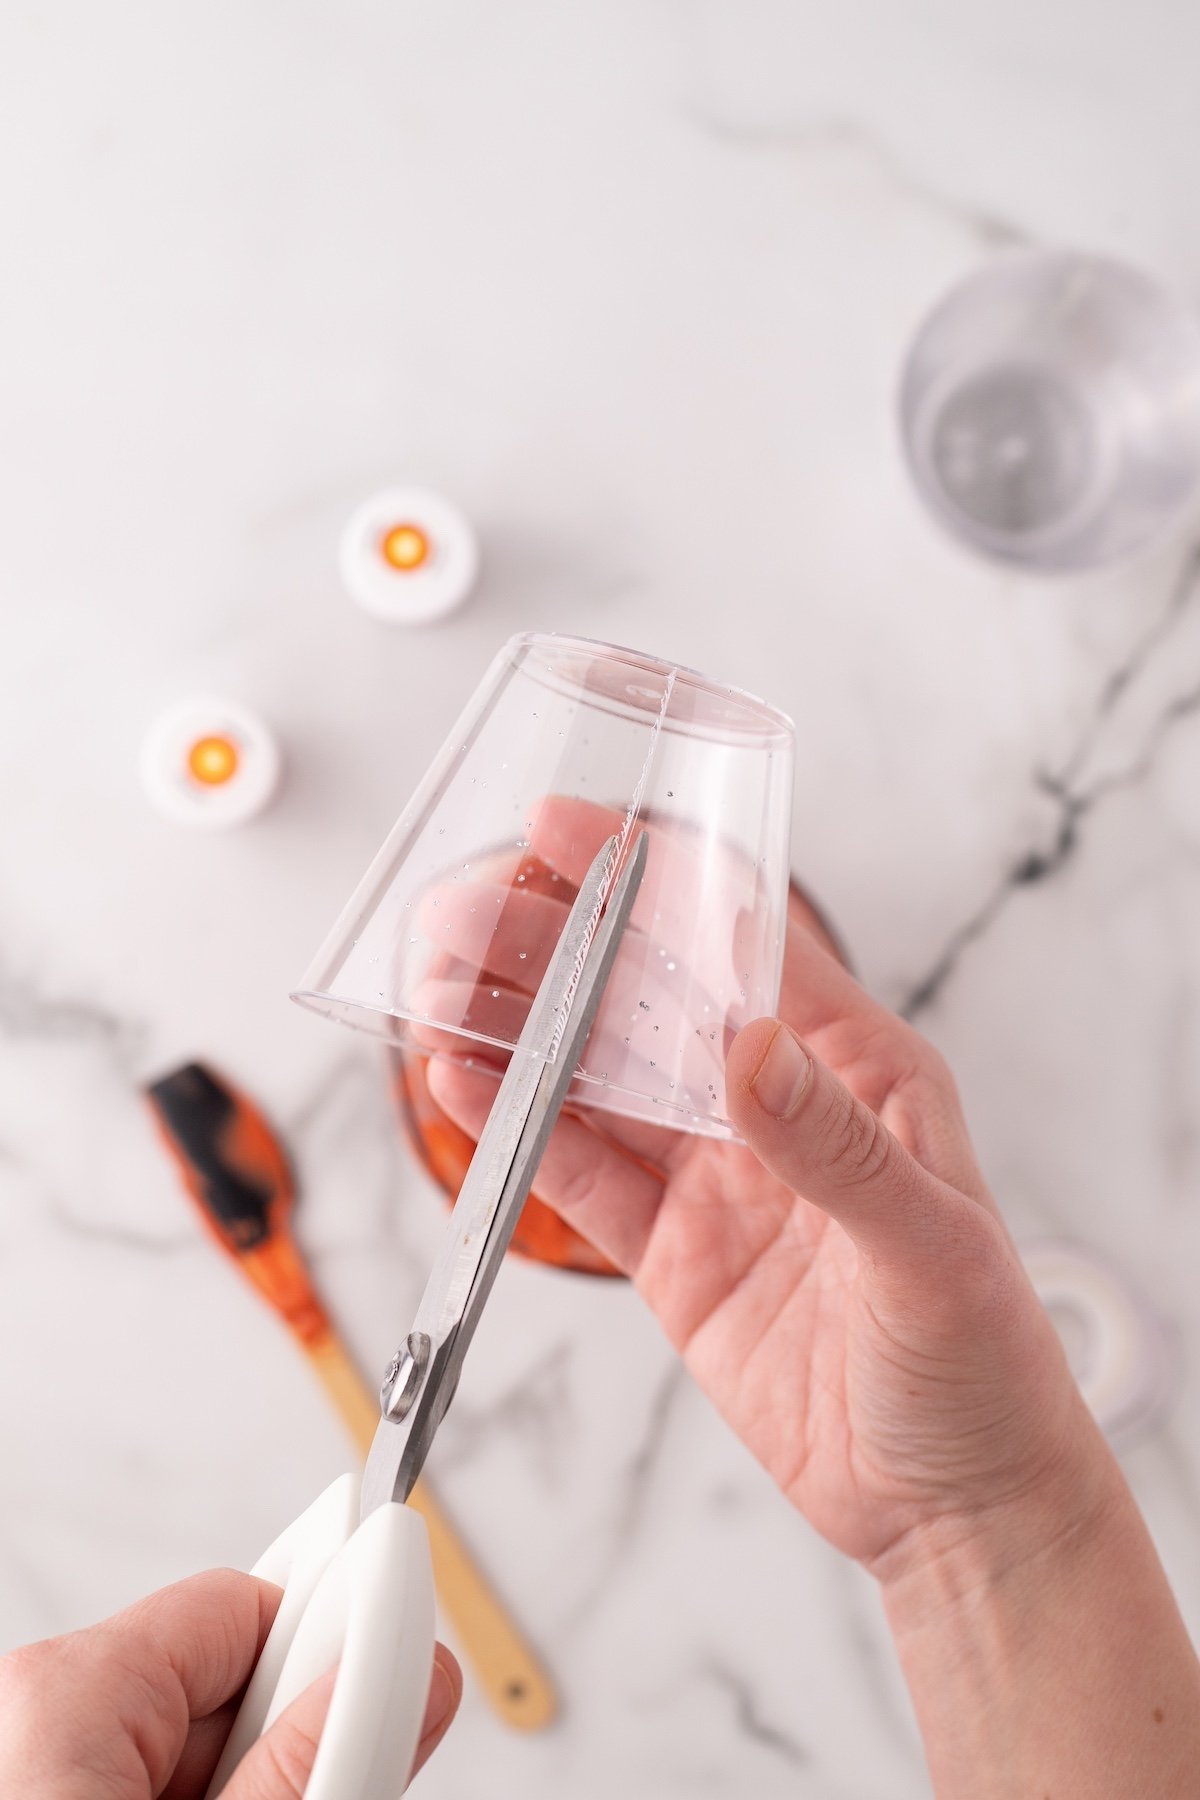
Make the Chocolate Shells
Cut a straight line down the side of a plastic cup. Place a piece of tape on the outside to hold it together and keep the chocolate from leaking. This makes it easier to remove the chocolate later.
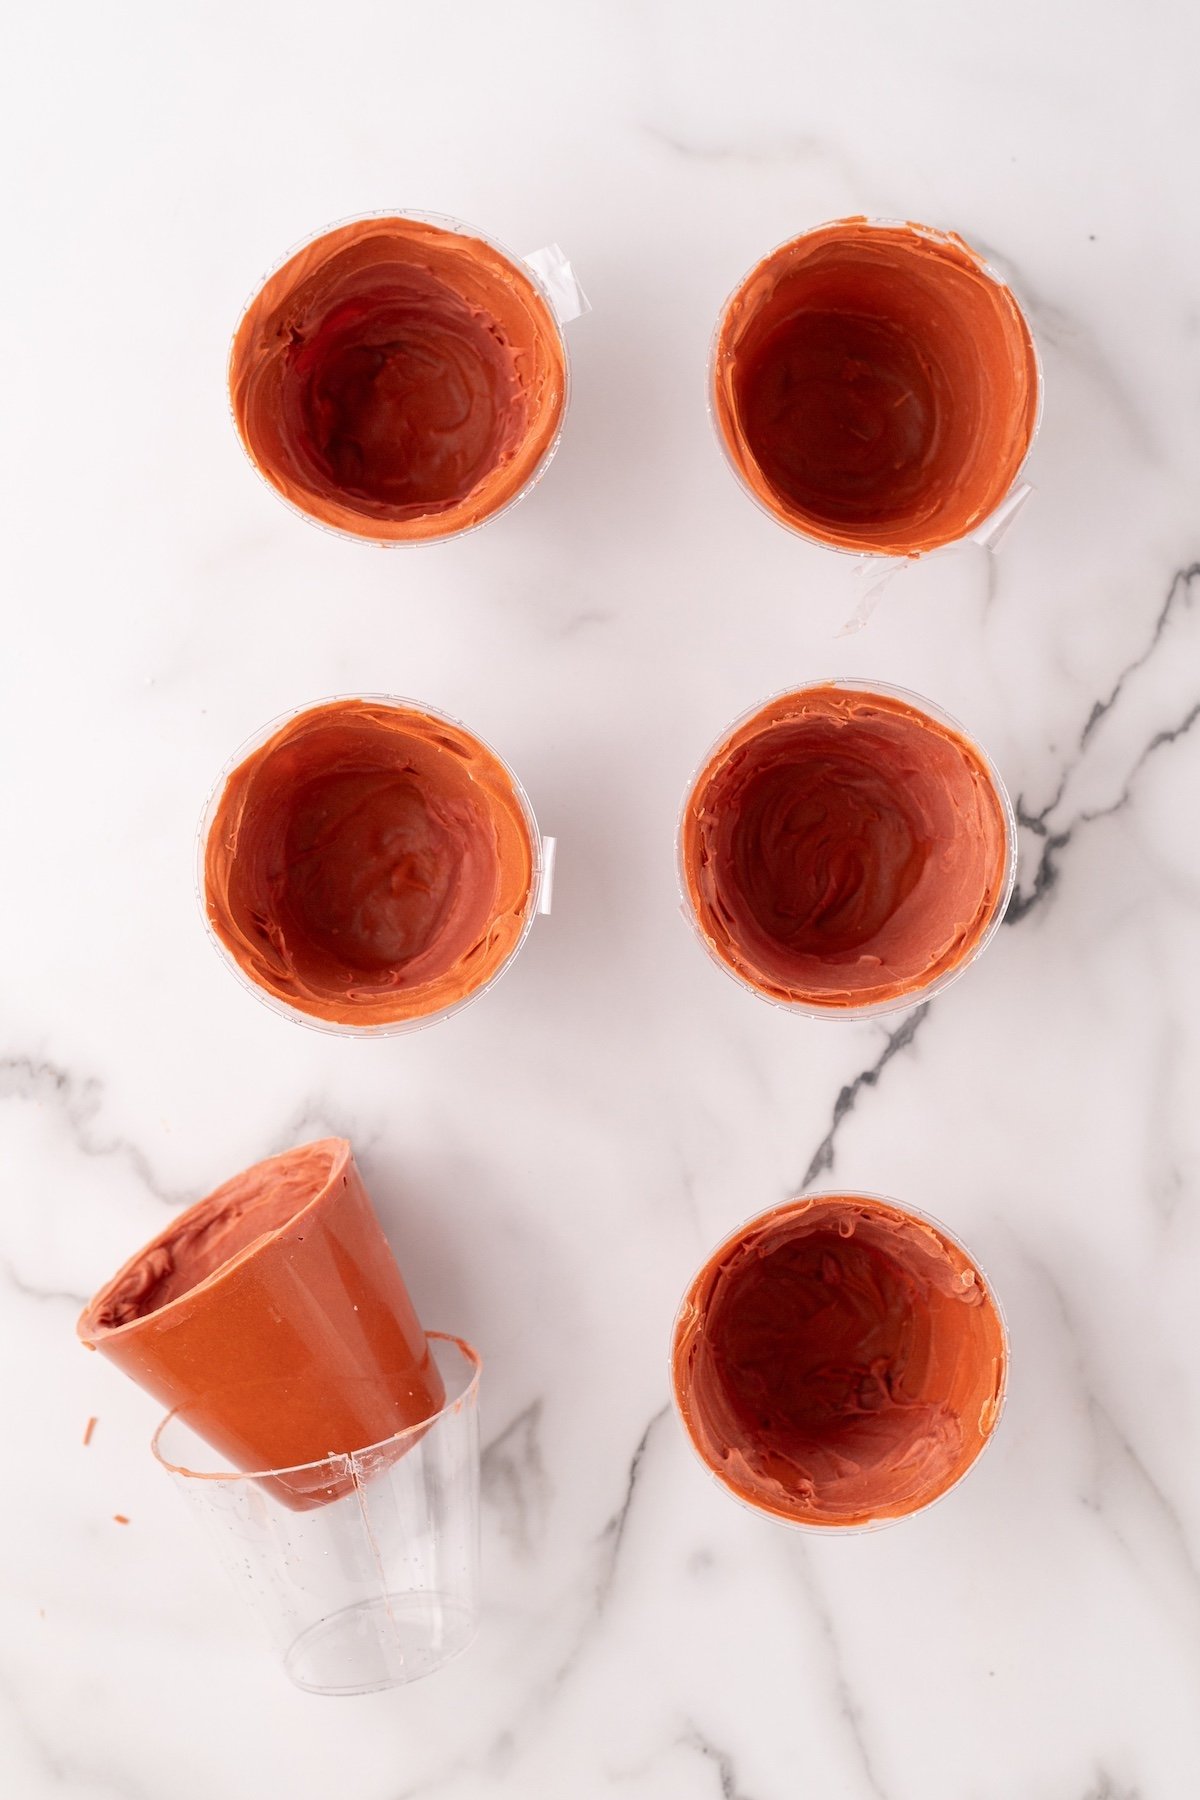
Pour a few tablespoons of melted chocolate into the cup. Swirl it around to coat the entire inside evenly. Tilt the cup as needed to get full coverage.
Turn the cups upside down on a baking sheet lined with parchment paper. Place them in the fridge for about 15 minutes or until firm.
Repeat the process to add another layer of chocolate. This helps create a thicker, sturdier shell.
Once the chocolate hardens, carefully peel away the plastic cup. Remove the tape first, then gently pull the cup off the shell.
Make the Pudding Mixture
In a mixing bowl, whisk the pudding mix and milk until the pudding thickens, about 5 minutes.
Fold in Cool Whip and crushed mini Oreos until combined for a creamy, slightly crunchy texture.
Transfer the pudding mixture into a piping bag for easy assembly.
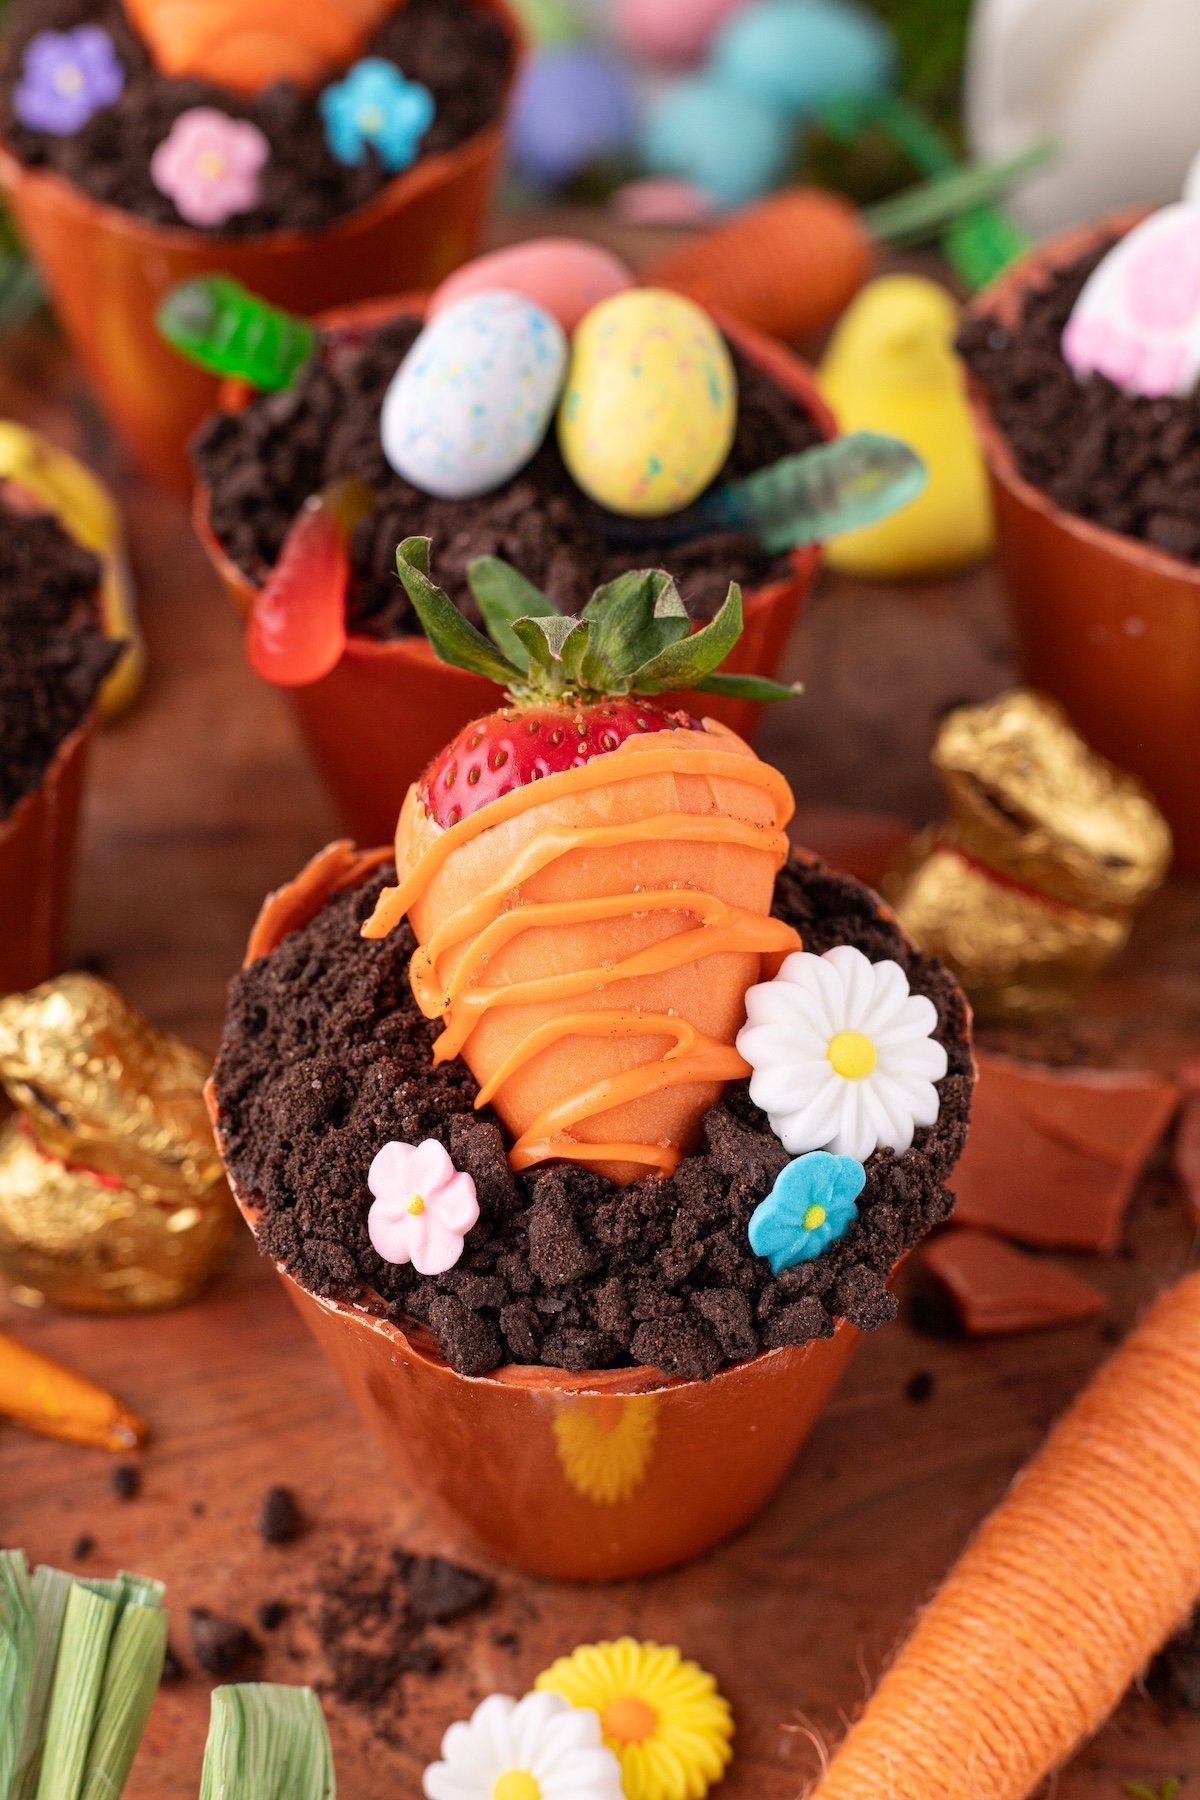
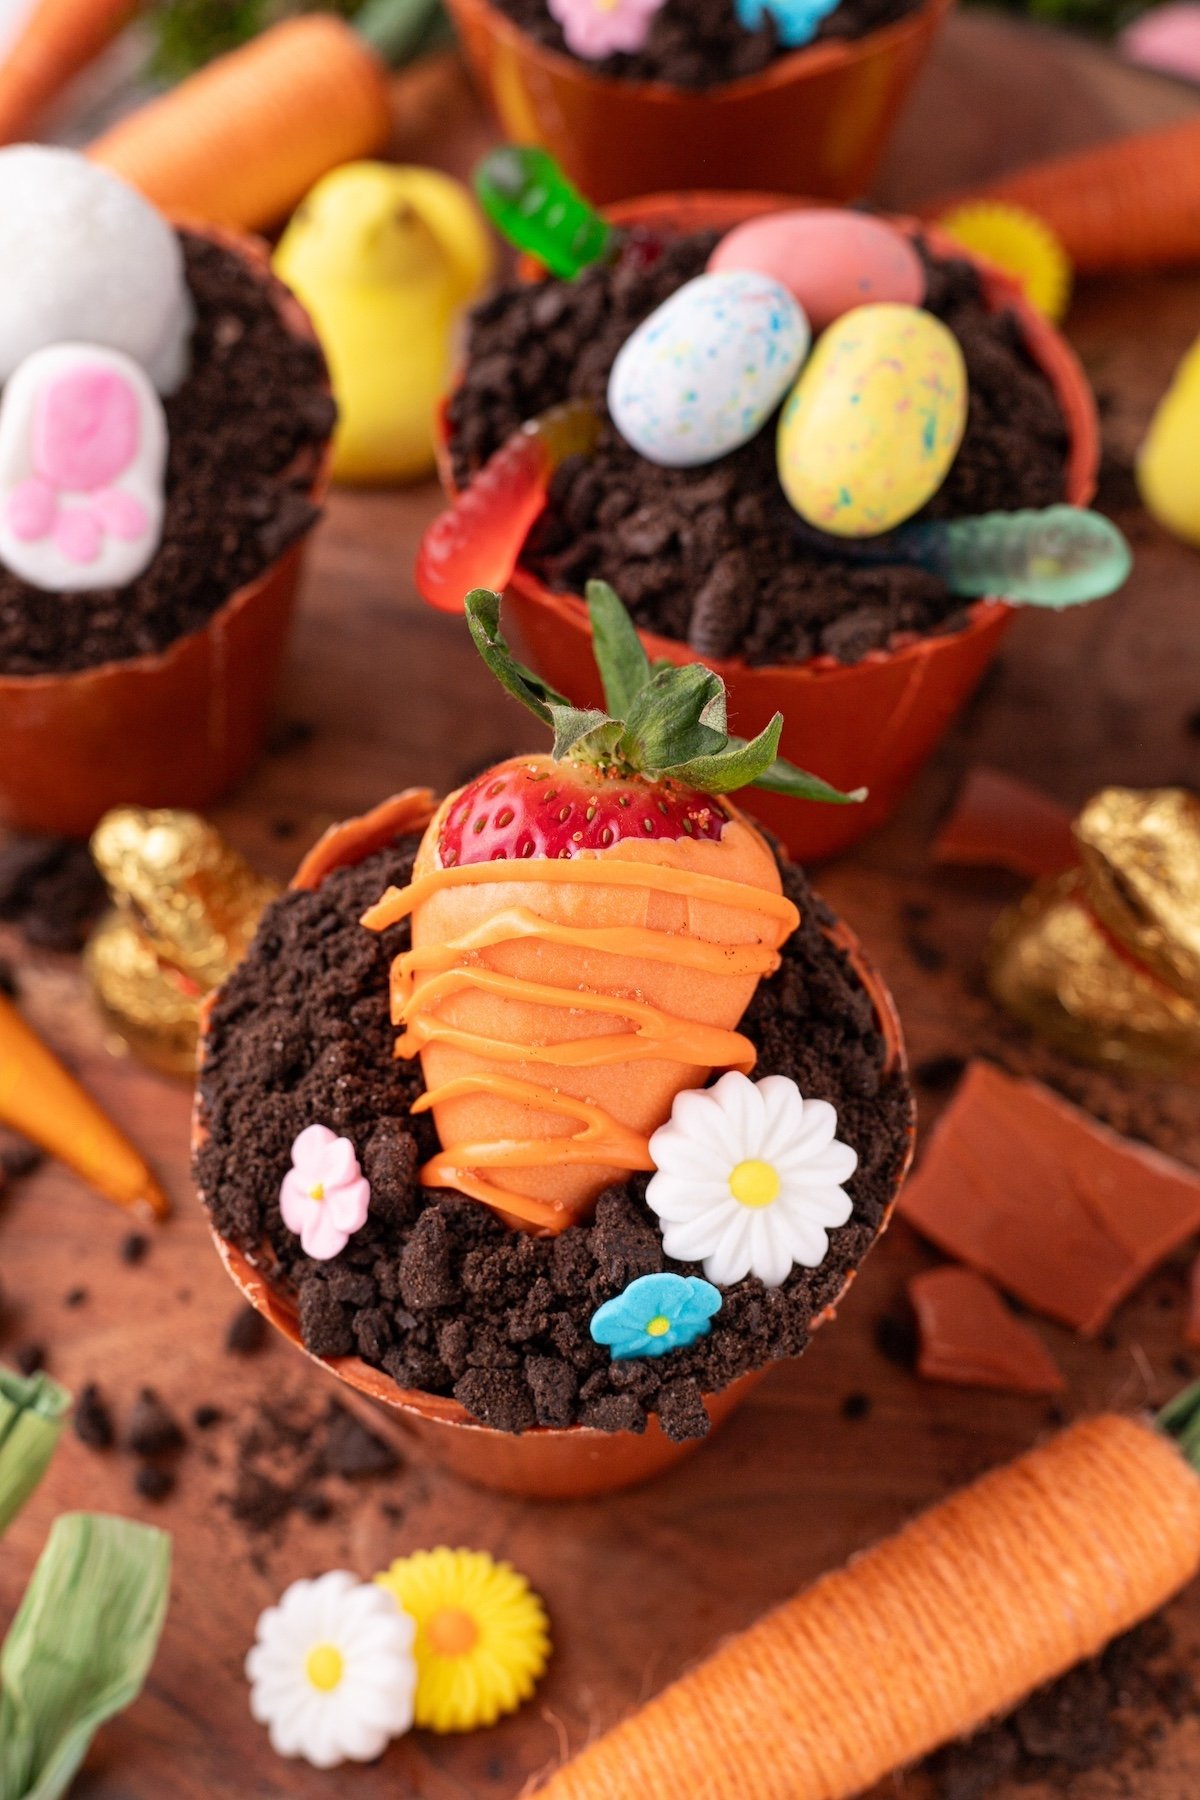
Assemble the Flowerpots
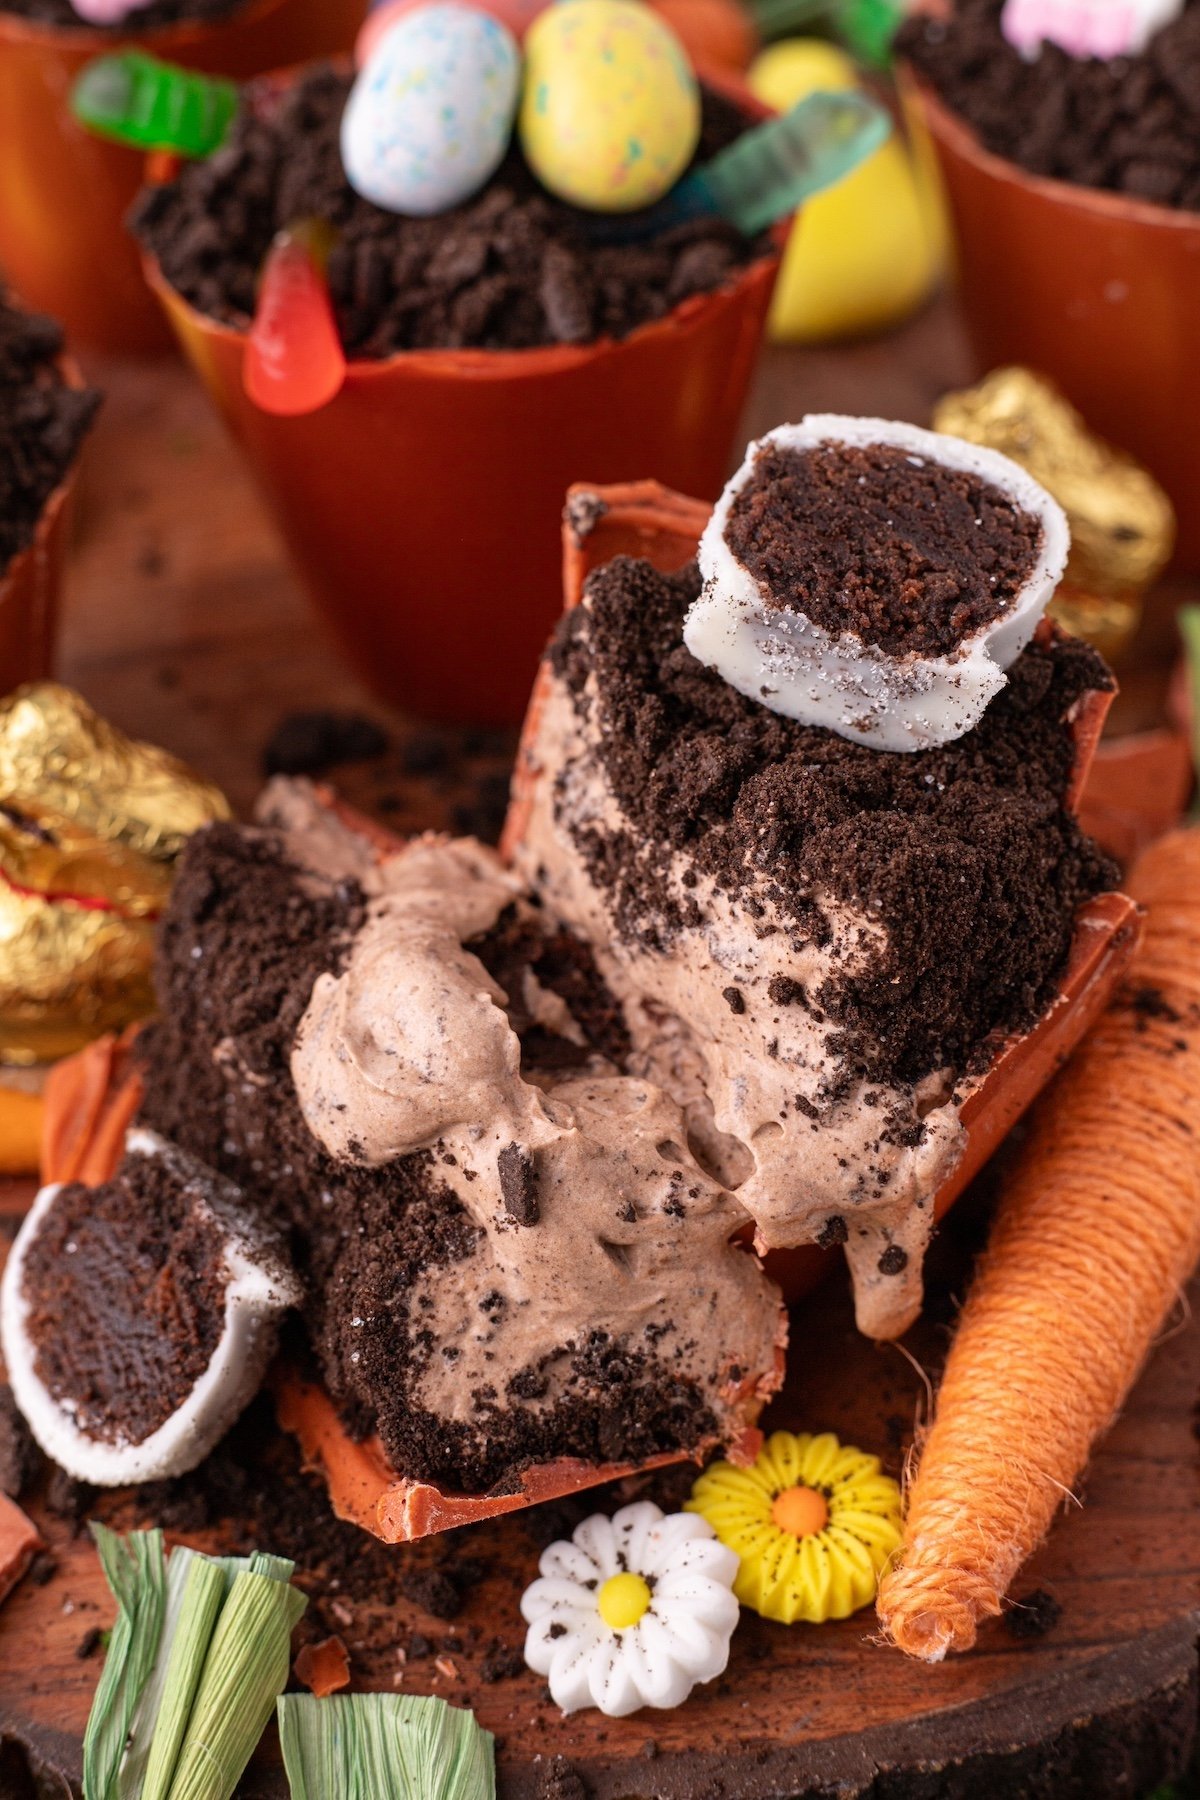
Place a brownie bite at the bottom of each chocolate shell.
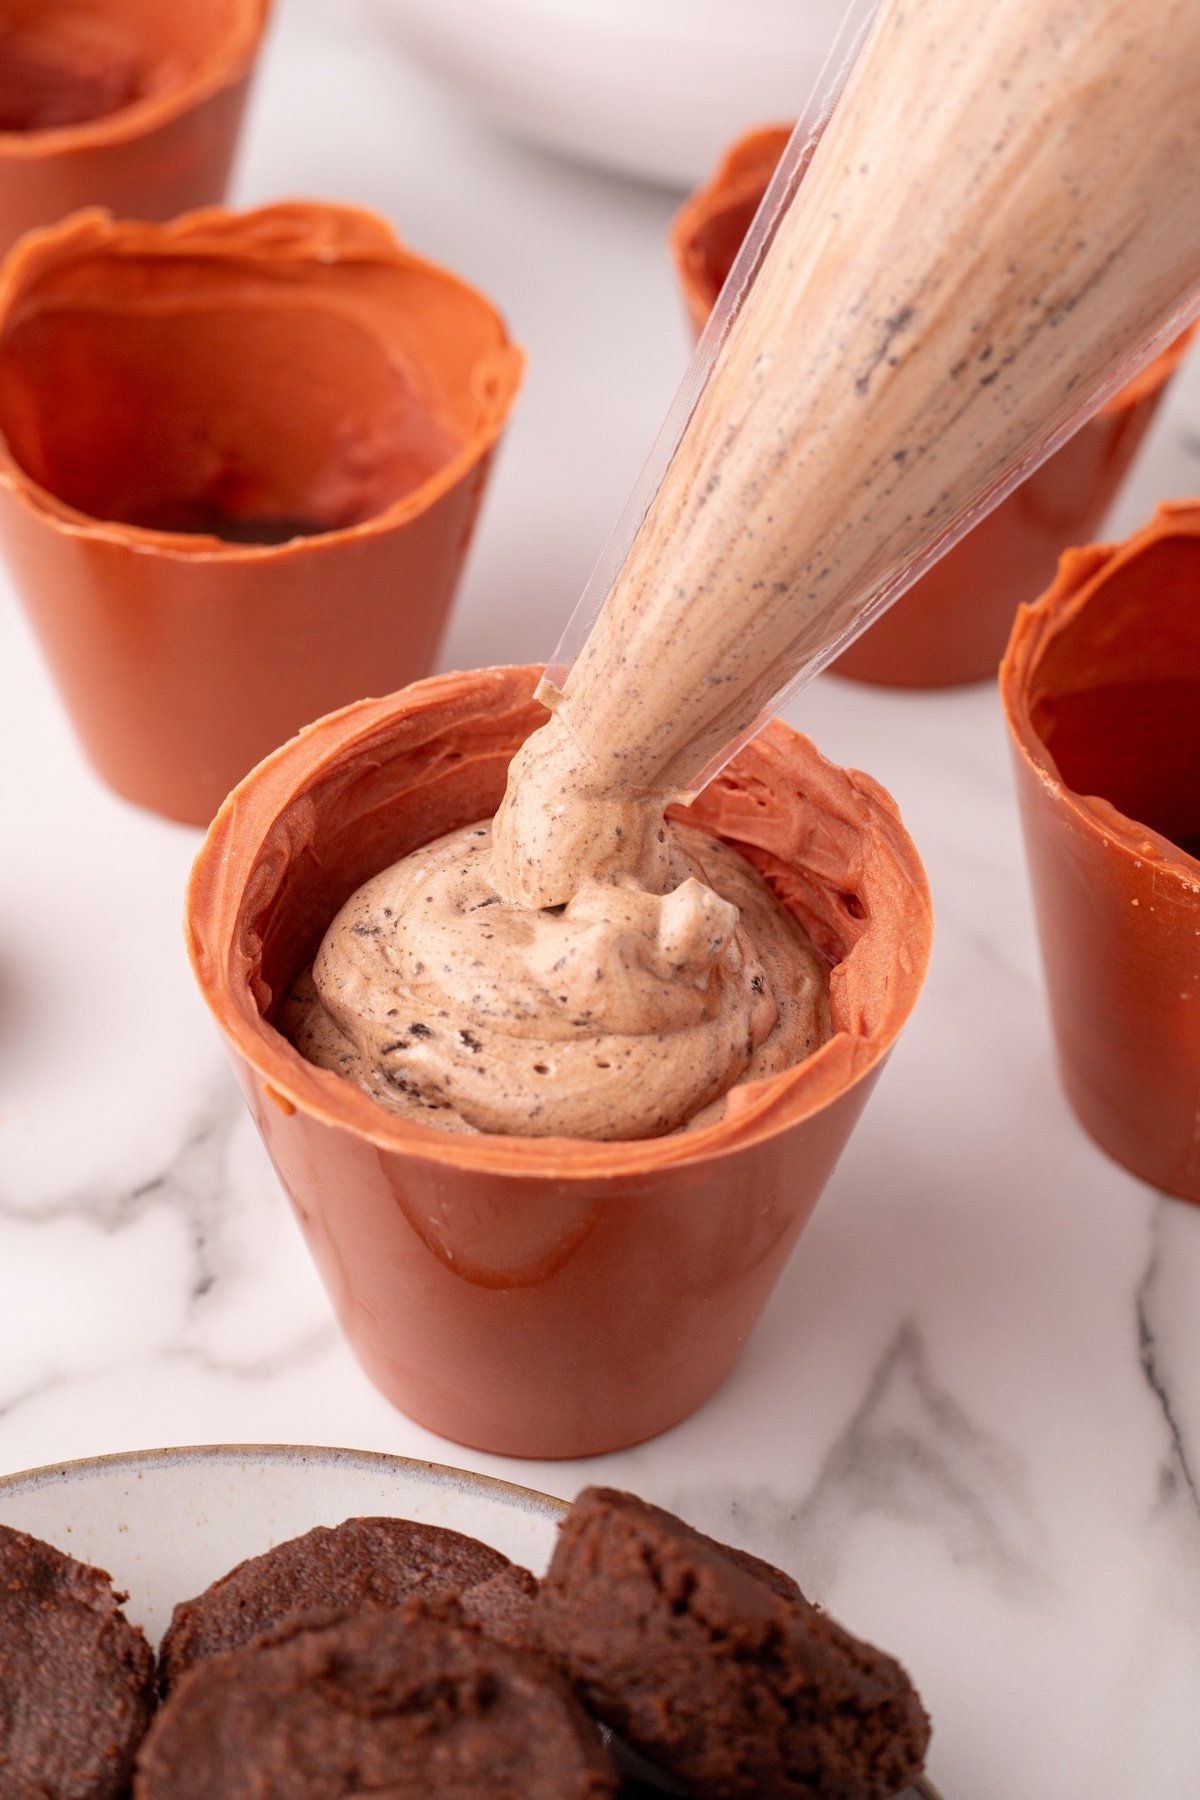
Pipe the pudding mixture over the brownie, filling the shell almost to the top.
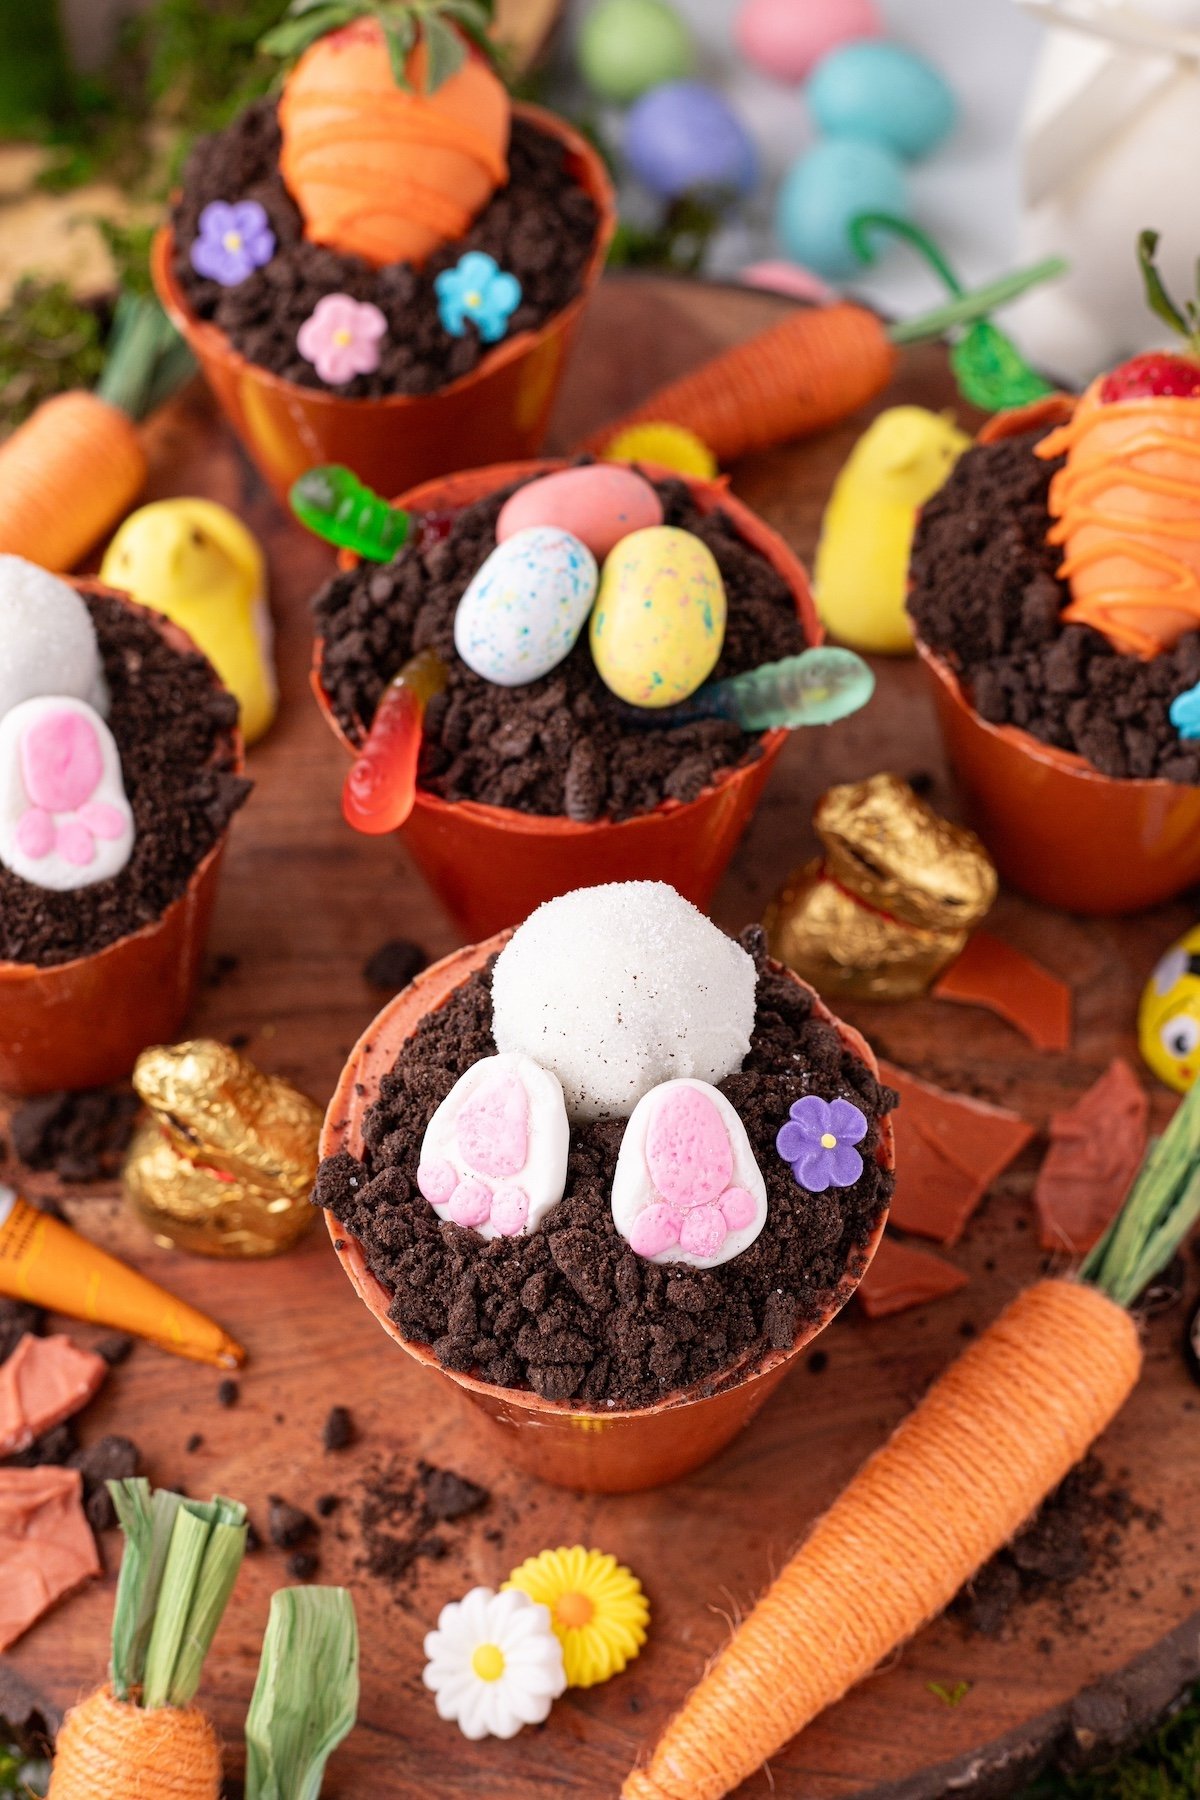
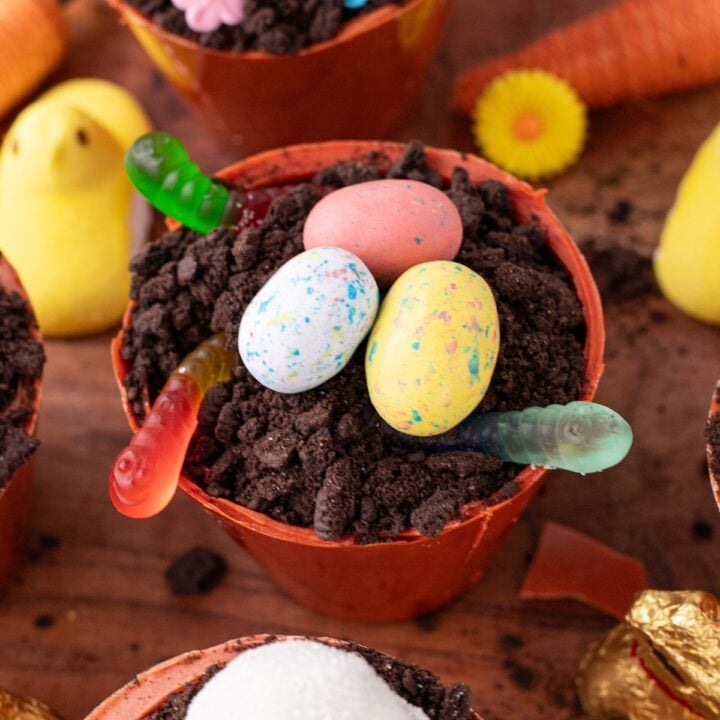
Sprinkle crushed Oreos on top to look like dirt.
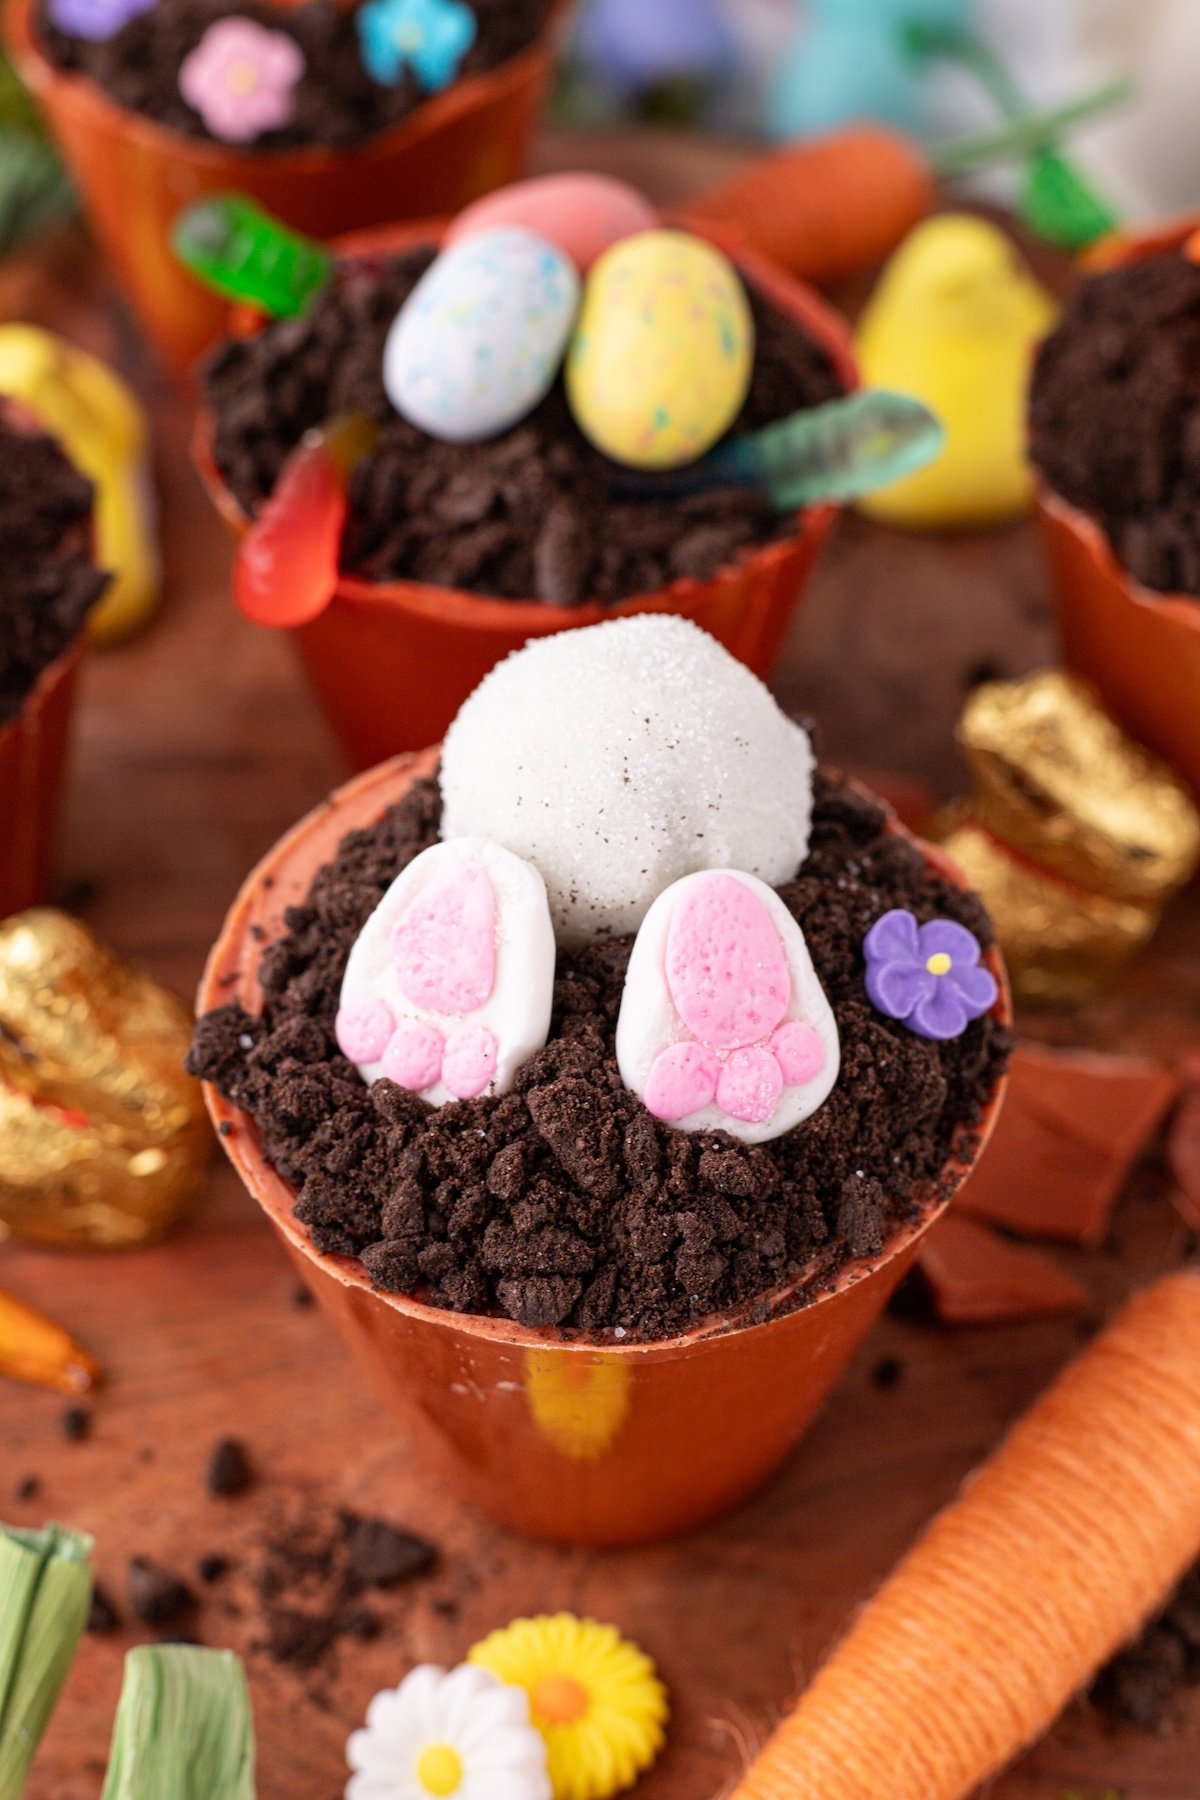
Add fun decorations like gummy worms, edible flowers, chocolate-covered strawberries shaped like carrots, or even candy bunny tails. (Find the details for making the bunny butts in the recipe card)
Serve and Store
These are best served fresh, but you can refrigerate them for up to 2 days before serving.
Enjoy your adorable and delicious flowerpots!

Tips for Assembling and Decorating Flowerpot Cupcakes
Want your flowerpot cupcakes to look picture-perfect?
- Layer, Layer, Layer: For extra depth, try adding a second frosting layer before sprinkling on the "soil." This creates a more polished look.
- Work with a Palette: Stick to earthy tones—browns, greens, and soft pinks—to keep the design cohesive and realistic.
- Use Fondant for Finishing Touches: Fondant is fantastic for shaping detailed decorations, like mini flowers or leaves. You can even use it to create a small garden marker for added charm.
- Keep It Cool: Warm frosting and melting decorations can ruin your masterpiece. Chill your cupcakes for 10 minutes after frosting to set the designs in place.
Variations and Substitutions
Spring-Themed Variations
Is there anything more perfect for spring than pastel hues and fluttering butterflies?
- Pastel Frosting: Swap traditional chocolate pots for pastel-colored buttercream frostings. Use a piping bag to swirl soft pinks, light greens, or soft yellows into a floral design.
- Edible Extras: Add candy butterflies or sugar flowers for a whimsical finish. You can even make tiny edible ladybugs for an extra garden touch.
- Seasonal Flourishes: Enhance the spring vibe with light decorations like these Valentine's Day Cookie Cupcakes—just update the hearts for florals!
Themed For All Seasons
Why stop at spring? Flower Pot Cupcakes can adapt to fit any time of year. With a little creativity, they’ll be the life of every party:
- Halloween Twist: Replace edible butterflies with candy eyes or worms for a spooky flowerpot vibe. Use darker, richer tones like black, orange, or deep purple frosting.
- Christmas Cheer: Swap the “dirt” for white sugar sprinkles to resemble snow. Add mini fondant poinsettias or a festive green swirl.
- Valentine’s Day: Use red velvet cupcakes as the base and decorate with tiny fondant roses or heart-shaped sprinkles.
What if My Chocolate Pots Crack?
This can happen, especially if the chocolate layer is too thin. Don’t worry—it’s an easy fix! Remelt some leftover chocolate and use it like glue to patch up the cracks. Allow it to harden before handling again.
More Spring Time Recipes
- Spring Snack: String Cheese Flowers
- Fast Forward To Spring with These Butterfly Pretzels
- Spring Fun: Edible Terrarium Dessert Jars
- Easy Spring Brunch Ideas
More Easter Ideas
- Easter Hot Cocoa Surprise
- Individual Bunny Trifles for Easter
- Easter Chick Pudding Cups
- Easter Dessert Candy Board
Flowerpot Cupcakes
Celebrate spring with adorable Flower Pot Cupcakes! These no-bake treats feature brownies, pudding, Oreos, and cute bunny decorations for a fun dessert.
Ingredients
- 2 cups Whole Milk
- 3.9oz. Instant Chocolate Pudding
- 8oz. Cool Whip
- 1 ½ cups Crushed mini-Oreo
- 1 cup Crushed Oreo, without filling
- Two Bite Brownies
- 24 oz. Vanilla Almond Bark
- Plastic Wine Stemless Cups
- Tape
- Scissors
- Copper Food Gel
- Orange Food Gel
- Pink Food Gel
- Fondant, for bunny feet
- Strawberries, optional for “carrots”
- Sugar Sprinkles
- Gummy Worms
- Candied Flowers
Instructions
- Melt the almond bark in a microwave-safe bowl in 30-second intervals, stirring in
between until smooth. Add coloring gel 3 drops of copper and 1-2 drops of orange,
and 2 teaspoons of coconut oil to melted almond bark and stir, this will give you the
terracotta look for the flowerpot. - Cut a straight line down the plastic up. Place a piece of tape on the outside to keep
it together and the chocolate from leaking out. This step will help removing the
chocolate easily. - Pour a few tablespoons of melted chocolate into a plastic cup, swirling to coat the
inside completely. Tilt the cup as needed to evenly cover the sides. - Place cups upside down on a parchment-lined baking sheet and chill in the fridge
for about 15 minutes, or until firm. Repeat process to make sure that the chocolate
is a thick layer. - Once hardened, gently peel away the plastic cup from the chocolate shell. Remove
tape and easily pull the plastic cup away from the chocolate shell. - Prepare the chocolate pudding by whisking together pudding mix and milk until
thickened (about 5 minutes). - Fold in Cool Whip and mini crushed Oreo’s for a creamy texture.
- Place pudding in piping bag.
Assemble the Flowerpots
- Place a brownie bite at the bottom of each flowerpot.
- Pipe the pudding mixture over the brownie bite, filling the pot almost to the top.
- Sprinkle crushed Oreo cookies over the pudding to create a "dirt" look.
- Add gummy worms, edible flowers, carrots “chocolate covered strawberries”, or
even bunny tails for decoration. - Serve and enjoy!
- Serve immediately or refrigerate up to 2 days until ready to enjoy.
How to make fondant bunny paws and bunny tail
- Roll out white fondant to about ¼-inch thick. Shape by hand two small ovals for the bunny feet.
- Slightly flatten and round one end to make them look like little paws.
- Roll out pink fondant and cut out two small ovals for the paw pads. Attach one to
each foot using edible glue or water. Attach three small circles near the rounded
end of each foot. - Place the fondant bunny feet on a parchment-lined tray and let them dry for about
30 minutes so they hold their shape. - Roll brownie bites slightly between your hands to make them more rounded like a
bunny tail. - Dip each brownie into the melted almond bark, gently tapping off the excess.
- Immediately sprinkle with white sprinkles to create a fluffy, fur-like texture.
- Place the dipped brownie bites onto a wax-paper-lined tray and let them harden at
room temperature for about 15 minutes (or refrigerate for 10 minutes for faster
setting). - Place the bunny tail brownie bite on top of the "dirt" (crushed Oreos).
- Add fondant bunny feet in front of the tail to make it look like a bunny burrowing into
the flowerpot!